Concerning geodesy in construction, it is indicated how to mark the strip foundation of a building by transferring parameters from the project to the site. The allowable error is 10 mm, so an individual developer will have to remember a school geometry course in order to install callouts, pull cords or strings with their own hands.
The king's original society moved to the National Academy, but when its German part was defeated, he began to work on the idea of creating an Academy of Sciences and Arts. He rejected the idea, naming the Academy after himself, but accepted the election as his first president.
In the last two decades and at the beginning of the century, there were no more austere buildings in Prague and Dzehe, in which Josef Hlvvka did not give either advice or financial contributions. Here we can recall the renovation of the cemetery of Dienzenhofer in his native Saxons, the reconstruction of the Karlštejn Castle, the reconstruction of the flooded Charles Bridge or the new National Museum. "A piece of life", as he said, took him from the Academy fine arts and secured its new building on the edge of Stromovka. He supported everyone, amateurs, writers and musicians, country societies and people from the Czech Philharmonic Orchestra.
An individual developer needs to know that it is impossible to build a building in any place convenient for him, despite the fact that he is the owner of the land. According to the existing standards of joint ventures, fire safety and SNiPs, the foundation should be removed from significant objects at a distance:
- 6 – 15 m from the neighboring dwelling, depending on those used in both buildings wall materials(For example, brick house from the brick is removed by 6 m, the log house from the log house, "skeleton" by 15 m);
- 3 m from the "red" line of travel;
- 5 m from the "red" line of the street.
To properly make a septic tank of an autonomous drainage system, it will need to be removed from the dwelling by 5 m, at least. Therefore, you should determine the place of its installation in advance.
In order not to constantly bypass the cottage, it is wiser to orient the main facade with a porch to the street side.
In some cottage settlements there are guest parking lots, but you will probably have to leave your own transport in the parking lot near the house, on the territory of your site. For which it is also necessary to leave a place.
To connect engineering systems to the central communications with your own hands, you will need to install power line poles, make wells, which are usually located on the side of the street. To make the operation of the dwelling, the site as comfortable as possible, it is worth thinking about this at the marking stage.
Snap to Landmarks
The sequence of marking the foundation with the placement of axes in the building spot in accordance with the design documentation is as follows:
- finding the corner of the foundation - according to known distances from the border of the site, the red line of the street / driveway;
- building the axis of the front facade - parallel to the red line of the street from the first corner, the length of the wall is laid off with your own hands;
Front facade axis
- construction of the axes of the side walls - the size is known from the project, the right angle is found by the triangle method (more details below);

Marking the remaining walls using the triangle method.
- building the axis of the back wall - stretching the cord between two cast-offs installed at the previous stage;
- reconciliation of diagonals - these segments must coincide with an accuracy of 10 mm.
To properly label right angle according to the triangle method, you must perform the following steps:
- A 12 m cord is taken with a small margin;
- Knots are tied on it every meter;
- The rope is connected into a ring with a peg passed through the first and last knots. The peg is driven into the found corner of the house;
- Then two more pegs are added to the 3rd and 7th knots. The long leg is oriented along the marked first wall, the second leg, the movement of which will be limited by the hypotenuse and will be the desired direction, i.e. a right angle is formed between the legs.

Construction of a right angle with a cord with knots.
By the way, the distance between the nodes does not have to be measured in meters, the main thing is that the ratio of 3: 4: 5 (leg: leg: hypotenuse) is observed, so the distance can be measured even with a stick, the main thing is to postpone the segments with it the required number of times. You can also not knit knots, but make marks on the rope, but the knots are more reliable and with their help it is convenient to fix the pegs (nails).
The diagonals may not line up due to some stretching of the cord and the use of knots instead of the scale of the measuring tool. If a tape measure is used instead of a rope, the diagonals will have an allowable error without additional adjustment of the corner posts.
If, nevertheless, the diagonals do not match, it is necessary to ensure that the difference in lengths falls within the allowable limit (10 mm). To do this, move the pegs of the back wall of the house to the right or left, until the diagonals match, while the lengths of the sides cannot be changed.
Shaft for fixing axes
Ordinary pegs are inconvenient when adjusting the axes at the initial stage. They must be periodically pulled out, hammered in, with a slight inclination, the centering of the axis goes astray. Therefore, it is easier to make cast-offs correctly once, with the help of which it is much easier to adjust the string. The do-it-yourself construction technique is as follows:
- two 60 - 90 cm pegs are made, pointed at the bottom;
- a horizontal bar is screwed to them (a bar 3 x 3 cm or a board 25 mm) 30 - 60 cm long, depending on the width of the foundation tape.
![]()
For every angle and inner wall The building will require two cast-offs. They are installed a little further than the corners (by 50 - 70 cm) so that the soil under them does not crumble when the soil is excavated from the trenches / pit. The advantages of a cast-off in comparison with a peg are as follows:
- mounted once, no need to rearrange;
- two cords are placed on a wide bar (outer + inner perimeter of the tape);
- to adjust, just move the string along the bar.

The corners are found with a plumb line at the intersection of the cords, marked on the ground with crosses with paint or lime mortar.
What to consider when marking
- without surface waterproofing any concrete structure, operated in the ground or having contact with it, loses its operational life faster, therefore, in order to provide access to the side faces of the FBS blocks or the tape poured into the formwork, it is necessary to expand the trenches by 0.6 - 0.8 m;
- to reduce heaving forces, insulation of the sole of the tape and the blind area is often used, so the trench may have to be expanded to 1 m.
Thus, the most correct option is to install additional cast-offs, pegs along the inner and outer perimeter. The cords stretched at the preliminary stage will allow high-quality mounting of FBS blocks on FL slabs or formwork panels for self-casting of the tape. Additional marking will help dig a pit or trenches for the rest of the work.
In addition, load-bearing structures or equipment are often used in cottages, which require a separate foundation:
- emergency generator;
- fireplace, stove;
- internal staircase;
- pump equipment;
- porch, veranda.
For them, pits are marked inside the perimeter with their own cast-offs, or they are marked with lime mortar on the ground. Minimum distance from outer edges separately standing foundations to the tape is 10 cm. During backfilling, it is forbidden to use excavated earth, it is necessary to use non-metallic materials with layer-by-layer compaction.
The above instructions will save time, avoid serious mistakes, and keep within the allowable error of full-scale constructions. This will save you from such troubles as insufficient support of floor slabs, divergence of the diagonals of the roof slopes.
Advice! If you need contractors, there is a very convenient service for their selection. Just send in the form below detailed description work that needs to be done and offers with prices from construction teams and firms will come to your mail. You can see reviews of each of them and photos with examples of work. It's FREE and there's no obligation.
Construction work begins after the preparation of project documentation. And the very first step here will be the removal of the foundation drawing to nature, i.e. marking on the site of the actual location of the building. The slightest mistake in this case can lead to dire consequences, since the disproportions in the size of the base and its incorrect placement will not allow it to withstand the requirements of the project. Correcting the situation is often possible, but this will lead to enormous material costs. Therefore, the position and dimensions of the foundation should be marked out with the utmost care and understanding of the essence of the process.
Do-it-yourself markup: what is needed for it?
In addition to a detailed construction project, you will need knowledge of geometry at the level of the seventh grade of high school, as well as a set of materials and tools:
The presence of a laser builder is not a prerequisite, however, with its use foundation marking simplifies in order.
Preparatory work.
Before starting the markup, you must do the following:
- clear the site of shrubs, trees, debris and tall grass;
- identify a place with the most even surface, when placed on which it would be possible to easily bring communications and fulfill all the requirements of SNIP;
- think over the options for delivering materials to the construction site at the chosen location of the house.
In addition, for a successful choice of a place for the foundation, it is necessary to take into account the geological features of the site: the type and composition of the soil, the depth of freezing, heaving and the level of groundwater.

Marking the outer contour of the foundation.
This procedure will require the following steps:
- at the point where the corner of the building closest to the border is planned, a metal pin is driven in;
- parallel to the front boundary of the site, the design width of the frontal part of the foundation is laid off from the pin;
- the second pin is driven in;
- in the direction to the depth of the site and perpendicular to the resulting segment, a second line is laid, equal to the design length of the lateral part of the foundation.
After that, it will be necessary to check the perpendicularity of the resulting lines. Having a laser builder, you can install it on a corner and visually verify the accuracy of the work performed.
If there is no builder, then you can use the usual cord and tape measure. According to the Pythagorean theorem, a triangle with side lengths of 5, 4 and 3 meters is a right triangle. 
Given this fact, you can do the following:
- take a piece of cord 12 m long;
- at distances of 3 and 4 m from each end of the cord, marks are made with a marker;
- the ends of the cord are connected at one of the corners of the checked markup;
- cord segments up to marks of 3 and 4 m are stretched along the marking lines forming the corner;
- if the hypotenuse of the resulting triangle is in tension, then the marking was done correctly.
In the case when, when trying to tension the "legs", the length of the "hypotenuse" is not enough or it turns out to be excessive, then foundation marking was made incorrectly.
After checking one corner of the external marking, they proceed to the construction of the next one, continuing until the contour is closed.
Foundation marking quality rectangular shape can be checked in an even simpler way. It is enough to measure the lengths of the diagonals. If they are equal, then a rectangle is obtained.
The property of equal diagonals in a rectangle can also be used when marking the bases of a complex shape. To do this, the foundation plan should be divided into rectangular sections and, during operation, the quality of the marking of each of them should be consistently checked.
In individual construction, reliable strip foundations are most common. When marking under them, it will be necessary to mark the position of the inner walls of the base, as well as the boundaries of the foundation tapes under the internal load-bearing walls.
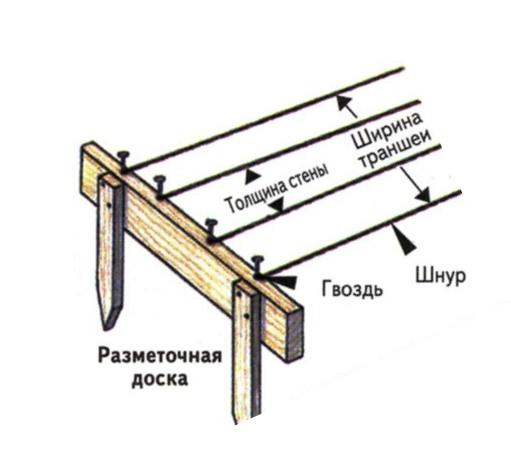
Wall width strip foundation given by the project. Having learned this value, inside the outer contour of the base, the cords of the inner contour are pulled on metal pins. The indent from the outer contour will correspond to the thickness of the foundation tape.

Applying wraps.
The marking lines of the foundation determine its contour and wall thickness, however, when carrying out work, relying only on them alone is extremely undesirable, since it is very easy to damage the cord or displace the peg.
Therefore, in construction practice, it is customary to use cast-offs. At their core, cast-offs are fasteners for cords stretched along lines that follow the contours of the trench. Unlike the corner pins of the marking contour, cast-offs are installed outside the future foundation, at a distance of 1.5-2 m.
Structurally, cast-offs consist of three elements: a pair of pegs and a transverse board. The height of the pegs is chosen so that they can be securely fixed in the ground. Above ground level, the peg should rise at least to the height of the above-ground part of the foundation under construction.
A crossbar is nailed to the pegs, the upper cut of which must match in height with the planned cut of the foundation tape or pile field. For the crossbar, you can use a board with a thickness of 20-40 mm, which has at least one absolutely flat side. The crossbar is nailed on the outside of the pegs. The height of the upper face of the crossbar is determined by the foundation project.
Each wall has its own pair of cast-offs. In this case, the upper sections of their horizontal crossbars are set in the same plane. For this, either a tubular hydraulic level or a laser builder is used.
Nails are hammered into the crossbars of the cast-offs, between which a cord is stretched. Each of the cords is located strictly above the lines of the main marking of the foundation. The control of the position of the cast-off cords is carried out by a vertical plumb line or a laser builder. You need to check at two points, in the vicinity of each of the cast-offs.
As a result, a redundant network of stretched cords is obtained, completely repeating the main marking made earlier, but fixed on supports placed outside the working area. If the main marking cords are displaced or damaged during the construction of the foundation, it will not be difficult to restore them, focusing on the cast-off cords.
You can use a cast-off not only when arranging a tape or open column foundation. It is also suitable for arranging a foundation with a grillage. In this case, the second horizontal crossbars are nailed between the pegs of the cast-off. They are aligned horizontally in the same way, but set a little higher, in the plane of the grillage surface. 
Cast-offs are especially useful when building a pile or column foundation. They help to correctly break the axes of vertical supports or screw piles. To do this, a cord is stretched between the cast-offs, passing over the centers of the supports.

The cast-off cords, as well as the cords of the main marking, can be removed before the start of construction work, having previously made the necessary marks on the ground. However, when digging a trench or installing piles, it is very easy to knock down these marks. Therefore, it is recommended to pull the wrapping cords as often as possible to control the correctness of the work. The more often such checks are made, the less time-consuming it will be to correct errors.
In order not to be mistaken with the breakdown of the foundation on the ground, it is necessary at the planning stage of work to deal with the project documentation as carefully as possible and to understand all the architectural features. In the future, this will help not to make fatal mistakes at the facility and prepare such a markup that can be easily arranged geometrically. right foundation the right sizes.