Summer sheds and gazebos are perhaps the most common places for outdoor recreation. In them you can feel yourself in the bosom of nature at the same time, without giving up the comforts of home.
You do not have to sit on the ground or bare stones - almost any gazebo is equipped with benches and tables of various designs that unobtrusively perform their functions without disturbing the natural atmosphere.
In fact, garden gazebos and sheds are two parts of a single whole, since it is quite difficult to imagine a gazebo without a roof. If such an option is feasible, then only if a summer gazebo is made of metal, where the roof is replaced by living plants that give shade.
In any other case, the presence of a canopy is always included in the structure of the gazebo. By and large, the gazebo is a stylized and adapted for outdoor recreation canopy.
The gazebo-canopy is inherently a fairly simple design - unlike residential buildings, it has a lightweight structure, which makes it possible to build it with your own hands, even without professional building skills. In this article, you will be given detailed instructions about how to make a gazebo-canopy with your own hands, without resorting to the help of specialists.
Construction of a gazebo
Foundation laying
First of all, it is necessary to decide on the basis for the future gazebo, since rest on bare ground is not the most convenient pastime. Dust, slush and other troubles are provided to you. Since the canopy is not determined for agricultural needs, it is impossible to do without a base raised above the ground.
There are two types of bases for gazebos:
- solid concrete platform;
- prefabricated wooden board.
In both cases, one of the main roles is played by the correct construction of the figure of the base - most often, garden sheds-arbors have a rectangular shape. The correct geometry of the base has a direct impact on the further assembly procedure - if the figure is built incorrectly, then in the future, difficulties will inevitably arise when sheathing and assembling the frame.
When building figures, one visual impression is not enough, because even if “by eye” everything is relatively even, in fact it may turn out to be skewed. Yes, and to look at the creation of your hands vertically from above, in order to assess the degree of correctness of the ratio of proportions, it is not always possible.
In order for the figure to have a perfectly even structure, it is necessary to markup using a simple geometric formula.
- First of all, the layout of the selected area is carried out - the hillocks are cut off, and the pits are filled up. If we are not talking about pouring a concrete slab, then the filled-in places are necessarily rammed;
- The length and width of the future rectangle are measured - based on these data, the initial figure is outlined, which should be visually even. For this purpose, it is necessary to use an analogue of the ruler - a stretched rope or a flat board, a metal strip, etc.;
- Checking the location of the sides of the rectangle is carried out by comparing the diagonals- for this procedure, you will need an assistant and two fairly long pieces of rope;
- The diagonal of the figure is measured - a rope is stretched diagonally between two corners and the length of the resulting segment is fixed. The same operation is performed with the two remaining corners, after which both diagonals are compared with each other. If their length matches, then the figure has the correct structure, if not, then it is skewed;
- If the diagonals do not match, then it is necessary to shift the segments of the length and width of the figure along the plane until the diagonal segments coincide with each other;
According to the data received, a concrete slab is poured or assembled wooden base, which is then set to . Both options are formed strictly in accordance with all building codes.
The installation of a wooden platform on concrete blocks laid on the ground is undesirable, since there is a high probability of the structure tilting under the influence of seasonal soil movements.
Note!
If the gazebo will have more than 6 square meters. m of area, then when assembling a wooden base, special attention must be paid to the side frame - it must be massive enough to serve as the basis for the installation of load-bearing pillars.
load-bearing frame
On the finished basis, they are installed, the material for which can be wood or steel, depending on the style in which the gazebo will be decorated under a canopy. The pillars must have sufficient thickness and bearing potential, which is determined by the design and mass of the future roof.
If the base is wooden, poles of a similar material are used. For their fastening, it is necessary to implant a metal spike into the base of each unit, through which the pillars will be fixed on the side elements of the frame.
To make a metal part a part of a supporting column, it is necessary to drill a cavity in its base, the diameter of which will correspond to the section of the part. Then the groove is smeared epoxy glue and a spike is inserted. At the installation sites, holes of the appropriate diameter are also drilled in the base.
Note!
The cavity must be drilled as evenly as possible to avoid distortion of the part, otherwise you will have problems with their further installation.
Metal racks can either be walled up in a concrete slab or simply driven into the ground. The second option is less preferable, since over time the structure undergoes shrinkage, which will not always be uniform.
If you still decide to install the racks directly into the ground, then their base must be concreted without fail - this will significantly reduce the degree of shrinkage.
For installation in concrete base when pouring, it is necessary to leave several exit spikes at the locations of future supports. In the future, racks will be welded onto them. You can install load-bearing elements immediately before pouring, but this is a rather laborious process that will take a lot of time and effort.
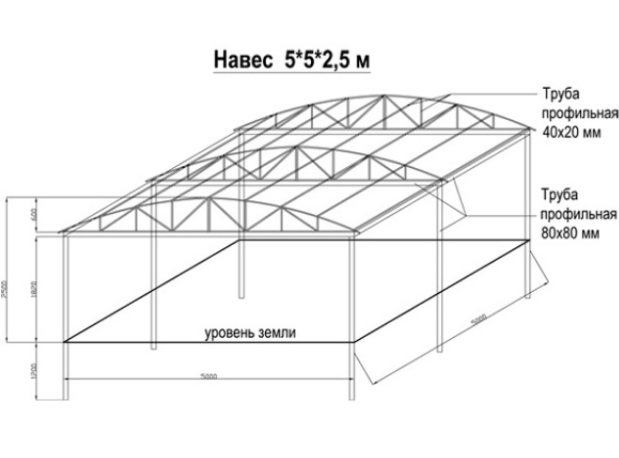
On average, the distance between the bearing supports is about two meters, but in each individual case, common sense must be followed - the structure must be reliable enough to withstand the weight of the future roof.
When installing load-bearing columns, it is important to ensure that they are vertically even - for this it is necessary to check their position with the construction plumb line. It is also necessary to create a slope for the future roof, that is, one side of the structure should be slightly higher than the other.
Roof
Roofs are most often assembled according to rafter system, in which the rafters form two or shed roof. A gazebo with a canopy most often has a shed structure.
To assemble it, it is necessary to create a level difference between the supporting columns, which will create a slope for the future roof. To install the frame for the roof, the upper trim is carried out, which lies on top of the supporting pillars and serves as the basis for mounting the rafters.
Installation of railings, additional supporting elements, roof sheathing, frame, etc. - depends entirely on your preferences and. If you carry out all the previous points as accurately as possible, then you should not have any difficulties with subsequent operations.
Outcome
Sheds and gazebos - hand-assembled on suburban area or in the courtyard of a private house, will become your favorite place to spend time outdoors. The price of buildings of this type is quite democratic, given the simplicity of their design. You can get more detailed information on how a canopy gazebo is assembled with your own hands by watching the video in this article.
The gazebo is one of the most favorite places in the garden, where summer residents spend their free time and meet guests. Someone from such a structure can make a kitchen, and someone - a convenient place for gatherings of the whole company. But the main task of country arbors and awnings different type protection against various weather phenomena of a negative nature.
Types of gazebos for summer cottages
The canopy belongs to small architectural ensembles and is a rather advantageous construction in terms of construction. It is an open type structure, the basis of which are vertical type racks. The roof rests on them.
Types of sheds that can be built on a suburban area:
- By location: sheds, standing separately from other buildings, and attached to structures. Attached canopies are usually placed close to the wall, it turns out that one side of it is closed, and the other three are open. These canopies are designed, as a rule, for verandas. Single canopies are used for household needs and parking lots.
- By assembling the structure: stationary and collapsible. Stationary arbors are collected for a long time, for many years. And collapsible canopies are installed with the onset of the thermal season and removed for storage when the cold season begins.
- By type of roof: straight and sloping. Direct canopies are gazebos with a flat roof. Sloped roofs are further subdivided into single-pitched and dual-pitched forms. Such a tilt system allows rainwater and melted snow to drain. Also, awnings in the form of an arch are becoming increasingly popular for summer cottages.
- According to the material that was used for construction: metal, wood and slate sheds. Depending on the material used in the manufacture, gazebos are placed on the ground or on the foundation. In turn, the foundation is divided into tape and pile.
- By appointment: gazebos that are used in the household or recreation area, open and closed.
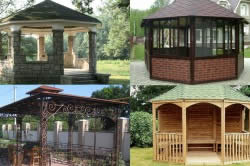
Popular gazebo designs
Pergolas can be built in a variety of styles. At the same time, the most important thing is that they are combined in style with the rest of the buildings and structures that are on your site. The most popular designs of country arbors are as follows:
- Arbor awning. Often, summer gazebos are made in the form of awning structures. Frames can be made of wood or metal. The awning is usually made of durable fabric or traditionally tarpaulin. The installation of such a gazebo is not difficult, as is the process of disassembly and transportation. Its assembly is carried out in a short period of time. Therefore, gazebos with an awning and a tent are mobile structures: in a short period of time they can be easily moved to another place. An awning of this design is removed in winter and hidden for storage.
- Bench under a tree. Another fairly simple option is a summer bench under a heavy tree that has a circular shape. It will take very little time to arrange it, and it will look decorative. One of the benefits of having a circular seating arrangement is that the soil around the tree will be perfect.
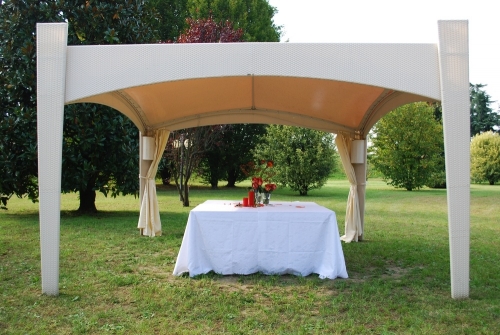
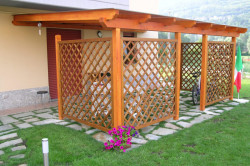
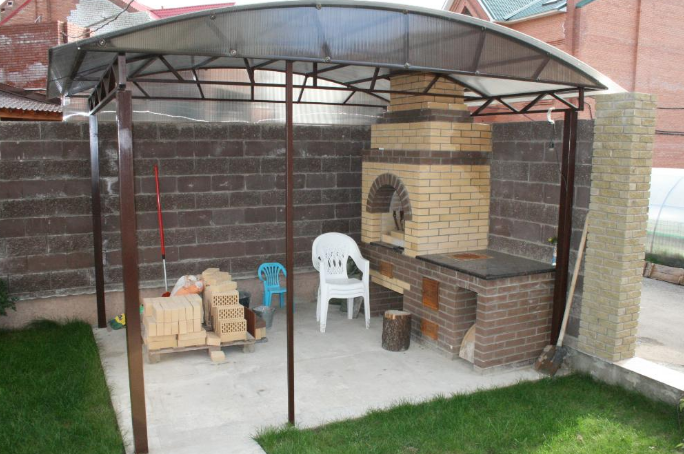
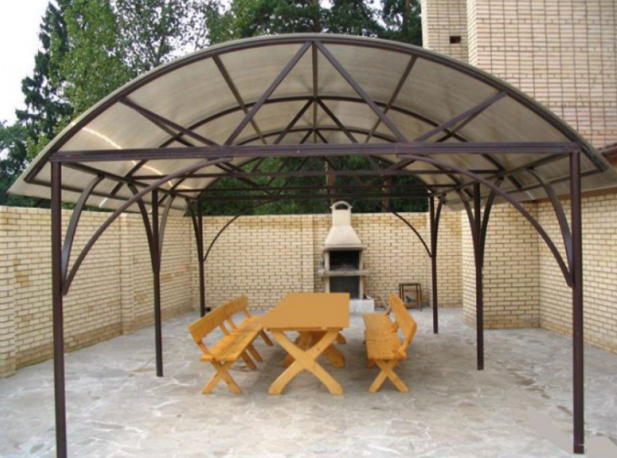
- Canopy. An excellent option for a summer gazebo is a spacious canopy. Various racks are usually made of rolled metal or timber, and the canopy itself is made of awning fabric. Also in the course is a canvas. In such gazebos, it is best to install rectangular wooden seats. If necessary, you can quickly build sunbeds from such seats. Country furniture under a canopy will be decorated with a foam pillow with a bright removable cover. The place over which the canopy will be located can be tiled, as shown in the photo of the canopy gazebo.
Do-it-yourself gazebo for a summer residence
The construction of a stationary large gazebo is a rather complicated matter. After all, you have to deal with concreting the site before installing the structure itself, and then a rather difficult process of erecting a roof follows. Therefore, this option is rarely chosen. In addition, it is possible to build a simple but practical gazebo in a very short period of time with a small amount of money. And you will get some square meters oasis in summer.
Choosing a place for a gazebo
Arbors come in all sorts of types and shapes, but for proper fit into country interior they must be installed in the right environment and in the right place:
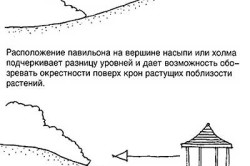
- Country arbors, according to the design rules, are installed at the end of the perspective line, in places where garden paths connect or intersect, on hills from which beautiful view to the garden.
- In practice, gardens usually find a quiet corner among green spaces that is not visible to strangers. It is also customary to put gazebos near a stream, a pond, where you can admire the water surface. May be nearby alpine slide or flower bed.
- The main thing is to open a pleasant landscape. No garages and facades of suburban buildings.
- The gazebo is recommended to be placed in a place well protected from the sun, among shrubs and plantings.
- If there is no such place, you can hide the building from the burning rays of the sun with climbing plants. For example, even if you cover at least two sides with green spaces, you will still get enough lighting, but at the same time it will be cool in the gazebo. The entrance itself and the walls of the gazebo can also be filled with vines.
- In order for your gazebo to become the center of attention, you need to install it on a high plinth. It is advisable to increase the area of \u200b\u200bthe gazebo if you are going to dig a small reservoir near it.
Construction of the gazebo frame
The most important thing when building a gazebo for a summer residence is to build a strong and reliable frame:
- Suitable materials for the construction of a summerhouse are a beam of certain parameters (length 3 m, section 150X150), 3-meter boards - in the amount of 12 pieces and self-tapping screws.
- Lumber is sold in standard six-meter. That is, it is necessary to take one beam for our work. It is cut into two equal parts.
- In addition, you will need six more boards about 100-120 mm wide. These boards should also be sawn into two equal parts, because you will not need materials that are more than three meters long.
- One of the most difficult actions associated with the construction of a summerhouse will be the installation of pillars in a vertical position. The easiest way is to dig them into the ground.
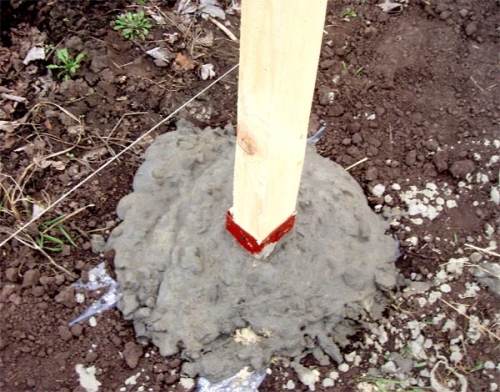
- Dig a hole for the pole. Remember that the depth of the pit should reach a quarter of the length of the post itself. Fill the bottom of the pit with rubble, then tamp it well. After installing the posts, check their verticality by using their plumb bob.
- Moisten the ground under the support post. It should not absorb water from the concrete solution. Then fill the hole with freshly prepared concrete mortar. Wait a few days for the concrete to harden.
- But here the following should be remembered: wooden poles rot within 5-6 years. Accordingly, they need to be changed. In order for them to be used much more, it is necessary to treat them with copper sulphate (5-10% solution). The processing scheme itself consists in the fact that a wooden pole is dipped into this solution for three days.
- Of course, the best option would be if you isolate a wooden pole from the ground with two metal supports. Fitted corners will do. After that, they are concreted in the foundation. The column is attached to the supports with self-tapping screws. You can also use capercaillie - self-tapping screws that have a powerful hex head.
- After installing the post, you need to do the stretch marks that come from the post. Usually stretch marks are made 1.5-2 meters long. It is they who set the size of the umbrella and the area of \u200b\u200bthe gazebo itself. Stretch marks are installed at a height of 2.2-2.4 meters from the floor. Rafters, of course, are longer. Self-tapping screws and nails are used to fasten parts. In this case, triangles are formed, guaranteeing the strength of the umbrella.
The roof of the summer house
After erecting the frame for the gazebo tent, you should just do the roof:
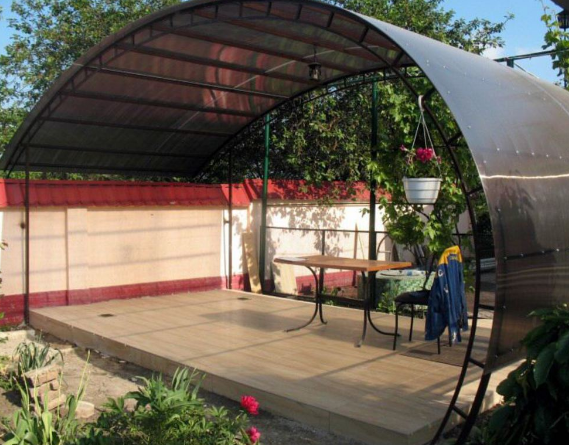
- For summer types of gazebos, there is no need to make a solid stationary metal roof, since it is operated only during the warm period, and is removed for the winter. Therefore, an awning is quite suitable, for the manufacture of which it is advisable to use a tarpaulin, canvas, dense fabric.
- You can also install a polypropylene roof, which is completely transparent. For these purposes, you need a sheet of polypropylene 4 mm thick. The main advantage of this roof design is that it is the most economical option, which is also removed for the winter.
- The roof of a country gazebo can be made from dry reeds. Dry straw is also suitable. In this case, the gazebo will look exotic, unlike the mass production of Chinese tents. For more reliable protection from rain in such a roof, or rather, in its middle, you can put a roofing material or film.
- To prevent sagging of the roof, stretch a steel wire of small section from the center of the umbrella to the Mauerlats. Or you can use thick fishing line. Install the wire at intervals of 25 cm. Such a system will not allow the structure to sag as a result of heavy rain.
Finishing the gazebo in the country
At the final stage of the construction of a country gazebo, it is worth considering how to make it more convenient and comfortable for spending time in different weather - in rain and in hot heat. To do this, follow our simple recommendations:
- To begin with, you should worry about how to make the floor of the gazebo canopy with your own hands. It is definitely recommended to remove soil with plant roots from the prepared area. Next, you need to fill the area of \u200b\u200bthe land under the canopy with sand, and then tamp and lay the tile.
- To create the floor of the gazebo, it is necessary to lay a concrete pad paving slabs. Or you can concrete the area with a cement-sand mortar. Then, even after rain, the floor in the gazebo will remain dry, and the legs of the table and garden furniture will not sink into the ground.
- To create a favorable environment in the gazebo, it is advisable to lower the ropes down from the corners of the roof, and plant various climbing plants near them. These are wild grapes, hops, ornamental beans, clematis and other creepers. After such a procedure, by the middle of summer, a living green wall will grow around the entire perimeter of the gazebo. She will save you from the heat on a summer day.
- If you do not have enough space under your canopy, you can increase the area of the gazebo. For this purpose, you do not need a large number materials. When installing a gazebo in the country, we will add more to the support. Instead of 3-meter boards, we need 4-meter ones. And 4 more boards of 2.5 meters each. You also need a 4-meter beam. As a result, the roof span will be much larger.
Thus, summerhouses of the awning type are very convenient and practical. They can be quickly assembled if necessary and dismantled when bad weather broke out outside the window. The design is advantageous in that it can be installed in any place that you like. The light roof, made in the form of a tent, allows you to quickly disassemble the gazebo for the winter. If you decide to assemble such a gazebo yourself, then choose strong and reliable materials for the frame and be sure to make sure that the roof does not sag.
- Types of arbors-canopies
- Where to start building
- How canopies are made
Many people have suburban areas with small house. There is also a seating area on this site: a table and a couple of benches. But it is not always possible to admire the flower beds and beautiful views of nature. This can be prevented if not by the sun, then by rain. In order to relax peacefully, some of the summer residents build a canopy with their own hands.
If for some reason you do not have the opportunity to build a gazebo, you can build a canopy. It is easy to build, low cost and performs almost the same functions as a regular gazebo.
To build such a gazebo, you do not need to invest a lot of money. For this, old bars that are left over from the construction site will come in handy, and you will have to spend money on covering the roof of the gazebo itself. The roof can be either transparent or non-transparent.
Where did gazebos come from? According to historians, they appeared in Egypt and were intended only for noble people. But in our time, love for these buildings has not disappeared.
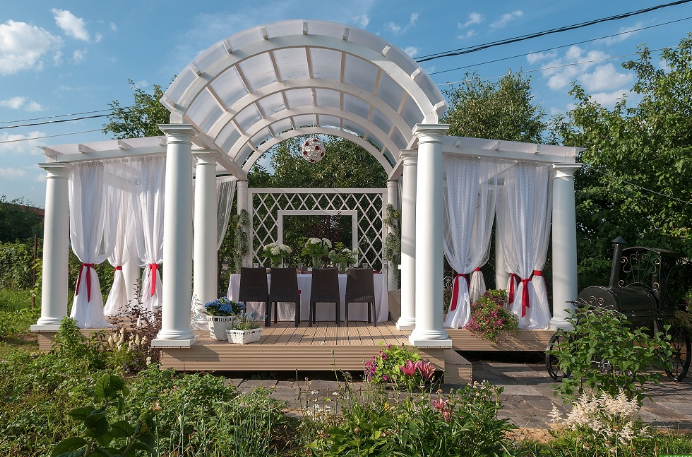
A gazebo is also called a pergola.
This zone serves for solitude, relaxation. And it doesn’t matter at all what territory the gazebo occupies, it can be small or large, simple in design or with decorative elements. It all depends on the skill and taste of the owner.
Types of arbors-canopies
Most best material for the construction of a gazebo-canopy is a tree. It is environmentally friendly and is not inferior to other materials.
Can be built from wood, brick, stone. Arbor configurations are very diverse: rectangular, square, round. The gazebo can be glazed and open. If it's time to choose material for, then you should decide on the location and purpose. No matter how many types of gazebos there are, they are united by one thing - they must be in harmony with nature, fit into the landscape and not look like capitally rebuilt buildings. It is best to build a gazebo made of wood: wood is convenient for work, and you can build the building yourself.
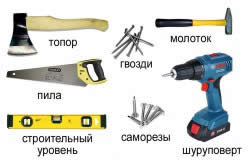
When you need to have at your disposal the following tools and materials:
- saw;
- construction tape measure;
- jigsaw;
- planer, can be electric;
- a hammer;
- six bars of wood;
- nails of any suitable size;
- railing boards;
- the required number of boards for the manufacture of lining;
- rubble.
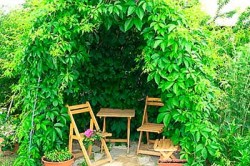
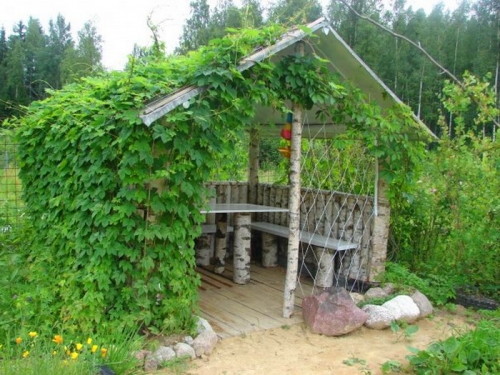
In the warm season, you can create "live" arbors from climbing plants.
They are collapsible and stationary. Stationary gazebo awnings are located on the foundation, have a visor. In addition, such canopies and gazebos can be open and closed. The former are very suitable for the summer period. And the latter are good protection against bad weather. “Live” arbors are made from hedges and climbing plants, they are also used in the warm season. There are also barbecue pavilions. They are distinguished by a large area and have a barbecue and a fireplace.
The most popular are three types of arbors.
- Classic gazebo. It has a strict look and a minimum of elements.
- Oriental pavilions are distinguished by screen doors and pagoda-shaped roofs.
- Village gazebos. They are made of solid wood and do not violate the harmony of nature at all.
As mentioned above, when building a pergola or gazebo, it is best to use wood, but at a cost such a gazebo will cost much more than simple design from metal.
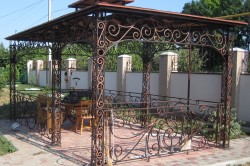
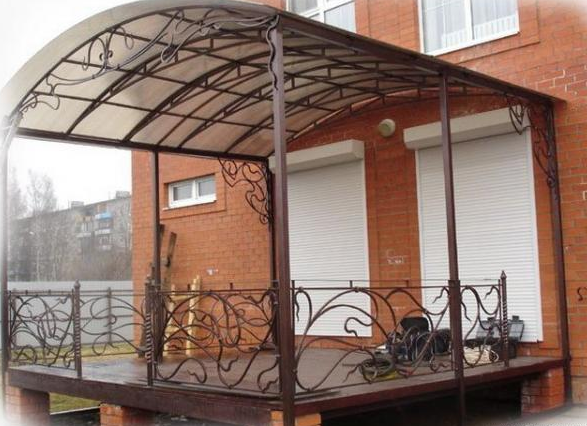
The arbor made of metal is strong and reliable. It will serve you much longer than a wooden gazebo.
At metal structure has its advantages. Such an arbor has a good fortress and can serve for a very long time. It can be both stationary and collapsible. The only negative is that on a very hot day such a gazebo heats up.
You should understand the pros and cons of a polycarbonate gazebo. There are a lot of pluses: this is ease of construction work, and the low weight of the material itself, and UV protection. And most importantly - polycarbonate can withstand temperatures up to 120 ° C. With all this, it still increases the lighting in the room, as it is translucent. There were no cons to this gazebo.
Brick is suitable for building barbecue gazebos and is very easy to use.
Now that you have learned everything about the types of arbors, you need to decide where to start.
And you need to start with the execution of the drawing. If it is difficult to make a drawing yourself, there is no practice, then the Internet will help in this case. There are a lot of options out there, and if you can add something of your own. But here you have to take into account all the little things: a combination of materials, a canopy, a visor, a load on every detail of the gazebo.
Back to index
Where to start building
Construction is best to start with the choice of location. It can be a garden or a reservoir, an artificial pond. This takes into account the type of soil. If the soil on the site is saturated with water, then construction cannot be carried out. The wooden parts of the gazebo before construction must be impregnated with special protective solutions. This will keep the gazebo in excellent condition for many years.
Now that the drawing is ready and the place for construction has been chosen, you need to make a foundation and install supporting structures from concrete or stone. In order to make a foundation, you need to clear the site of debris and remove no more than 10 cm of soil with plants. Then dig holes for the foundation pillars.
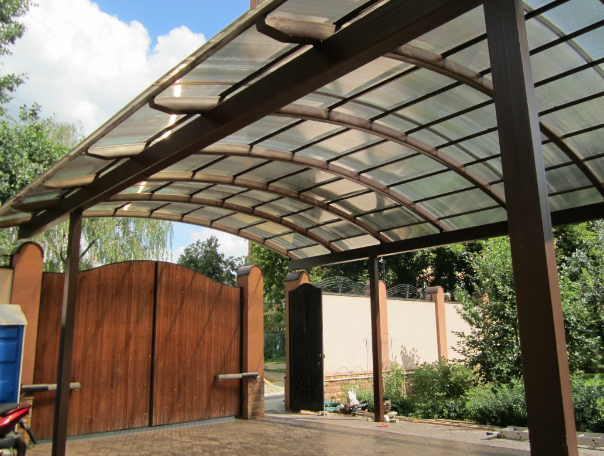
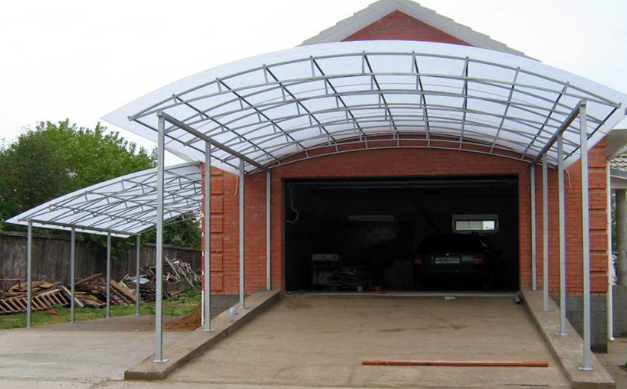
Recently, polycarbonate has been increasingly used to create simple hinged structures. From it you can build a gazebo, a canopy, the roof of various buildings near the house or cottage. This material is very plastic, so it can easily cover non-linear surfaces. In addition, polycarbonate is moisture resistant, very light and durable, which is important in the construction of structures such as a canopy. But still, despite all the seeming simplicity of mounting various polycarbonate buildings for summer cottages, you need to adhere to some technology, which we will discuss below.
How to make a polycarbonate gazebo with your own hands
In order for the construction of a canopy, gazebo or polycarbonate visor to proceed quickly and according to plan, you need to prepare a plan. Each plan must include the following mandatory items:
- design drawing of a gazebo or canopy;
- choice of polycarbonate;
- choice of floor covering;
- mounting;
- decor.
For all these works, the following tools will be useful:
- pliers;
- drill;
- screwdriver;
- construction knife or a circular saw;
- welding machine (if the frame is metal);
- gloves.
Design drawing of a canopy or gazebo
Polycarbonate panels are quite plastic, so it is often used to create various buildings near a house or cottage. Polycarbonate sheets are easily mounted on a wooden, stone, metal or forged frame.
If your gazebo is made of stone or wood, then polycarbonate will be an excellent choice for roofing. The transparent roof allows light to pass under the canopy, and at the same time protects well from the scorching sun.
Sheds and gazebos made of open type polycarbonate are very light, they perform the function of weather protection and fit perfectly into the light interior of a cottage or house, but still, during rain, it will be more comfortable to be in a room with walls. Therefore, polycarbonate is also used for the construction of sides or full-fledged walls. The gazebo can be made in the form of a hangar, when two opposite sides are covered with polycarbonate, and the ends are left open. Gazebos or sheds look beautiful, where a forged frame or simply decorative iron elements are welded to metal poles.
Attention ! Having created a drawing of a future canopy or gazebo, you can easily calculate the number required material for building any structure at home.
Choice of polycarbonate
When building a canopy or gazebo with your own hands, the following types of polycarbonate are very often used:
- Monolithic polycarbonate. Outwardly, it is very similar to glass, it can be transparent or colored. Aesthetic appearance is combined with high strength, which is not found in glass. Often it is used for highly loaded structures at home or in the country.
- Profiled polycarbonate. This option is not inferior in strength to sheet, it differs only in the shape of the panel - they are wavy. It is often used on roofs in combination with metal tiles, in which the wave size is equal to the polycarbonate wave size, so they are easily joined. It is also convenient to make light windows on the roof from profiled polycarbonate.
- Cellular polycarbonate. This is the most common type of polycarbonate. It is inexpensive and easy to operate. It is quite possible to mount a canopy or gazebo in the country from such polycarbonate alone. It is very flexible and plastic, which allows you to create any non-linear shapes from it.
Which polycarbonate is better to choose for a canopy or gazebo is up to you.

Frame selection
The main condition for the successful construction of a canopy or gazebo for a summer residence is correct installation frame. This is also the most responsible event, so the choice of material should be taken seriously. Basically, for the construction of canopies and arbors made of polycarbonate, they use:
- metal;
- concrete or foam blocks;
- forged gratings.
It will be easier and more convenient to assemble a metal structure, for this you need to purchase:
- pipe;
- fittings;
- corners;
- profile.
In order to assemble the frame from reinforcement, welding is required. This is one of the easiest ways, the appearance of which is not very attractive. In addition, the disadvantages of reinforcement structures include the fact that polycarbonate sheets will need to be fixed with wire. If the holes for passing the wire cannot be closed, then moisture will enter through them into the canopy, and the frame itself will begin to rust.
Pipes have the same disadvantages - unpresentable appearance and susceptibility to corrosion. They are used if they have accumulated in the country or at home as an unnecessary material. The only convenience compared to fittings is that polycarbonate sheets can be fixed with screws to the pipe.
Attention ! Most often, a profiled pipe is used to create a canopy frame for a summer residence. Together with it, if necessary, corners are used.
The option with forging is quite expensive, such gazebos or awnings for a house or a summer residence are made to order, or a frame is purchased in special stores. But the finished product is easier to buy as a whole, along with polycarbonate. When ordering a forged structure, it is better to choose the polycarbonate material yourself and transfer it to the manufacturers. So you will be sure of the quality.
The choice of flooring
The first thing to start with the construction of a gazebo or a canopy for a summer residence is preparation floor covering. For the outdoor construction of a gazebo or a canopy made of polycarbonate, it is not necessary to build a capital floor, since the gazebo will be light. But still, for your own comfort, it is recommended to ennoble the ground cover so that there is no dirt under your feet during and after the rains.
This can be done with thin concrete screed(5-8 cm), or just lay ceramic tiles and squeeze it well. You can pre-remove a layer of soil on the site of the cottage selected for construction and fill the pit with sand or gravel.
It is also possible to create a wooden platform under a canopy, but this is a more expensive option. And yet, if you decide to build it in the yard of a summer house or house, then it will be necessary to dig holes for small posts. The posts should be slightly above ground level. The installed supports are poured with concrete, and when it seizes, beams are laid on top, which serve as the basis of the future platform. Beams are located at a distance of not more than half a meter from each other. Boards, plywood or any other wooden sheets are chosen as the floor itself.
Attention ! Must be processed wooden structure with a special sealant against decay, and close the ends with moisture-resistant material.
Another option would be to fill the perimeter of the canopy or gazebo with clean fine sand. To do this, a pit is dug 15 cm deep, and a little wider than the perimeter of the structure itself, and covered with sand. Coarse or fine sand is up to you to choose, the only difference is appearance. At the border of sand and soil, it would be advisable to dig a low curb so that the sand does not mix with the ground. Such a sandy island, especially if there is a reservoir nearby, will look great on any summer cottage.
We install a gazebo
The assembly of a gazebo or canopy for a house or cottage can be divided into three stages:
- Frame assembly;
- Mounting the frame on the base;
- Polycarbonate attachment.
If you have prepared a drawing of the future building in advance, then you can immediately start assembling. First you need to dig holes 15-20 cm deep under the bearing supports, where iron, stone or wooden poles should be installed.
After the bearing supports are fixed, it is advisable to wait a couple of days for the concrete to get stronger and hold the supports securely. Next, you can proceed to welding or another type of assembly (if it is a tree) of the frame.
Fastening of polycarbonate sheets is carried out by drilling a hole in it and a metal profile, slightly smaller in diameter than the fastening screw. It is best to use rubber washers so that water does not enter through the place where the screw passes.
Interior decoration
When a gazebo or a canopy is installed on the summer cottage, it's time to deal with their internal arrangement. Sometimes, as an additional feature, a fireplace is installed during the construction phase.
You will choose the interior and design of your gazebo to your liking, and what will be there is up to you. Tables, chairs, bar counter, lighting and small decor details should be made of materials adapted to high humidity and temperature changes. Consider different climatic conditions when choosing furniture.
Conclusion
Having country house or cottage, this quiet corner away from the bustle of the city, you can easily equip it with a gazebo or a canopy, where it will be convenient to gather with a group of friends, or relax with your family. For this purpose, polycarbonate structures are best suited, as they are inexpensive and easy to install.
About 5000 years ago, the first pavilions appeared in Egypt. They were created exclusively for the nobility and were depicted on various frescoes that the Egyptians took with them to the afterlife. Much has changed since ancient Egypt, but the popularity of these buildings has not faded.
In ancient Egypt, pergolas were erected with landscaping as protection from the scorching sun.
It can be simple or sophisticated, small or large. It all depends on your tastes and preferences.
There are a great many different designs of gazebos for the garden. They are wooden, brick, metal, rectangular, round, glazed, open, etc. The choice of material and type of construction depends on the location and purpose of the object. Despite the variety of types of gazebos, they have one a common denominator: the gazebo should create the illusion of unity with nature, transparency and lightness, not resembling a capital structure.
Before you start building with your own hands, you should decide on the place where the structure will be located, determine the sunny side and the direction of the wind. After that, you need to determine the number of people who can simultaneously be inside the building, the shape, material and the need for glazing. After receiving the information, proceed to the development of a design project. If you do not have the opportunity to contact a specialist, even a simple freehand drawing will help prevent many mistakes during construction.
Among all the available materials for do-it-yourself construction, it is recommended to choose wood, since it is easy to use and almost all work with it can be done independently with a minimum set of tools.
Types of gazebos and choice of material
![]()
According to their design, gazebos are divided into 2 categories:
- Collapsible. They are constructed in such a way that during periods of uselessness they can be stored in a certain place without occupying the space of your site.
- Stationary. Such arbors have fortifications, are located on the foundation, have a visor or roof with one or more slopes.
In addition, gazebos are of 2 types:
- Open. Used during the summer.
- Closed. Protect from cold and bad weather.
- Live. They are built from a strong frame and living plants, used in the warm season.
- BBQ gazebos. Often, such gazebos occupy a large area and have a built-in fireplace or barbecue in their design.
The most popular styles are:
- Classical. The structure has a strict and simple appearance without unnecessary elements.
- Oriental. Such buildings are characterized by screen doors, patterns and ornate roofs.
- Rustic or forest. Arbors in this style are built from solid wood and evoke a feeling of unity with nature.
Types of gazebos by material: stone, brick, metal, wood.
The metal structure is extremely durable and strong, it can be both stationary and collapsible, but it gets very hot on sunny days.
Garden arbors made of polycarbonate have many advantages: ease of erection, light weight of the material, protection from ultraviolet radiation. Polycarbonate also withstands temperatures from -55 to +120°C and, despite the variety of colors, is a translucent material, which increases the lighting in the room. The brick is suitable for building barbecue gazebos and is easy to operate.
Back to index
Preparation for construction
Any idea should begin with the execution of a drawing, and the construction of a gazebo is no exception. If there are no basic skills to create it, there are many different options on the Internet that can be supplemented with your author's ideas. All the nuances should be taken into account: a combination of materials with the desired design, the load on every detail of the structure, a canopy, etc. Consider building a wooden gazebo with your own hands.
It is best to place such a structure among trees or near a reservoir. The position of the garden structure will be stable if the soil is rocky or sandy. In the event that the soil on your site is dusty and water-saturated, construction will be impossible. Before starting construction, impregnate all wooden elements with special solutions that are designed to protect against the environment. This will help keep the gazebo in excellent condition for many years.
Back to index
List of necessary tools and materials
- Saw.
- Construction roll.
- Electric jigsaw.
- Electroplaner.
- A hammer.
- 6 bars of wood.
- Nails of various sizes.
- Boards used for crossbeams and railings.
- Rubble.
- 26 boards for the manufacture of wall lining.
Back to index
Construction of a wooden gazebo
First of all, it is necessary to make a foundation and install a supporting structure made of concrete or stone. Cleanse your hands land plot from various debris, plants and remove 10 cm of the ground layer. After that, pits should be dug for foundation pillars measuring 30x30x50 cm. It is recommended to use oak timber as a material for pillars, the lower part of which was previously placed in tar or bitumen. After pouring crushed stone into the pits, tamp it down, providing a solid foundation, then cover each pit with a film and fix the timber with battens. After pouring concrete, you must wait a few days.
Take the pillars from which your garden gazebo will consist, and fix it on the foundation by cutting special holes in the pillars and attaching it with nails or metal corners. Before installation, grooves for railings and benches should be made in advance.
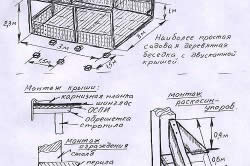
After installing the poles, secure them with boards. The posts should be perfectly level, and the grooves for the railing and benches should match in height. The frame of your gazebo is ready. The sides of the structure must be closed with clapboard around the perimeter in order to increase stability, and benches should be installed by leveling and sawing the edges.
After that it is necessary. For its construction, you will need several bars, 100x50 cm in size, which are fastened together with a central bar. In order for them to hold tightly on the base, special recesses should be made, fixing them on the supporting structure. Form the base of the roof around the perimeter with plywood.
It remains only to cover the canopy with flexible shingles, and the floor - with any tile chosen to your taste and discretion, or with wooden boards. Also, if desired, you can install a wooden table in the middle with your own hands.