is a common thing these days. Due to its properties, ceramics is suitable for wet rooms, it is durable, strong, easy to clean, and protects the walls of rooms from destruction. Usually, tiling is done for several years, because the price of high-quality wall cladding ceramic tiles not small, so the selection process and direct installation must be approached very seriously. Thanks to the variety of colors, patterns on the surface of ceramics and the forms of its execution, it is possible to embody a wide variety of ideas and desires.
But, in addition to color preference, the choice must be made based on the combination technical specifications and areas of application of ceramics.
For an apron at the stove, a heat-resistant surface is needed, at the sink, bathtub and in the shower - moisture resistant. If you decide to do wall cladding with ceramic tiles, then you need to know not only the sequence of the process, but also the difficulties that may arise during the implementation process. With modern tools and materials, laying is not difficult, but only if the surface is perfectly flat and the room is spacious and new.
First you need to decide on the amount of work in the room (dismantling the old masonry, transferring the wiring of communications, replacing the bathtub or sink, and much more).
In this article, we will not tell you how to properly dismantle the old cladding and level the walls, but we will focus on the process of laying new tiles. Let's consider this process in as much detail as possible.
Calculation of the necessary materials
For this we need a tape measure, paper and a pencil. We take a tape measure, and measure the area under the masonry. Pay attention to the corners in the room, if they are not straight, then you will need to provide for a supply of finishing material. To check if the corners are right, you need to measure the diagonals in the room. If the diagonals are equal, then the angles are right. Apply the tape measure strictly vertically or horizontally so that the measurements are accurate.
Important: Remember that if the old ceramic coating is removed, the working surface area will increase, and if the walls need to be plastered first, the area will decrease.
It is necessary to draw the area of \u200b\u200bthe room in the projection in order to clearly see all the bulges and recesses. This will help to more accurately calculate the amount of material needed.
We determine the presence and position of borders, decorative elements and friezes, if necessary, we mark everything on paper. Prepare several laying plans, you need to ensure that there are no narrow pieces of ceramics in the corners of the room.
Tip: Before laying tiles, you need to properly level the wall. In addition to the fact that a curved wall does not look aesthetically pleasing, it will be difficult for you to calculate the correct amount of materials. And when working, you will have to adjust the size of each tile individually.
For each wall, the amount of material is calculated separately. If not a whole tile is required, but a half, in the calculations it goes as a whole.
There are several technologies for wall cladding with ceramic tiles. In other words, it is necessary to choose the type of lining: seam to seam, run-up, herringbone seam or diagonally. The choice of seam directly affects the number of tiles required.
4 popular styling options
Diagonal seam
Diagonal seam
The most difficult to implement, but allows you to create the effect of a distorted space when using tile material of different shades and colors. When laying tiles in this way, it is important to accurately mark the diagonals, to have a quality tool for cutting the material and the appropriate experience. In this case, the calculation of the number of tiles is divided into two stages.
The second is to calculate how many cut tiles are required. To do this, we use the formula (surface perimeter length) / (1.44 * tile length + 2 * seam size). For example, 14000mm/(1.44*120mm+2*5mm)=76.59. As mentioned earlier, we round up, and it turns out that 77 tiles will have to be cut to diagonally lay the tiles on a surface measuring 5m X 2m.
Seam-to-seam method
Seam to seam
The most commonly used styling option due to its simplicity. Tiles are placed in a row, so the slightest unevenness will be in full view. With this method, the number of cut tiles is minimized, and hence the financial costs.
The result is long horizontal and vertical seams. To calculate the number, the height of the wall is divided by the height of the tile, the width of the wall is divided by the width of the tile, the resulting numbers are multiplied. Rounding is always done up.
It should be noted that this method does not require additional costs for materials (not many tiles are cut).
Runaway seam option
Option: running seam
This option resembles the previous laying method, but each next row is placed with an offset of half a tile. The displacement can be carried out both horizontally and vertically. With high-quality cutting of tiles, it is possible to achieve that the required number of tiles will coincide with the “seam to seam” method. When using tiles of different color shades, optical illusions and surface distortions can be achieved.
This method styling is also quite common.
herringbone stitch
herringbone stitch
This method is also called "parquet". Applicable only for rectangular tiles. With this method, the consumption of tiles increases by 5-10% compared to the previous method.
This method in the bathroom is used a little less often than the above, it can often be found when laying paving slabs, For example.
However, there are lovers of the original design, who also lay tiles in the bathroom in this way.
Tip: When calculating the number of tiles, allow 5% for accidental chipping during shipping or when laying.
Application of glue
For laying ceramics, you will certainly need glue. Ceramics are laid for a long period of time, so the correct choice of adhesive determines how soon this procedure will have to be repeated.
Since the ceramic coating is laid on the wall inside the room, the adhesive must also be selected for interior decoration. On the shelves in stores you can find ready-made polyurethane-based adhesive mixtures in buckets and dry bags. Liquid adhesive can only be used on perfectly flat surfaces. And dry mixes can be used in any conditions on any surface, even without prior plastering.
Without going into the technical component of the mixture and without advertising to any manufacturer, the adhesive can be divided by cost.
Cheap glue, suitable for gluing medium quality, and if you make mistakes when diluting and using heavy tiles, it can quickly fall behind the wall, which means that the tiles will begin to swell and fall off.
Average cost glue, has all the necessary characteristics for most jobs, plasticity, fluidity and allows the use of modifying additives. Expensive glue, slightly superior in quality to glue from the average price range.
Corner processing
Plastic crosses
Rarely does without the processing of corners on the wall, it can be both an external corner and an internal one. To create a complete look and protect the end of the tile from destruction, we recommend using special plastic corners that can be selected according to color, texture and thickness. Using a tape measure, count how many corners are required, and what type.
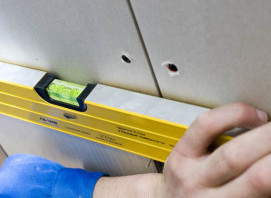
After choosing the material, it is necessary to prepare necessary tools for laying tiles. You will need a tile cutter, a level, a set of spatulas (notched, smooth, rubber), glue and mounting cross-separators.
wall cladding
The process of laying ceramics is important and irreversible without additional costs. If inaccurately laid plaster can be cleaned and leveled, then it is almost impossible to remove a dried-up tile without damage. Even laying of tiles depends on how the first row is installed, since all other ceramics are glued relative to the first row.
Let's figure out how to install exactly the first row of tiles.
Tip: You can find many video tutorials on wall tiling with ceramic tiles on the Internet.
If you want to place it at a certain height from the floor, then use a level and a pencil to draw a straight line at the desired height. Attach a metal profile along this line. If the ceramic material will be placed as close to the floor as possible, then attach the tile to the wall near the floor and use a level to draw a straight line along the top edge of the tile and fix the metal profile along it. The profile will protect the tile from moving down.
Now you can move on to the main process - tiling the walls.
To avoid the solution drying out, it is recommended to dilute it in small batches, for example, 1-2 rows of tiles. A small amount of mortar is applied to the back surface of the ceramic with a smooth trowel and distributed evenly, and excess mortar is removed with a notched trowel. Press the tile against the wall for a few seconds, pressing on the ceramic material evenly in the center.
To ensure that the tile seams are the same, use special plastic crosses. The cross is installed between the tiles, which are well pressed against each other.
Tiled material is laid in horizontal rows. After the first row is ready, check the horizontal level. Further, carefully and without haste, glue all the remaining facing material, not forgetting to install plastic separators. If you are not completely lining the walls, and the top layer of tiles runs at eye level, install a plastic corner over the entire row.
Do not forget to insert the corner into the inner corners, this will give an aesthetic appearance, and, in the future, will simplify the cleaning of the room. After placing the last, top layer, the first row will dry out, and it will be possible to remove the metal profile without fear of displacement of the cladding. Now you can stick the bottom (zero) row of tiles.
Tip: after finishing the facing work, do not forget to grout the seams. The grout will provide the masonry with a finished aesthetic appearance and protection of the joints from destruction. If a sealant is applied over the grout, this will increase the moisture-resistant performance of the masonry as a whole. If you used a tile with an unglazed surface in your work, then it must be remembered that when grouting, such material will take water from the filling solution, to avoid this, wet the edges of the tile. Otherwise unglazed finishing material not inferior in strength, durability and ease of care to glazed.
External wall cladding
Wall cladding is not limited to internal works. Many clad their houses from the outside, trying to give them a rich look. Respectable appearance accept . But, natural stone is expensive, and ceramic granite is used instead, while maintaining the aesthetic appearance of the stone and saving money. The process of ceramic tiling of external walls is similar in principle to internal cladding, but requires materials with high resistance to aggressive outdoor environments.
External cladding can only be performed at temperatures above five degrees, while the wall must already have a working load. Otherwise, when the load on the wall increases, it may have micro-deformation, and this will be enough to destroy the facing material. Attach the cladding not to the outer wall, but to the outer structure. Instead of glue, a cement-sand mixture is usually used, the solution is applied to both surfaces, which are pre-moistened, since moisture leaves faster outside and the solution may crack. The mandatory width of the seam is at least two millimeters, since the walls “breathe” through the seams, evaporating excess moisture. The ratio of the area of \u200b\u200bthe seams and the wall is 1/20 - 1/10. For external cladding, it is imperative to make expansion joints, since the facade will be subject to temperature fluctuations. Seams for external cladding.
Important addition
Like many other construction works, finishing, including wall tiling, must be done according to a long-established technology.
The list of materials, their quality characteristics, quality indicators, deviations and tolerances in the work are prescribed in the regulatory documentation. Of course, there is a document where the wall cladding with ceramic tiles is prescribed - this is SNiP.
If you decide to do finishing work professionally, then you need to study SNiP 3.04.01.87.
In addition to tiles, walls can be finished in three more very popular ways: stone, plasterboard and a wide variety of panels. Read more about these types of finishes. We highly recommend that you familiarize yourself with them and make a comparison with tiles.
Good luck with your repair!
Laying tiles with adhesive
In rooms with high humidity, it is most practical to apply ceramic tiles to the wall, which will protect them from moisture evaporation and water ingress on their surface. These rooms are well known to us, so wall cladding with ceramic tiles in the bathroom and in the kitchen is just the option where protection from excessive moisture is required. At first glance, the task seems complicated and requires the involvement of master tilers, who, of course, need to be paid a lot, but if the whole process is sorted out, most apartment owners themselves will cope with this matter. Let's call these shelves:
- Choice of ceramic tiles.
- Tools needed for wall tiling.
- Preparatory measures before tiling the walls.
- The main points for determining the quality of work.
- Preparation of walls for facing with ceramic tiles.
- Marking walls for cladding.
- Preparation of adhesive for ceramic tiles.
- Laying ceramic tiles on the walls.
As you can see, the work plan has been drawn up, and if you adhere to it clearly and slowly, then you can do without specialists in this matter, saving a certain amount of money.
So let's go.
Choice of ceramic tiles
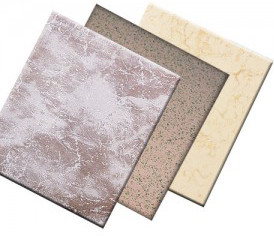
The choice of ceramic tiles must be approached carefully
When buying ceramic tiles in a store or on the construction market, do not be too lazy to pay attention to the appearance of the material, as the quality of all subsequent work will depend on this. The tiles must be strictly the same size, have right angles everywhere, rounded edges and a perfectly flat surface. If you are planning to work with glazed tiles, make sure that the glaze is applied evenly, that there are no runs or white edges.
Also check all the numbers printed on the packaging, which indicate the color, dimensions, roughness of the ceramic tiles. It is quite clear that everything that is indicated on the outside must match the internal content. According to European standards, the color of the code indicates the grade of the material: grade 1 is indicated by a red code, grade 2 - blue.
Tools needed for wall tiling
Consider: what tools will be needed in the process to carry out work in the bathroom.
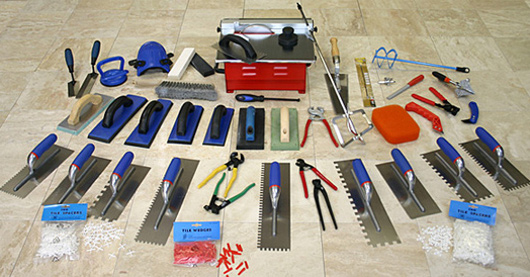
Tools needed for wall tiling
- The first thing we need is a two-meter aluminum ruler 70 mm wide and 25 mm thick. It is called the “rule” and with its help we will lay the tiles in even and orderly rows.
- A metal square (at a right angle) with sides of 100x100cm will be required to control the provision of right angles during masonry.
- A straight hammer will not hurt for a variety of work on chipping off excess tile fragments, tapping it, and also where necessary for driving nails and pins.
- A water level for determining the horizontality of the masonry line at large distances and a simple building level for the same purposes, but in certain areas of the masonry. If someone does not know what the water level is, contact the seller - he will tell you everything, especially since it is easy to understand.
- Be sure to use a plumb line, which is a weight attached to a cord. With the help of a plumb line, strictly vertical lines are set. This also includes chopping cords, which are needed for beating vertical and horizontal lines. These cords represent an ordinary cord with a chalk dye applied to it. By pulling it back and releasing it sharply, like a bowstring, a perfectly even chalk line is left on the surface.
- Tongs for chipping small pieces of tiles, a whetstone for smoothing the ends of the cut tiles, a wooden hammer (mallet) for gently setting the tiles on the glue, a rubber spatula to seal the seams between the tiles with a special sealant.
- Special metal spatula for combing the glue. The spatula should be of small thickness so that glue does not stick on it.
- Locksmith's tape measure - it's clear why.
- A paint brush to moisten the surface and a grater to apply glue to the surface of the wall and further level it.
- 1To cut tiles, you can use an ordinary turning tool, sharpened at an angle of 60º. You can cut tiles with a diamond wheel. If you're lucky, you can beg for a while somewhere a professional glass cutter, which is used by craftsmen.
- 1Purchase in the store the Nth number of joint crosses for laying between tiles so that the thickness of the joints is uniform everywhere.
This is perhaps the main tool that you will need for wall tiling in the bathroom with ceramic tiles. Of course, you will need something else, for example, rags, protective gloves, etc., but this is all a trifle.
Preparatory measures before tiling walls
All works require some preparatory process and ours is no exception. In order for everything to go on like clockwork, you must do the following:
- Sort ceramic tiles by size, color and shade. As a template, you need to choose one ideal tile with right angles and flat edges, and calibrate all the others on it, paying attention to cracks, depressions and bulges. Tile color is best checked in daylight.
- After sorting, bring the tiles into the room where they will be laid and put them in columns of 50-60 pieces each. In addition, the rejected material should be folded separately, as it can be useful for cladding in places where the reject is not visible.
- If there are new plumbing structures in the room in the form of a toilet, washbasin, bath, they should be covered with plastic or some other film. It is best to put a sheet of plywood about 10 mm thick on the bath so that debris and glue residue do not get into it.
- If it is planned to lay out the gap between the bathtub and the wall with a tide from a special border, then in this case the bathtub must be securely fixed so that later cracks do not occur between the bathtub and the facing tile, which can form during shrinkage. It is better to make ebbs from a whole tile so that the seams are not directly under the shower jet.
The main points for determining the quality of work
When laying tiles, you must adhere to the following rules:
a) the tile must be laid strictly vertically and be in the same plane;
b) the glue must fill the entire space under the tile, not allow voids, where all sorts of bugs and spiders can then start;
c) the seams must be of the same size and located on the same line, for which use joint crosses;
d) follow the pattern or pattern in the overall composition, otherwise it will be difficult to correct errors later;
e) the seams are best rubbed with Finnish sealant, which, unlike Turkish, does not turn yellow.
Preparing walls for ceramic tiling
The walls in the bathroom may have concrete base, wooden or sheathed with plasterboard sheets. For each category, the preparation will be unique.
Preparation of concrete walls
Concrete walls before cladding must have a perfectly flat plastered surface. You also need to pay attention to the verticality of the surface by checking it with a plumb line. If there is no verticality, additional plastering work must be carried out. There should be no greasy spots on the wall. If any, they are removed with a 3% solution of hydrochloric acid or a 5% solution of soda ash.
On gypsum surfaces, it is necessary to make notches with a hatchet or a chisel at a distance of 2-3 mm from each other.
If it is planned to lay the tiles with glue, the walls must be primed, having previously cleaned them of dust and dirt. As a primer, you can use the Knauf primer, which penetrates deep into the pores, binds dust grains, forming a protective film with high adhesion.
Preparation of walls from a wooden base
Preparing walls for cladding
WITH wooden walls in preparation for facing, to put it mildly, you need to tinker. First of all, you need to nail wooden slats 25-30 mm wide and about 2-2.5 mm thick on the surface, pre-treating them with an antiseptic composition that will protect them from decay. A roofing material is pulled over the “plank” to ensure good waterproofing and a metal mesh with small cells is fixed on top of it (you can also use a plastic plaster mesh). The mesh is needed for good adhesion of the plaster, which will now serve as the basis for laying the tiles.
Drywall walls
Adheres to drywall plaster mesh, then applied plaster mix. After the mixture has hardened, you can make lining.
Marking walls for cladding
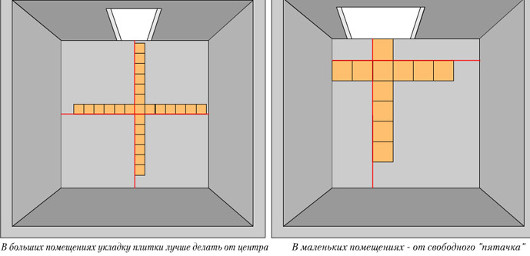
The marking of the walls should begin with the drawing of strictly vertical and horizontal lines passing through the center of the wall. From this center it will be possible to determine the number necessary tiles, orient how the drawing will look, if any. And since it is impossible to decompose the tiles on the wall, transfer the whole process to the floor, taking into account the gaps between the tiles. Preliminary layout is convenient to do with the help of an even straightedge, the length of which is equal to the size of the wall with a slight minus. Using this ruler, you can count the number of tiles in a row, as well as determine the size of an incomplete tile at the end of the masonry.
Experience shows that it is necessary to start laying from the corner that is most in the field of view and continue in the opposite direction, thus ensuring that a whole tile is laid in a conspicuous place. This advice is only suitable for homogeneous tiles.
Carefully and slowly, you need to correctly mark the horizontal and vertical lines
Next, after you figured out the number of tiles and patterns, you need to apply a base horizontal line to the wall, as close to the floor as possible, using a ruler and a level. When drawing a line, you must also take into account the design intent, which ultimately determines the height of the line from the floor. You can also draw a base horizontal line under
ceiling, above the curb or above the level of the bath itself. However, if it is possible to lay integral tiles on the wall, it is better to start laying from the floor. If the floor has not yet been laid, the first row is laid out along a rail fixed along the base horizontal line.
It should be noted that the baseline should be marked along the entire perimeter of the wall at the same distance from the floor. Reiki must be pre-prepared with nails hammered into them every 30 cm, and the nail on the other side should not protrude much, so that the rail can be easily removed later.
When facing walls where plumbing units have not yet been installed, do not forget to install beacons in places where plumbing will be installed. If the bathtub is already installed and fixed, the first row is laid out along the edge of the bathtub using the rule (aluminum rail), taking into account the size of the tide.
Preparation of adhesive for ceramic tiles
Nowadays, tiles on a cement-sand mortar are rarely fastened by anyone. Modern materials in the form of an adhesive solution, sealant for filling tile joints, insulating materials, primers allow high-quality wall cladding with ceramic tiles in any room and on any surface. Moreover, mixtures can be sold both in dry composition and fully suitable for work. Dry mixes and glues are used for work inside and outside the premises, and only adhesive compositions are used to repair walls in old buildings.
For greater efficiency, various plasticizers and emulsions are added to dry mixes, which significantly improve the quality of the adhesive with little deformation of fresh concrete. The action of plasticizers improves the resistance of the adhesive to various deformations and loads, so it is possible to use them when laying tiles on footpaths.
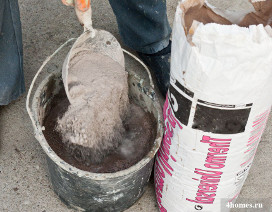
Preparation of adhesive mixture for wall cladding
It is very important to follow the instructions for use of the finished adhesive or adhesive mixture, which is indicated on the package. If, for example, there is an excess of water, the tiles will slide off the wall; if there is not enough water, the laying will be difficult. So that lumps do not form, you need to fall asleep mixture in water and mix it thoroughly. Mixing should be carried out at a temperature not lower than +5 ºС and not higher than + 30 ºС using protective equipment, since during mixing an alkaline reaction occurs, splashes from which can get into the eyes and onto the skin.
During operation, the adhesive mixture must be periodically mixed and, if necessary, water should be added to it. For laying tiles in problem areas, to increase the strength of the adhesive, PVA glue can be added to it, but only in water, at the rate of 0.5 l of PVA per 10 l of the finished solution.
Some make the mistake of adding alabaster to the adhesive solution. This cannot be done, since alabaster worsens the properties of the adhesive composition, making it defenseless against moisture.
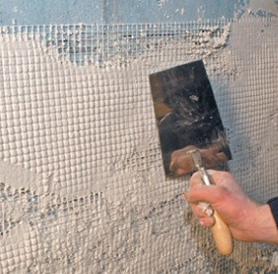
Laying ceramic tiles on walls
It's time to proceed directly to the facing work. Here you immediately need to take into account that if you have already laid, the first row is laid, pressing against the floor tiles, and if there are no tiles or other covering on the floor, then the laying of the walls begins from the second row, and the first will be laid after laying the tiles on the floor. As noted earlier, laying begins, focusing on the base horizontal line or leaning on a horizontal rail.
Tiled beacons
Laying begins with gluing lighthouse tiles in the corners, installed strictly along vertical and horizontal lines, after which you can safely lay the tiles further, inserting joint crosses into the seams to a depth equal to half the thickness of the tile.
The adhesive is applied with a notched trowel over a small area, as it cures quickly to allow a certain number of tiles to be laid. The suitability of the glue can be checked by touching it with your fingers - if it is still sticky, then you can continue laying. Don't forget about joint crosses. After laying each m², the work must be checked for verticality and horizontality of the masonry, so as not to move further to the side. It must be remembered that within another 20 - 30 minutes the tile can be corrected, adjusting its location. Crosses can be removed after 1 hour after laying.
In the process of work, monitor the thickness of the cool solution, keeping it the same everywhere. You also need to constantly moisten the lower rows of tiles with water with a damp cloth. You can start sealing the joints with a grout mixture, making sure that the tiles are firmly attached to the wall.
All work on the installation of soap dishes, hooks, shelves, etc. is carried out after the glue has completely dried. This also applies to holes for pipes, sockets, switches.
K category: Construction of a garden house
Cladding technology
In order to obtain a smooth and beautifully tiled surface at the end of the work, you should carefully read the tips listed below.
There are two ways of facing with ceramic tiles: diagonally (Fig. 1, a) and in straight rows; here they distinguish between laying tiles in a seam (Fig. 1, b) and apart (Fig. 1, c). Both square and rectangular tiles are laid in straight rows. As a rule, only square tiles are laid diagonally.
Wall covering. After marking and hanging the surface, but before laying the first (lower, frieze) row of tiles, it is necessary to take into account the condition of the floor: if the floor has not yet been laid or the tile will not be laid from the floor, then the level of the beginning of the laying should be noted and the rail should be fixed on it , it will serve as a support for the first row of tiles; if the floor is laid, but has a deviation from the horizontal, then we cut the tiles of the lower row so that their upper edges form a straight horizontal line.
Rice. 1. Facing methods: a - diagonally; 6 - seam to seam; in - offhand
In this case, we do not cut the tiles in the process preparatory work, but directly during installation. Now let's proceed directly to laying the tiles.
Wall cladding in a straight line. We start laying either from the middle of the row, if you want to achieve symmetry of the masonry, or from one of the corners, if you want the wall to have as few undersized tiles as possible.
Before laying, for better adhesion, the surface of the wall is moistened with water using a paint brush, and the back surface of the tile is momentarily (avoiding absorption) immersed in cement milk (or also moistened with water).
A small caveat would be appropriate here: in no case should the tile be pre-soaked, since in this case all the pores will be filled with water, which will greatly impair its adhesion to the mortar layer. The solution is applied with a spatula to one of the corners of the back side of the tile. With this angle, we apply the tile to the wall, after which we orient it with the entire plane along the mooring cord and upset it to the required level (7-15 mm) by lightly tapping with a spatula handle or with a hammer through a wooden block. In this case, the solution should completely fill the space between the tile and the wall, remove the excess solution with a spatula. Having laid two tiles, we insert two steel pins between them; this is necessary so that the joints are even and uniform in thickness. This operation is repeated after laying each subsequent tile. We remove the pins after installing 10-15 tiles. Filling the joints with mortar is allowed at 72 from the thickness of the tile.
We carry out laying in horizontal rows, moving the mooring cord to the desired height and not forgetting to install steel pins along horizontal joints. After laying each row, we check the quality of the lining with a 2-meter rail, applying it with its flat side to the lined surface. If a gap is found between the plane of the rail and the lined surface, we remove the tile (s) with defects, add the mortar and set it in place, upsetting it to the desired level.
Wall cladding diagonally. With diagonal wall cladding, the first row (friezed) is most often laid straight, installing tiles, as with the straight row method. For the same purpose, you can use rectangular tiles, the long side of which is equal to the length of the diagonal of the main (square) tiles. We lay out the second row of triangles with the hypotenuses down, orienting them along the mooring cord.
The laying of subsequent rows can be carried out in two ways: either in horizontal rows, controlling the quality of the masonry along the plumb line (the upper and lower corners of the tile should make a straight vertical line) and along the mooring cord (the side corners of the tile should make a straight horizontal line); or in inclined rows, then we install the mooring cord at an angle of 45 ° to the horizontal and already on it we control the straightness of the joints between the masonry tiles. The penultimate row of masonry, similarly to the second, will consist of triangles, and the last, upper, row is usually laid out straight. We control the quality of the lined surface with a 2-meter rail: if a gap is found between the plane of the rail and the cladding, carefully remove the incorrectly laid tiles, add the mortar and install again. The seams, as in the first case, are only half filled.
Floor cladding. It is much easier to perform facing work on a horizontal surface than on a vertical one. However, you should not relax here either - the quality of the tiled floors must correspond to the tiled walls.
Floor cladding in a straight line way. We start laying tiles with the device of two adjacent frieze rows (rows adjacent to the walls). And already from them we are laying the remaining rows towards the exit from the room. The method of laying tiles for flooring is somewhat different from the method of laying tiles for wall cladding: here the solution is applied not to the tile, but to the moistened floor base. We lower the tile with the back side into the cement milk (avoiding impregnation) or moisten it with water using a paint brush, press it against the mortar layer and set it down to the desired level by lightly tapping with a spatula handle or a hammer through a wooden block. We remove the excess mortar that has come out at the joints and fix the size of the seam with steel pins, which are removed after laying 10-15 tiles. We fill the joints between the tiles to V their depths, this is done for faster hardening of the mortar layer.
The horizontality and quality of the cladding is controlled by a building level installed on a 2-meter rail. If gaps are found, we remove the settled tile, add the mortar and set it in place, leveling it with the surface of the cladding. We check the straightness of the joints by running the edge of the trowel along the seam - the trowel should not cling to the corners of the tiles.
Floor cladding diagonally. Diagonal cladding will turn out to be of better quality if the rows adjacent to the walls (friezes) are laid in a straight row, and diagonal masonry is made from the friezes.
Laying tiles diagonally on a horizontal surface can be done in rows parallel to one of the walls, or in inclined rows, in this case, at an angle of 45 °, we stretch an auxiliary mooring cord, along which we will control the straightness of the joints. Techniques for laying tiles and leveling them completely correspond to the techniques used when laying the floor in straight rows.
Column lining. In order for the facing of tetrahedral columns to occur at an accelerated pace, but at the same time quality does not suffer, we install beacon rails on opposite faces with a plumb line, fixing them with arc rail holders. If at the time of facing the column the floors are not laid or the masonry will not be made from the floor, then at the level of the mark of the beginning of the masonry we fix the support rail.
The laying of each side of the column must be symmetrical, so we start laying the tiles strictly from the center, if necessary, install symmetrical incomplete tiles along the edges. In all other respects, the technique of facing the columns is fully consistent with the technique of facing the walls.
Facing multifaceted columns. Before starting work on facing multifaceted columns, it is necessary to make two identical collapsible templates. To fix the lower template, we will build a plank frame. First, we fix the upper template, orienting it horizontally using the building level. We will make a plumb line along each edge of the column, thus determining the position of the lower template, and fix the edges of the future lining with mooring cords. We lay the tiles in the same way as when facing the tetrahedral columns.
Facing of round columns. We will cover the round columns with carpet mosaic cards. We hang the columns vertically with a plumb line, we close the deviations from the vertical with a cement-sand mortar. After the solution has hardened, we prime the surface of the column and the back side of the mats with a 10% PVA dispersion, then apply a thin layer of mastic or glue with a spatula, apply the mat with the upper side to the column, align the verticality of its side edge along the plumb line, press it against the wall with the entire plane and smooth. The next rugs are laid in the same way.
If the circumference of the column is not a multiple of the length of the rug, then the last rug in the row will be incomplete. When laying carpet mosaic cards in the second and subsequent rows, it is necessary to very accurately combine the lines of the joints of the tiles in the upper and lower rugs - this will ensure the verticality of the laying.
External wall cladding. Work on facing external surfaces is best done in the warm season. Humidity of the surface to be coated should not exceed 8%.
Before facing, we carefully clean the wall from dust, dirt, streaks of cement mortar left over from construction work, hang it and moisten it with water. The methods of laying tiles correspond to the methods of wall cladding inside the premises.
Facing of furnaces and fireplaces. If your home has a stove or fireplace, they will look much more impressive if they are tiled rather than whitewashed or painted. In addition to the aesthetic effect, lining stoves and fireplaces significantly increases their heat transfer.
Tiles and ceramic tiles are used for lining stoves and fireplaces. Tiling is done directly in the process of building a stove or fireplace, and only a stove-maker can do it competently; ceramic tile cladding is quite possible to do it yourself. For this purpose, we use ceramic tiles for flooring square or rectangular shape, any size, 6 mm thick. The tile must have high heat-resistant qualities and have a glazed front surface. In addition, we will need shaped parts: cornice, plinth and for sealing corners.
There are two ways of lining the stove and fireplace.
The first way of lining stoves (fireplaces) with ceramic tiles. We introduce aluminum strips with holes into the vertical seams of the stove (fireplace) masonry. We attach an aluminum T-profile or corner to the bolted strips, and lay the ceramic tiles between the metal elements. The empty space formed between the tiles and the stove (fireplace) masonry is filled with clay mortar.
As we see from the description technological process, this method is applicable only if the masonry joints are perfectly vertical (checked with a plumb line). If the vertical seams have deviations, then we apply method number two.
The second way of lining stoves (fireplaces) with ceramic tiles. This method is fully consistent with wall cladding on a cement-sand mortar: the same technique for preparatory work, marking and hanging the surface; the same techniques for laying tiles and sealing joints. However, it would be appropriate here to recall the property of a cement-sand mortar that it is usually under the action of high temperatures lose their strength. Therefore, when facing the stove (fireplace) in the second way, we will use a clay-cement mortar.
Seam sealing. In the process of laying the tiles, the joints (or seams) are only half filled with mortar. This not only reduces the time and uniformity of the drying of the mortar layer, but also allows you to decorate the joints decoratively. After 2 - 3 days after the end of the masonry, the seams are sealed. To do this, a portion of the plastic cement mortar is placed on a rubber spatula and the recesses between the tiles are covered with movements along and across the seam. When facing elements of built-in furniture and swimming pools, we seal the seams with a special grout for seams.
Cladding technology