To create in a room original design walls, it is not necessary to use decorative plasters. You can make side surfaces with an interesting texture from ordinary putty. A creative approach to design allows you to save money on the purchase of expensive materials and express your individuality. Familiarization with the sequence of work and methods of finishing will help you choose the best option for creating an original interior with your own hands.
It was a rare dwelling that was not decorated with this type of technique. Follow the step and ask us if you have any questions regarding the procedure or materials. Goodbye! There are two main options: the finish can be done or hardened. How to find out? There is a very fast way learn it, and it is wetted with a small amount of water. If you see that the water is quickly absorbed by the surface, it ends up with dark paint.
After the surface is clean and dry, we will continue to cover the defects that are left in the wall. Step Finally, you will only need to paint the wall with the color you like best. Another option is to place or, depending on the result you want to get. You will see that the possibilities are endless.
Preparatory stage
A carefully prepared wall surface helps to extend the period of operation of decorative plaster made from ordinary putty. The alignment of the walls does not have to be brought to an ideal state; the textured finish skillfully masks minor flaws. To eliminate significant differences, gypsum putty or a sand-cement mixture is used. Gypsum mortars are classified as more modern materials are easier to work with.
Formation of "Fish Scale"
If this is your case, you have two options. Option -. This is what we call "removing the head", and with this we manage to reduce the thickness of the surface. After removal, we move on to mashing and damaging. We help with a spatula and proceed to the plastering of the wall. Once the mastic is dry, repeat the previous sanding operation if necessary until the walls are completely smooth.
Auxiliary materials you will need to remove
As you can see, the result is great. In this case, they decided to decorate the wall with striped wallpaper and decorative trim. It's also important that you wear clothes that you don't mind getting ruined or used, and avoid getting trash and gloves in.
Important ! The use of gypsum-based compositions is possible in conditions of moderate humidity, in other cases, cement mixtures are used.

The entire procedure for preparing the surface for applying decorative plaster with your own hands, the basis for which is putty, consists of the following steps:
Do not forget that if you are going to do this, and you have doubts, you can consult with our specialists. The comment area is yours. So get to work and say goodbye to the hotele. Don't forget to share the post on your networks if you find it helpful and subscribe to stay up to date with all the updates and offers.
Walls say a lot about your home. Coloring, paper, with a decorative backing, etc. the possibilities are many and varied, depending on the effect and style you want to achieve. We'll tell you a few keys to keep in mind when it comes to all the rooms in your home.
- First, the wall is cleaned of dust and various contaminants, the old finishing layers in the form of wallpaper, paint or plaster are removed.
- If there is a predisposition to cracking, reinforcement must be made on the wall using plaster mesh. A reliable surface is immediately coated with a deep penetration primer.
- To improve the quality of the further layer of decorative plaster allows a pre-applied starting layer of putty. There is no need to treat the wall with a finishing solution.
- The drying time of the solution depends on its composition and the surrounding climate. You can proceed to the formation of decorative plaster after a certain period, which lasts from 4 hours to 2 days.
- Before applying decorative plaster with your own hands, the walls again need to be treated with a primer on the surface of the starting putty. These measures improve the adhesion of the adjacent layers.

The problem is that so far it has taken a lot of effort. It was necessary to lay putty all over the wall and, judging by the dryness, skip the scraper to remove the tips of the painting. It was about wetting and cleaning the paint until the plaster was visible.
However, today there are other more simple options to take into account farewell to an unsightly finish: you can putty on the wall on the wall, starting from the top of the left side and ending with the bottom of the right side, then allowed to dry, the spatula comes through, and it is gone. You need to wait about 9 hours and then apply the primer. When it dries, you can start painting.
Before you start creating your own masterpiece, you should choose the processing method you like, prepare the tools, calculate the need for materials and purchase them in required quantity. One of the options for finishing the wall with putty, which successfully imitates decorative plaster shown in the following video:
Well insulated, moisture-free walls

Now that you've got the walls ready to decorate them, it's time to conveniently insulate them, if not. on those walls that stand on the street. And it will also soften the noise coming from outside. They are then given a finish line. There are also paints that are insulating: waterproofing or liquid waxes. They are applied like any paint, with a roller.
And if you have moisture, now is the time to figure out why they are coming out and repair the damage that causes them, be it a pipe or another problem. When you are sure the damage is fixed, reapply until the stain is completely dry.
Ways to decorate walls
Upon completion of the preparatory procedures, they begin to form a mixture for decorative plaster with their own hands. The usual putty and grout for joints are poured into the container in a ratio of 1: 1, cold water pour in gradually until a thick solution is obtained.
They may think that a very large expense is necessary to decorate our house. However, we know that this is not the case, that even in times of skinny cows, we can change our site with little success with very little investment and very good taste. One way to make our new decorative design more economical and simple is to transform our walls to look like stone.
We prepare the composition and start finishing
For this work, we need; spatula, bubble level, natural sponge, adhesive tape, flat brush, brush and, of course, putty or paste. Once with all the materials ready, as we always say, we get to work. First of all, we must determine with masking tape the area in which we will work, remember that this work can be useful for both internal and external walls.
Remark ! The mixture for decorative finishing should not flow down the walls. Stick to the consistency of the selected texture.
There are several ways to form a texture pattern:
- using a roller;
- using a notched trowel;
- using ready-made stencils;
- brush, trowel or other hand tools.

This will be the area where we will apply the mastic, once we have prepared it, as indicated in the instructions, according to the manufacturer we choose. The ideal is to obtain a mixture with a thickness of about five centimeters, which we evenly distribute with a spatula.
On the soft mass, we must distinguish between horizontal and vertical lines that mimic the shapes of the "supposed" bricks. For vertical lines, it is convenient to use the narrowest edge of the spatula, with a bubble level that will not mark twisted lines. We have to mark the lines with little pressure on the wall, without having to reach the bottom of the plaster.
Formation of "Fish Scale"
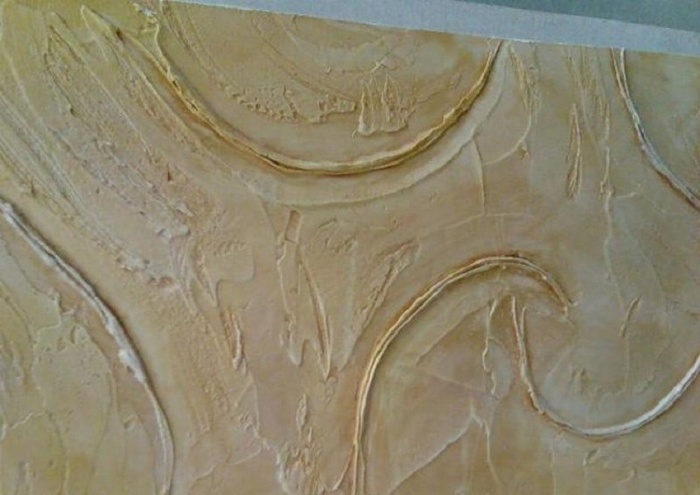
Decoration with decorative trim that imitates fish scales of the entire room is not common. It is much better to focus on a section of the wall, using ordinary putty for this purpose. The thickness of the layer and the pedantry of the performer determine the final result of the original wall covering. The procedure for working on homemade decorative plaster is as follows:
Then, when the intended bricks are demarcated, we will gently press them with a sponge. In doing so, we will achieve a rough effect, leaving an irregularly shaped surface, resulting in a similar stone that we intend to imitate. The last of the work to be done before the mixture has dried is to highlight the joints by pressing the marked lines with a brush and get a more realistic look. Now let's dry the dough until it becomes very heavy.
Meet - decorative plaster
With dry stock, the last thing to do is apply a light oak tone acrylic varnish on the texture and not on the joints. It extends with a flat brush and light touches to get the base color of the wall. The second coat of lacquer should be applied using threading technology, removing excess product. Boards should be painted in light grey colour to simulate a solution.
- Putty 3-5 mm thick is applied to the surface of the wall, if you wish, you can make a more embossed image with your own hands, the layer can be increased.
- With a spatula 8-10 cm wide, starting from the corner of the area to be formed, a pattern is systematically applied. To do this, the tool forms recesses that form a checkerboard pattern along the diagonal. If the required lines are incorrectly applied to the decorative plaster, the oversight is easily corrected: the putty is gently smoothed out and the furrow is created anew.
- After complete drying, the surface of the wall is painted. Golden hues will help to emphasize the original relief of decorative plaster.
If you want to add variety to the facade of the building, imitation of fish scales can be done using semi-circular movements with a trowel, as shown in the photo below:
Creating textures on wall and ceiling surfaces
After that, we only have to wait for the varnish to dry and observe the results. How to imitate the stone in the walls of our house and, above all, continue to win until the crisis. The reasons are easy to understand. Eco-friendly - Venetian plaster is produced using natural materials such as lime and natural pigments. Of course, there are also acrylic venetian plasters on the market with antibacterial additives to provide the same antifouling effect. Moisture Resistant - Are you looking for extremely moisture resistant yet breathable? It is no coincidence that it is born in extremely humid climates such as lagoons. Customizable - Venetian plaster is crafted by hand, always with a unique result. Allows you to choose from a variety of colors and can be used to decorate an entire wall or as a decorative element to be included in the coffered plaster. Finishes in lime-based stucco last several decades without being retouched with glossy, matte or satin finishes. - Original Venetian plaster is opaque, but can be made shiny with a grinder, which must be protected with special waxes.
- For this reason, it is often used to restore historic walls.
- Venetian plaster is the right choice.

Familiar "fur coat" in a new way
The well-known relief of decorative plaster called "fur coat" can now be made by a new method. To form a textured surface with your own hands, you will need quite a bit: ordinary putty, a wide spatula, an impressive piece of plastic film or a trowel. Initially, it is necessary to apply a putty layer 2-4 mm thick on the surface to be decorated and evenly distribute it with a spatula. In the final version, decorative plaster will be voluminous, so it makes no sense to strive for perfect smoothness.
Ways to decorate walls
Original Venetian stucco made with slaked lime, paradoxically less polymer stucco acrylic paint forced choice if you want to achieve special effects such as pearl venetian stucco or antique venetian stucco.
Finally, Venetian stucco in light colors costs less than more intense colors. Do you want to be sure to pay the right price for your clearance? A very easy way to gauge how comfortable a rate is for comparing more ratings.

Important ! Such a site should be processed in order to have time to use the induced solution and at the same time the imaginary decorative plaster did not have time to dry before the start of its construction.
You can get a relief structure in three ways:
- In the first case, the trowel is gently pressed into the putty and released. Thus, a rough surface is formed, resembling decorative plaster. In conclusion, too voluminous relief can be smoothed out with circular movements of the tool.
- Instead of a trowel, you can make a lump out of a piece of plastic film with dimensions of 30x30 cm, which is applied to freshly applied putty. The solution will stretch behind the polyethylene, creating bizarre spikes and successfully imitating the use of decorative plaster.
- If you want to have a less voluminous relief on the wall, the surface treated with ordinary putty is completely covered with polyethylene, tracking uniform contact. A day later, the film is removed and a moderately structured surface is contemplated, which is difficult to distinguish from a wall treated with decorative plaster.

Compare Stress Offers
Comparison of offers of different professionals allows. Understand what are the average prices in your area and immediately reject cheaper offers; require free registration - especially if you have mold, moisture and cracks, and are also likely to be preventable; find a decorator available to treat the end cost of the job - some specialist and other discounts for nearby jobs because they save on travel costs, especially if they have to come back multiple times to respect different hand drying times. Comparing more offers helps you save money, but often you don't have time for that.
The correct consistency of the putty solution is the key to a high-quality coating for decorative plaster. It should firmly adhere to the wall and reach well for the film. Therefore, at first it is better to do an experiment on a small separate area. It is worth noting that this method of applying putty is not acceptable for children's rooms, because the child's outdoor games can provoke scratches on delicate skin. How to decorate the facade of the building under a fur coat with your own hands, you can see in the following video:
If you wish, you can request quotes from specialized companies near you through our portal. Just fill out a short request and in a few hours you will receive three quotes from three professionals in your area, complete with prices. The quotes you get through our site are free and do nothing: if none of them do your thing, you just have to look for the right deal for yourself.
In addition to making the rooms look large and bright, the white Venetian stucco looks like marble, decorative technique, which uses marble and lime powder to create continuous marble-effect surfaces. The main difference between the two decorations lies in the technique of application: Venetian stucco has a greater visual impact, while marble is more discreet.
Other methods
There are many more ways to turn a layer of ordinary putty into an original surface with decorative plaster. Here are a few of them:
Various reliefs help to create rollers with special nozzles. By processing a freshly applied layer of putty with them, an interesting texture is formed on the wall. A few examples are shown in the photo below:
How to use the effect of Venetian stucco marble? It can be used as a decorative display piece on a wall containing other special architectural features - such as a double window - or as a decorative piece. In this latter case, it is advisable to equip the walls with light spots that make the texture of the decoration stand out. Large environments with minimal decor can look bare. In this case, Venetian stucco helps to give the surface dynamism. For moisture resistance, Venetian plaster, which we mentioned at the beginning of the article, is especially resistant to mold and moisture. It can be an ecological and challenging solution for historic buildings or bathrooms in classical style.
- To create a decorative wall.
- Matte Venetian plaster is ideal even in modern conditions.
- For finishing minimum conditions.


Even an ordinary fluffy roller, carried out once on a wall with putty, will create a non-uniform texture. If you want to reduce its volume, it is enough to carefully walk over the surface with a spatula.

Carrying out semicircular movements with a hard bristle brush, you can make an exclusive pattern, as in the following photo:


For a kind of “rose” pattern, you will need to prepare a special tool with your own hands. A ball crumpled from a newspaper is wrapped in thin polyethylene so as not to get wet. By applying a simple device to a newly applied layer of putty, a pattern resembling flowers is obtained.

Finishing
To give the putty layer a complete look and achieve a final resemblance to real decorative plaster, I paint the surface.
Advice ! The use of two matching shades of colors will help to emphasize the volume of the relief.
To start with a roller long pile paint the entire surface in a single color. After the starting layer has dried, they proceed to the final stage of transforming the putty into decorative plaster. Using a roller with a short pile, the protruding details of the relief are painted in a darker or lighter shade. After 30-40 minutes, you can add glaze, which is prepared from wallpaper glue and panel varnish. It is applied to decorative plaster with a sponge by plugging. In conclusion, the entire surface with applied putty is covered with acrylic varnish. One of the proposed ways to design a wall for decorative plaster is shown in the following video:
For internal and exterior finish buildings, different materials are used, and among them a worthy place is occupied by finishing and textured plasters, which create a certain relief. Most of them go under painting after drying, although in some mixtures the color is added when it is kneaded, so that the color is ready in advance.
Below we will talk about how to prepare and apply such solutions, and also watch the thematic video in this article as an addition.
Meet - decorative plaster
Definition. Textured or figured plaster is commonly called decorative trim with granular granules-fillers.
Sometimes the relief surface (texture) is made with ordinary putty using a trowel, spatula, or simply with your hands.
Varieties and features

- For granular fillers that determine the texture or pattern of the surface, an astringent base is required, and for this different kinds materials . These can be mineral (lime-cement), silicate (potassium silicate), latex and acrylic binders.
- Fillers or granules for textured putties are most often crumbs (screenings) of natural and artificial minerals, but it can also be crumbs of flax, cotton, wood, and the like. Depending on the filler, of course, not only appearance finishes, but the price of the material. According to the drawing, such plasters can be divided into three main types of patterns, these are a fur coat, a lamb and a bark beetle.
- has great popularity, which is growing every day and this is not just a fashion trend, but a reasonable desire to get high-quality decor that will not need to be changed for many years. In addition, such plasters are easy to care for - they can be washed with detergents, a rag, a sponge, and even a jet of water from a hose (outside).
Preparatory work
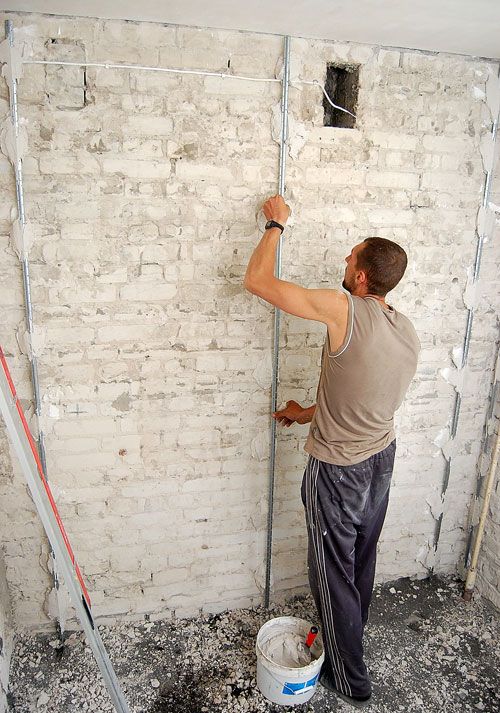
It doesn’t matter at all where it will be - inside the building or outside - both there and there the wall before the start finishing works should be even. For leveling walls, cement or polymer putties are used, but the cheapest and most reliable way, this is a cement-sand beacon plaster.
To do this, the surface must first be cleaned of old finishing materials such as lime, paint or loose plaster. After that, the wall is swept from dust with a broom or brush and covered with a primer. After the latter has dried (from two to four hours), beacons are set up. The profiles are installed on the same solution that will be used to level the walls in a dotted way or on a path from the mixture strictly according to the level.
The distance between them is determined by which you will work in this moment, that is, the step should be 10-15 cm less than the length of the tool.

If the surface differences are more than 50 mm, then before the start of the plaster, a cape should be made (without leveling) so that the leveling solution does not slip from the wall. After the cape, you can plaster the very next day. Before applying decorative putty, the cement-sand mortar must dry and this usually takes three weeks (21 days).
Recommendation. If such work is carried out in hot sunny weather, then after they are completed, the wall must be sprayed daily with water. Otherwise, it will be covered with cracks.
In addition, in order to reduce the consumption of decorative putty per unit area, the next day after plastering, rub the wall with a grater or half a trowel.
Firstly, you will get rid of shells on the surface, and, secondly, the solution will not crack when solidified.
Preparing the mixture

It is not for nothing that we pay attention to the preparation of the putty mixture solution, since the quality of the finish and the convenience of its application depend on this. Of course, there should be instructions from the manufacturer on the packaging, but there the main attention is paid to proportions. We want to talk about the duration and methods of kneading.
The kneading is done in a plastic rubberized or galvanized (enamelled) metal bucket using a low-speed electric drill with a putty mixer (not for paint).
If you do not have such a drill, then in this case you can use a conventional power tool, but at the same time set the speed control wheel to the lowest possible position. That is, if you set it to the full minimum, then the engine will not have enough power to rotate the mixer in a thick mass - you need to choose the golden mean.
First, 1/3 of the water is poured into the bucket, and then the powder is poured in the required proportion and stirred for five to seven minutes, and then left for five minutes to settle - this is how the whole mass soaks without exception. Then the settled mixture is beaten again for one or two minutes and then the solution is ready for use.
Recommendation. At one time, you should stir such an amount of the solution that you have time to work out within 20-25 minutes without a trace.
The fact is that the putty will begin to set, which will prevent you from applying it to the surface, and repeated whipping is not recommended.
If you mix the solution after setting, then its molecular structure is disturbed, as a result of which it solidifies for a very long time, and then loses its density and crumbles.
Finishing work

After the leveling layer has set, a coat of primer is applied over it and allowed to dry - this can take from two to six hours, depending on the humidity and air temperature. The mixture on the wall can be spread with a spatula directly from the bucket, but you can use a construction falcon for this, as shown in the photo above (you do not have to bend over to the bucket every time).
Also, for applying plaster to the wall, you can use two spatulas - small (10-12 cm) and large (30-40 cm) - narrowly applied to a wide one, and then applied to the wall.
In any case, you can’t get by with one spatula, since you need a wide blade to spread the mixture over the surface (you can also use a malka), and a narrow one to collect the solution from a bucket. Modern spatulas are made of stainless steel, so no impurities remain in the putty (they used to be made of ordinary metal and rusted).

To give the texture the proper look in a decorative sense, the plaster is rubbed with an ordinary float in a certain direction. That is, due to a certain direction, granular granules furrow the surface, while creating a pattern or pattern that will depend on your desire, or rather, on the movements of your hand.
You can also create a direction of grooves in one direction, and then, on top, create another direction that intersects the previous one.

You can also create a relief surface with your own hands in the literal sense of the word - after applying the plaster to the rough base, make directional movements with your hand, as shown in the top photo. They also use an ordinary clothes brush for this - after it there are very beautiful directional grooves.
Conclusion
White or gray color textured plaster, most likely will not suit your taste, so the right color will come to your aid, which is sometimes added directly to the mixture, and sometimes applied to the surface.
Also, sometimes the surface is tinted with two or three shades, highlighting each level of relief (foam rubber sponges, brushes, brushes and paint rollers are used for this). And, of course, as with any plaster, here you can use a stencil, which can make significant changes in the design of your interior.