Sooner or later you will think about the huge amount that you pay for utilities. Price utilities quite high, especially for heating and hot water. You can’t do anything about heating, but the issue of paying for hot water supply is completely solvable.
Reasons for the high payment for water supply
In order for the water utility to be able to keep records of water consumption by subscribers, they install common house meters, the readings of which are taken monthly. From the received figure, the testimony of residents who have individual water meters installed is taken away. The remaining number is distributed among all tenants who do not have water meters installed. Therefore, it turns out a disproportionately large amount that you have to pay.
Note! By not using meters, you pay not only for the amount of water you spend, but also for leaks in basement pipes, malfunctions of neighboring taps. In addition, unscrupulous workers of the water utility may well attribute additional cubic meters to you.
Need for installation

It is necessary to install meters even if several people live in an apartment and actively consume water. As a rule, meters pay for themselves quite quickly, and you only have to pay for the water used.
Hot water supply
With the installation of a hot water meter, everything is a little more complicated. Often there are situations when, in the morning, when you turn on the hot water tap, you have to wait until it heats up. If there are no hot water meters, you are just wasting your time, but when there is a meter, you will pay for cold water at the cost of hot water. Therefore, if you often have situations where you have to wait a long time for hot water to drain, perhaps installing a meter will not reduce the amount for hot water in your receipts. In this case, it is more expedient to install only counters for cold water.
Of course, there are meters with automatic detection of water temperature, but their cost is very high and they have not yet been certified in our country.
Basic Rules

Each region has its own rules governing the installation of meters. Somewhere you just need to submit an application to the water utility, after which an inspector will come to you and put a seal on the previously installed meter. In other regions, you will need to obtain permission directly to install the meter, and then carry out work and seal it.
Note! Operating counters must be checked without fail once every 24 months, otherwise, after the expiration of this period, the readings will be invalid.
Stages of work

You can perform the installation of a water meter yourself or contact a locksmith from a housing office at your place of residence. Independent implementation of the process should not cause you any difficulties with a careful study of the technology.
Note! To install the meter, you will initially need to buy a coarse water filter and gaskets. If plastic pipes are available, also purchase fittings with a nut or thread, based on the method of connecting the water meter.
Installation on PVC pipes
On plastic pipes, the meter is mounted below the tap, which blocks the access of water to the apartment:

metal pipes

In the case of metal pipes, the progress of work will be as follows:
- Remove a piece of pipe that matches the size of the counter along with the connector;
- Screw a coarse filter to the faucet;
- Make a thread on the other end of the pipe;
- Screw connectors on both ends of the pipe and install a water meter.
Check the installation by slowly opening the faucet, allowing water to enter the apartment, while observing the connection points. If, when the tap is fully opened, no leaks appear, and the meter is working, you can invite the inspector to seal it. The device is ready for use.
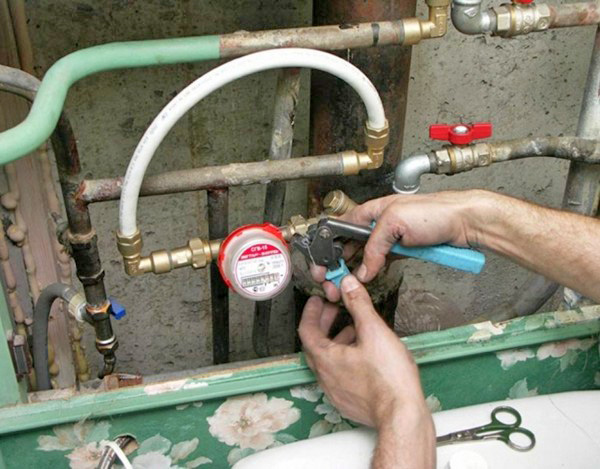
Works on connecting water metersTariffs for housing and communal services are growing every year, and if earlier people were willing to pay at the “average” cost (the average volume of water that a person consumes per month), today this no longer suits them and they want to pay only for what was real used. To do this, the eyeliner is equipped with water meters. It is typical that immediately after installation, such devices must be sealed by the management company, otherwise their readings will not be considered valid.
Another reason for buying meters is the intention of the state to supply them to all users of the centralized water supply in the near future (at the expense of the users themselves, of course). One way or another, the counter will have to be installed, and how to do it correctly will be discussed in this article.

To find out if you can really save money with a meter, you need to weigh the advantages and disadvantages of this device.

Suppose five people are registered in the apartment, but in fact only two live. In this case, you will have to pay for the “average” monthly consumption of each registered tenant, which is extremely unprofitable, because if, for example, four cubic meters of water were used, then you will have to pay for all ten. Here, a water meter will really reduce utility costs.
If the number of residents in the apartment is the same as officially prescribed, then after installing the water meter, the costs will be reduced by about a third.
Important! There are situations when the use of the counter is impractical. First of all, these are apartments in which the number of real residents exceeds the number of registered ones. Here, for obvious reasons, it is better to pay "average bills".
Letter of the law
From a legal point of view, installing water meters with your own hands is not prohibited, although it has its own nuances.

Important! All this must be taken into account before installation.
After weighing all the pros and cons, you can proceed with the installation.
Stage 1. Preparation
First you need to contact the local water utility for technical requirements for the device. Then the meter itself is bought (always with an imprint on the seal).
Stage 2. Checking the water meter

To check, you must contact the KIP department of the ZhEK or Gorvodokanal, but if you wish, you can use the services of a private licensed company. Upon completion of the check of the meter, the accompanying data sheet will contain marks in the appropriate fields and a stamp of the department, after which the owner will be notified of the date of sealing.
Important! It is impossible to damage the seal of the instrumentation, because such a meter will not be accepted in the city water canal. It is characteristic that the device can be handed over to the instrumentation even without a factory seal, but without the seal of the department, the readings will be considered invalid and.
Stage 3. Choosing a place for installation
![]()
![]()
The meter must be placed as close as possible to the entrance of the water supply to the apartment. The place of entry depends on the layout of the house, so there are no specific requirements in this case. An authorized inspector will come for inspection, who will choose optimal location for installation, but if desired, this can be done earlier.
In city apartments, meters are usually installed next to the toilet, but if the pipes run in the floor, then the device should only be installed in the bathroom, because to hide traces installation work unlikely to go to the toilet.
If we talk about private houses, then for them the requirements are much stricter. The meter should be placed no further than 20 cm from the entrance of the highway, and all wells on the site should be capital and locked with a lid (the latter is also subject to sealing).
Stage 4. Accessories

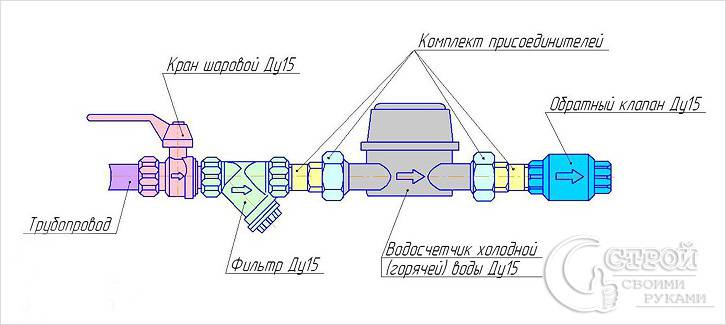
To avoid any problems during installation, you first need to figure out the purpose of each structural element.

Remember! The shut-off valve must be either open or closed, there can be no half-open position. If a partial overlap is planned, then a valve must be installed.

Stage 5. Installation of a water meter
After buying everything you need, you need to carefully read the instructions. The technical passport indicates the length of the straight sections of the pipeline to the installation site and after it.

The sequence of further actions should be as follows.
Step 1. First of all, you need to lay out all the components in a line in order to avoid trouble in the future: first comes the shut-off valve, then the strainer, the meter itself and, finally, the check valve. An arrow is applied to each of the elements. Make sure all arrows point in the same direction.


Step 2. Then the parts are connected "dry" for the correct count of turns. A filter is screwed onto the tap, turns are counted in parallel (there are often no more than five of them). It is noted on which turn the sump was at the bottom. Then the parts are unwound, a sealant is taken (a simple linen tow will do) and wound around the filter element of the stopcock.


Compaction happens like this:
- a strand of tow is leveled and rolled into a lace of millimeter thickness;
- the thread is wrapped with a cord;
- then plumbing paste is applied and the tap is screwed on (you do not need to tighten it strongly, otherwise the connection may burst).
Important! Instead of tow, you can use Unipack sealing paste or a special Tangit Uni-losk polyamide thread.
Step 3. Usually, sealing rings and “Americans” (connecting tubes with union nuts) come with water meters. "American" can be left, but the rings must be bought new. For a hot water meter, it is necessary to use paronite gaskets; for cold water, you can take ordinary rubber ones.
The first branch pipe is screwed onto the sealed thread of the filter, after which the meter itself is placed. The second is connected to the check valve. The result should be the following:
- the impeller is directed downwards;
- sump - up;
- counter scale - similarly;
- tap switch - also up.
Step 4


Important! In apartment buildings, only a representative of the city water utility can shut off the water.
Length is measured first. finished construction, after which a similar section of the pipeline is measured. Before cutting, place some dishes under the pipe, as water may leak.
Step 5 When connecting the meter to the supply line, certain difficulties may arise. If the line is metal, then threading will be required, moreover, in this case it is necessary to accurately measure the distance, because metal, unlike plastic, will not bend.
If possible, the entire section is replaced with plastic pipes, but this will require special adapter fittings to transfer the metal pipeline to plastic.
Stage 6. Checking the performance and
Upon completion of the installation, the operation of the entire system is checked. The water supply is resumed and the shut-off valve is unscrewed. If after that a leak has not formed, and the water meter is working correctly, then you can call an employee of the city water utility. He will inspect, make the appropriate marks in the technical passport of the device and put a seal.

Sometimes the filter is also sealed, but this is not necessary. After the meter is put into operation, water supply services must be paid according to its readings.
About the calibration interval of the water meter
Just a few years ago, the calibration interval for water meters was canceled in Russia. Prior to the adoption of Decree No. 821 (it was approved in February 2004), hot water meters had to be checked every five years, and cold - every four years. The cost of such a check reached 1.5 thousand rubles, which was equivalent to buying a new device. Service firms resorted to all available methods to convince citizens to use their services.
Today, there are no such restrictions, and water meters can be operated until they fail.
Conclusions: the requirements of the companies-managers of firs regarding the mandatory verification of meters no longer have legal grounds. In other words, such services can be refused.


conclusions
As you can see, installing a water meter with your own hands does not require special material or labor costs. The most difficult thing in this case is bureaucratic delay, collection and approval of various documents, filing an application, etc. It is worth remembering that the correctness of the meter readings needs to be checked from time to time (fill two 10-liter buckets and see if the meter has wound up 20 liters or more /less).
For a more detailed acquaintance with the nuances of editing, watch the thematic video.
Video - Do-it-yourself water meter installation
The question of how to install a water meter is asked by many people, especially if we talk about residents of the private sector, whose water consumption in the summer can be more than a dozen cubic meters. It is difficult for them to do without a meter, since it is on this contingent of the population that the water utility is trying to write off all its losses of precious liquid in the process of its transportation to the consumer. How else? Watering, especially during the hot season, requires a large number water, which without accounting can turn into huge water bills. In this article, together with the site site, we will consider the issue of installing water meters from "A" to "Z" and learn how not to pay too much.
Do-it-yourself installation of water meters photo
How to install a water meter: what is required for this
We will not beat around the bush, but we will immediately deal with the question of what we will have to purchase in order to correctly resolve the issue of how to install a water meter on our own? And it doesn't take much.
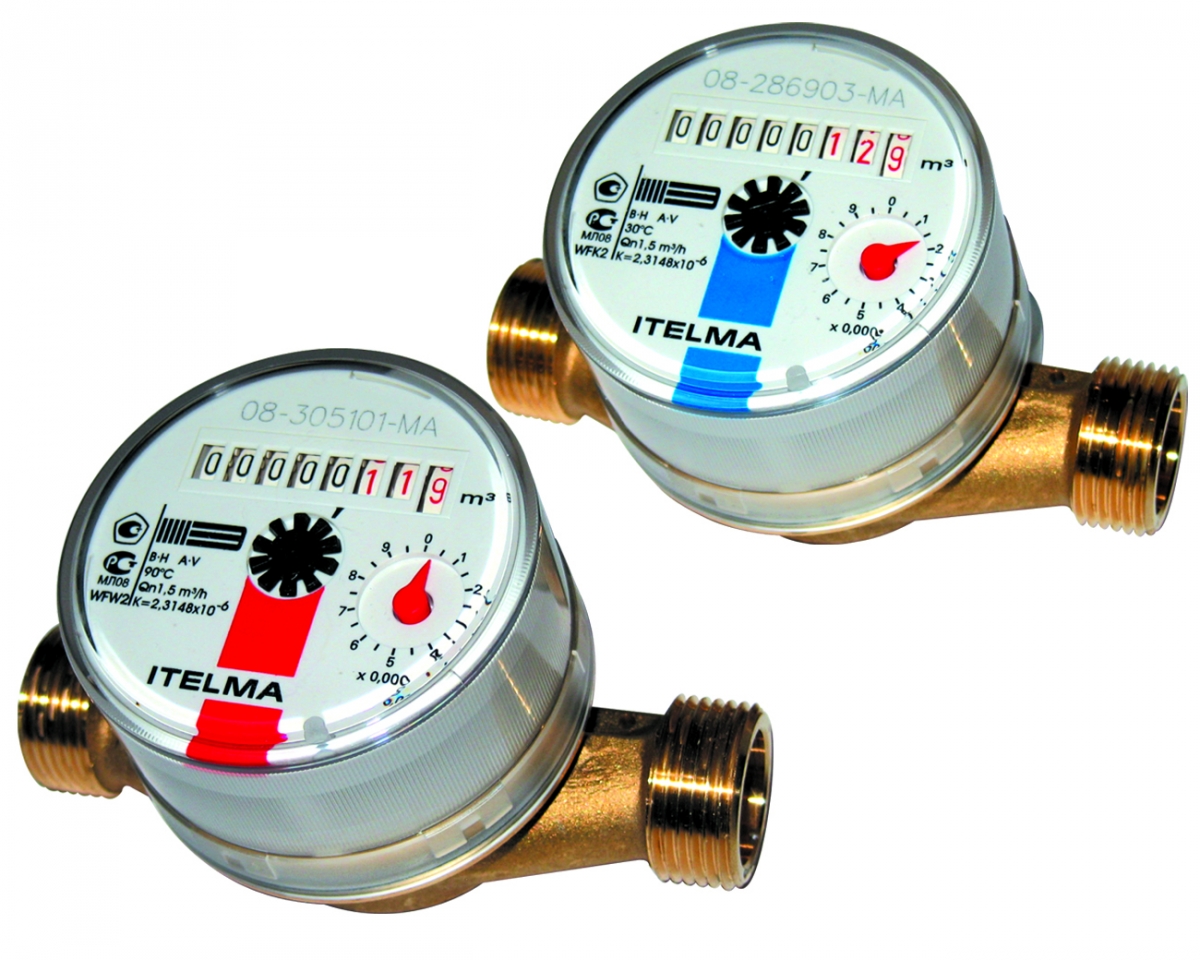
- The counter itself. In principle, you can choose any, even electronic counter water - the only question here is the expediency of such a purchase. For domestic needs, an ordinary mechanical device is quite suitable. The only thing you need to pay attention to is the installation diameter of the meter and its purpose (for cold and hot water, these devices differ not only in color). By the way, if we are talking about installing a meter for cold water, then you can safely mount both a red and a blue meter. But only a red specimen is suitable for hot water.
- Filter. Install it in your own interests - it protects the cold and hot water meter from debris contained in tap water. The filter traps large particles that can damage the meter impeller.
- Check valve. In principle, this is a requirement of the water utility - the check valve is designed to prevent the meter reading from being unwinded.
- Inset in . It is selected depending on the type of pipes - in any case, without a special limit switch that allows you to connect the water meter to the apartment wiring, you can do it only in the case of iron pipes. Then the trailer will have to be cut on the pipe yourself.

How to install a water meter photo
We seem to have sorted out the materials, now it remains to clarify the situation with necessary tools. Everything is extremely simple here - in addition to standard adjustable wrenches, you will additionally need a specialized tool for working with a particular pipe. You will need a soldering iron, a press and scissors for metal-plastic, a welding post for copper, and a thread-cutting machine for metal pipes.
Now that the situation with materials and tools is clear, you can begin to study the rules for installing water meters.

How to put a water meter
Do-it-yourself water meter installation: the whole process from start to finish
To master the technology according to which the water meter is installed, we will begin by studying the assembly of this unit as a whole. Subsequently, when we deal with this point, we will move on to the direct installation, which will seem to you already an easy and simple task.
So, we unpack the counter and find a bag in the box, in which there are two union nuts and gaskets for them. We take one of them and wind the tow on the threaded part (it is better not to use the FUM tape, the tow is more reliable). We wind it clockwise, holding the union nut in our left hand - we wind it as tight as possible, and most importantly with a cone, the thin end of which should be located at the beginning of the thread. The wound tow must be lubricated either with a special paste (Unipack), or with silicone, or with paint. Wound and lubed? Now we take the filter and screw the union nut into it from the side indicated by the arrow stamped on the filter - tighten it tightly with keys and set it aside.
How to install a water meter yourself
We do the same with the other union nut, only we screw it not into the filter from the other side, but into the non-return valve from the side of the opposite end, which is indicated by the arrow stamped on it. Tighten the keys again. If your water supply is not assembled from metal pipes, then on the other side of the check valve we install, using the same tow, a trailer with an external thread corresponding to the type of your pipeline.
Now is the time to put all our pieces together. To begin with, we take the counter and closely study its back side. The goal is to find the arrow. Found? Then we take the union nut and check valve twisted together, insert the gasket into the nut and screw the nut onto the meter from the side where the arrow points. In the same way, using a gasket, a union nut with a filter is screwed to the back of the counter. We check that all three arrows point in the same direction - from the filter towards the check valve. This is important - otherwise the system will not work. At this stage of work, the cap nuts can not be tightened with wrenches - you still have to unwind them in the process of solving the question, how to put the meter on the water?

Installing a cold water meter photo
In this form, the assembled meter crashes into the plumbing system. Installing a cold water meter is done in exactly the same way as installing a hot water meter - there is no difference.
How to assemble and install a water meter, see the video.
How to embed a meter in a water supply system: the subtleties of the work performed
Let's start in order, and to begin with, we will select the section of the pipeline into which the meter will crash - as a rule, it is located immediately after the tap that cuts off from the riser. We attach the assembled assembly to the place of its installation (be sure to take into account the thread entry) and mark the place of the cut of the water pipe from below. Again, do not forget to take into account the thread, if we are talking about iron pipes, as well as the section of the pipe necessary for connecting to the trailer, if the tie-in is carried out in polypropylene, metal-plastic and copper water pipes.
Now we take a grinder or scissors for plastic pipes and cut out an unnecessary piece of pipe. If we are talking about a metal pipe, then at its lower end, using a thread-cutting device, we roll a thread. If the water supply is made of plastic, then we proceed to the next stage of work, which provides for the installation technology of a household water meter.

Installation of a water meter photo
Now we disassemble our assembly (in order not to get confused, we do it in parts) and first we disconnect the union nut from the side of the filter and install the separated assembly directly on the shut-off valve. If the threads do not match, then between them it is additionally necessary to install a connecting nipple of the appropriate diameter. All connections are screwed together with tow and tightened tightly with keys. We do the same with the other part of our main assembly - we disconnect the union nut from the meter and screw the disconnected assembly onto the second end of the pipe. In the case of plastic pipes, this assembly is either soldered or connected to a fitting.
Now it's up to the small thing - to insert a counter between the two union nuts and do not forget to install the seals, then tighten the nuts tightly with wrenches. Be sure to check the direction of the arrow on the meter - it should point from the shut-off valve.
That's all, now we can safely say that the question of how to install a water meter has been completely resolved. It remains only to check the correctness of the connection, and if everything is fine and there are no leaks anywhere, you can contact the water utility and invite a specialist for sealing. You will start paying for the meter from the moment the seal is installed, and this moment will be recorded by the water utility employee.
If you do not have a water meter, then you are a rich person and are ready to support everyone who does not pay for water consumption in your house with your money. Since 2013, the installation of a water consumption meter in a private house or apartment has become a mandatory rule. Therefore, specialists from the housing office, house service or city water utility quite often began to tell tales that installing water meters with their own hands is not allowed and requires a special project. The purpose of such tales is simple - to earn an extra penny on a simple and affordable procedure for installing a water meter.
In reality, the law and the rules for installing water meters stipulate cases when the installation of water meters will require the involvement of a trained specialist in the procedure. For example, if in your apartment building hot water is supplied according to a two-pipe scheme, or a fire hose coupling is made on the pipe in the well. In such situations, you need to go to the experts, in other cases, installing a water meter with your own hands is a perfectly reasonable solution. You just need to figure out how to properly install the device.
How to install a water meter yourself without gross errors
Most often, when installing water meters, one has to face several problems of the following nature:
- In order not to litter the wall in the toilet with additional taps and pipes, a small niche is cut out in the wall adjacent to the riser. Next, the body of the water meter with a tap and a filter is installed on the pipe, the opening is laid with a brick, leaving a small window with a door, the size of a meter, for taking readings and checking seals;
- The metering device for consumed water is installed on a “rotten” riser pipe, with a poorly functioning tap at the input. In this case, before installing a water meter, you should replace the riser or, at least, change the outlet from the pipe with a valve, otherwise gusts and leaks occur even from a small load on a rusty pipe;
- For installation, a water meter was bought very cheaply, from the hands, from the same employees of the water utility or housing office.
Important! You need to buy a water meter on your own in places where they will not just sell a box with a meter, but offer the opportunity to choose from several options, write out a check and issue a set of documents for the device.
Install a water meter with your own hands
All three cases are due to the desire to save on installation costs. In such conditions, any of the plumbing professionals will offer to do everything “humanly”, for an additional fee, or you will have to install the meter yourself. How exactly to proceed is up to you.
We buy a counter
In building supermarkets, the risk that you slipped a substandard option is minimal, but it exists. Even in expensive models, the share of sales defects is at least 1%, so when buying, be picky to the point of tediousness, check the package according to the packing list and product passport.
![]()
If instead of a printed form you were given a photocopy with the device number entered by hand, you should take a closer look at the water meter - in this way, counters repaired under warranty are most often sold.
Be sure to check before buying:
- Number and series of the device, stamped on the body or under the glass of the front panel;
- Completeness. A water consumption meter necessarily comes with a pair of connecting fittings with union flange nuts and a set of gaskets, usually silicone for “cold” and paronite for “hot” water meters, a warranty card and a passport. Everything else, a tap and a filter, can be completed at the discretion of the manufacturer;
- Factory seal on the case. This is a confirmation of the guarantee, an exchange for a warranty case is possible only with a whole sticker seal;
- Signs of a used product. If you are buying new counter, there should be no traces or marks on the joints and threads, indicating the assembly of the device and its use or installation.
Advice! A new product will always be packed in sealed plastic bags.
In addition to the meter itself, you need to buy a check valve, a filter for cleaning water from debris, a faucet and a winding tape, popularly referred to as a “fumka”. If you have doubts about the brand, model of the water meter, do not hesitate to ask your neighbors for an opinion about their meter before installation, and even better, from a water utility or housing office specialist.
Preparing to install a water meter
It is rare that the outlet from the pipe of the cold and hot water riser is carried out using a threaded tee, as in the figure. Most often, the outlet is simply welded into the riser pipe by welding, then an outlet valve is mounted to the outlet. From the moment of commissioning, both the outlet and the valve often corrode and become unusable. Therefore, in order to prevent the installation of a water meter from leading to a break, breakage or breakthrough of water, you should first knock out or open the space around the inlet and carefully check the condition of the pipe metal.

If you see rust and traces of water leakage, the best option would be to invite a housing office specialist who will turn off the water and help deal with the condition of the pipe.
If a plastic riser is installed in your house, in addition to the above, you will need a small piece of plastic pipe, a tee and a coupling necessary to insert the meter into the apartment's input line. Any work with the riser must be done with the water turned off.
Advice! In any case, at the first opportunity, make an audit and check the operation of the inlet tap, lubricate the threads and remove the layers of dirt present in the water.
This does not mean that it needs to be changed urgently, many valves installed more than 20 years ago remain operational for a long period, but require cleaning, maintenance, replacement of the sealing element, and lubrication. With careful maintenance and use, they can last at least another 10 years.
Most of the ZhEK specialists, plumbers will be happy to remove and take such a tap from you under the pretext of its unsuitability for work, installing a new, expensive beautiful valve on a spherical element bought for your money. How long such a Chinese miracle will last is unknown. When replacing the outlet on the water supply riser, it is most often necessary to weld it in by welding with a metal-plastic adapter, followed by the installation of a polypropylene tap and a threaded outlet for installing a filter, meter and check valve.
If your apartment is supposed to replace the output with a metal valve and steel pipes, it will be necessary to initially weld a tap with a thread of the required diameter into the riser pipe, install a tap with a metal drive, to which the entire water meter set will be attached. In any case, the initial connection to the metal riser will need to be made by gas welding. A niche or a window in the wall around the old entrance is dismantled, the bricks are carefully knocked out of the masonry to make a window of at least 30x30 cm.

If you have new metal or plastic pipes in your apartment, and there is no need to make repairs in one part of the water supply with replacing a tap, you can immediately proceed to installing a water meter in your home water supply.
Installing a water meter
Before installing the meter, make sure that you have all the parts necessary for its operation. Next, we will assemble the filter, the meter and the check valve with an ordinary wrench, after installing the gaskets and winding the “fumka” tape in a couple of turns along the thread. In this case, all threaded connections, nuts and spurs should be wrapped to the end, but with little effort.

Having collected all the nodes in one design, we get the product shown in the photo. Such an assembly will help you choose the most convenient place for installing the meter, determine the length of the inlet and outlet pipes. The meter can be installed both vertically and horizontally. The inlet pipe of the water meter body is installed no more than 200 mm from the inlet.
When choosing a location for the meter, consider the following:
- The body of the meter should not be affected, touched, supported by any pipes, fasteners;
- The position of the water meter should make it easy to apply a seal, check its integrity, read the readings;
- No liquids, including detergents, should get on the counter. It is strongly not recommended to paint over all the elements of the meter, including the meter itself, with paints, lubricants, or any decorative compositions.
To install the meter on a metal water pipe, it is necessary to disassemble the preliminary assembly of the meter, remove pieces of packing material, install silicone or paronite gaskets under the union nuts and shackles. Next, we reel up the “fumka”, we screw the coarse filter onto the thread of the drive to the meter inlet. We screw the check valve to the outlet thread of the meter.

All connections are carefully, with effort, tightened with an adjustable wrench. Thus, we got the same assembly that we used earlier to determine the dimensions for installing the meter, but with tightened threaded connections. At the same time, please note that the filter, the device body and the check valve have arrows in the direction of water movement, which determine the correct position of the elements in the assembly.
It remains to screw the assembly to the squeegee coming out of the inlet tap, the second end of the assembly - the thread at the outlet of the check valve, is connected to the squeegee or coupling of the rest of the apartment's water supply.
If you have a plastic water supply system, then we will insert the assembled meter with a valve and filter into the water supply system in the following order:
- In the selected area for installing the meter, mark with a marker the length of the meter with a filter and a valve;
- According to the chosen measurements, we cut off a section of a polypropylene pipe with a knife or a hacksaw. At the same time, the water must be shut off, the remaining water must be carefully removed, and the cuts on the pipe should be wiped with a dry rag and prepared for soldering and installation;
- Using a soldering iron for polypropylene water pipes, it is necessary to solder two plastic couplings with a transition to a metal thread;
- We wind 8-10 turns of sealing tape on the threads of the soldered couplings and install, tighten the meter with a filter and a valve, thereby connecting the water supply to the tap at the inlet.

Final steps for installing a water meter
When choosing the location of the water meter, it must be taken into account that after 3-5 years you will need to remove it and give it for verification. At the same time, at the time of testing the device, instead of it, it will be necessary to install a connecting pipe - a drive. If your house has metal water pipes that are more than 10 years old, or the water is often turned off, be prepared for the fact that at least once a quarter or half a year it is necessary to clean the mesh of the coarse water filter from rust and debris. The connections are tightened once, immediately after installing the device and turning on the water.

If, after assembly and installation, water leakage is detected on the connections, you should not try to eliminate the water leakage by additionally tightening the union nuts, spurs. It is necessary to disassemble the connection, replace the tape and repack the connection again.
Conclusion
If you managed to put the meter correctly at least once in your life, you can freely and without problems remove it, maintain it, change it. When installing and subsequent operation of the water meter, pay attention to its operation in various modes. Like all metering devices, water meters can lie both in the direction of underestimation of readings, and in the direction of overestimation.
Installation of water meters is carried out by management companies, as well as contractors accredited by the company. To begin with, of course, it is advisable to decide, and only after that think further. Installing a counter for purposes is not always a justified undertaking. Therefore, in order for the management company to begin taking readings from your meter, you will need to seal it. If you decide to install a water meter with your own hands, it is better to familiarize yourself with the list of approved meter models and the requirements for their installation in your management company. The main such requirement is often the installation of coarse filters and a check valve, and less often a pressure reducer. (On how to make repairs with your own hands, read)
When working, remember that installing a counter with your own hands, you can create an emergency in the house. Therefore, just in case, find out the telephone numbers of emergency services, when doing work, do not forget to turn off cold and hot water in the apartment, and also stock up on a bucket and rags.
Choosing the right installation location
If you decide to install a water meter, you need to choose the right place for it, as it should be convenient for you to take monthly readings from it. Various unplanned situations may also occur when access to the meters is necessary, for example, to clean the coarse filter. Keep this in mind when installing meters.
Choosing and buying water meters
There are some nuances in the process of buying a water meter. To account for water in an apartment, water vane meters 15-1.5 are suitable, you will need 2 pieces. It is also important to know that it is forbidden to install a cold water meter on hot water, while hot water meters are universal and can also be used to measure cold water.
Make sure that the kit includes a factory passport, which should contain stamps and product certification marks, as well as detailed instructions for its installation and operation. Counters are sold in specialized plumbing stores. During the purchase, please note that the numbers on the meter body match the numbers in its technical passport. This is very important for the management company, which will not take the meter into operation without these characteristics.
If the meter kit includes plastic fittings, replace them with brass ones, and paranitic gaskets with silicone or rubber ones. This will protect the structure from leakage in the very near future.
To install the counter yourself, you may need additional materials and tools:
Coarse filter, which prevents your meter from becoming clogged with coarse impurities in the water such as rust and scale. An oblique filter is mainly used, as it fits any kind of pipe. You will need two such filters, for hot and cold water. Please note that often filters are sold with a counter, you need the size Ф15.
Check valve. You need 2 pieces for hot and cold water. A device that allows water to flow only in the direction of water flow. This valve gives you the added benefit of preventing water from mixing in the faucet, preventing so-called back-mixing. Attention! Some models of meters and filters are already equipped with a built-in non-return valve.
Pakovka. Helps to seal threaded connections, protecting them from leakage. In plumbing, linen is traditionally used for this, as well as modern tapes and threads (Unipack, Tangit unilok). You can seal the thread with both linen and thread at the same time, winding it on top.
Mounting clamps for fixing the angle to the sewer riser D = 100 mm (2 pieces), clamps reinforcing meters to the angle D = 80 mm (4 pieces), two aluminum corners 40x40 mm and a length of 500-600 mm (2 pieces).
Polypropylene pipe(diameter in place) or flexible piping (2 pieces) dy=12 and length from 0.5 to 1 meter. On the flexible hose, there should be a union nut on one side, and a thread on the other.
Wrench at 27
adjustable wrench up to 30 mm or gas wrenches.
Hacksaw, grinder or scissors for plastic
Calibrator
soldering iron for polypropylene pipes
Couplings, to switch to a different pipe diameter, the number depends on the diameter of your pipes
Flipper½ inch, for connecting polypropylene pipes, quantity on site
Do-it-yourself water meter installation
1. Before installing the meter with your own hands, make sure that there are no leaks and unaccounted water intake points in the pipes to the meters. Also make sure the stopcock is holding water.
2. If everything is in order with the tap, we turn off the hot and cold water in the entire apartment, if not, we change the tap. When replacing a faucet, pay attention to the tie-in (thread) of the faucet, in what condition it is. Determine how many turns you can screw on the tap thread. If it turns out less than 4.5 turns, cut the thread with lerks so that, together with flax or thread, the crane is screwed up by at least 4 turns.

3. Cut off with the help of a piece of pipe going after the stopcock to the sources of water consumption. From the stopcock, using an adjustable or gas wrench, we unscrew a piece of the old pipe. Be careful not to damage the tap when unscrewing, otherwise an accident awaits you.
4. We proceed to the assembly of the meter structure in the following sequence. Take a coarse filter, wind it on the tap, first without flax. Check how many turns it spins. To prevent the tap from bursting, do not twist it, if you twisted the tap by 3.5 turns, then twist it with flax or thread by 3.
5. Next, we screw in the fitting, a union nut is included with it, which allows you to remove the water meter at any time without damaging other elements of the plumbing system. With union nuts, the meter is attached to the filter from the side of the water inlet after the fitting, and from the side of the water outlet to the check valve, then the fitting. The connection takes place with the help of silicone or rubber gaskets, and not with the help of linen and connecting threads. Attention: you can specify all the nuances associated with the counter in the instructions attached to it.
6. When you install water meters with your own hands, the most common mistake awaits you - non-observance of the installation direction of the meter elements. For your convenience, arrows are marked on all parts, all these arrows should look in one direction, namely in the direction of the water flow. Look for arrows on the filter housing, meter and check valve. During installation, look in which direction the water direction arrow on the meter points. If there is no arrow in the meter model, we are guided by the grid, where there is a grid - this is the entrance of water, where there is no - the exit.
7. As a result, you got the following design: stopcock, coarse filter, meter, check valve. The structure is attached to the pipes with the help of packaging (linen, threads), the remaining elements are interconnected with the help of gaskets.
Inserting the meter into the plumbing system.
The complexity of installing a water meter in a water supply system depends on the material of the pipes from which it is assembled. If the water supply is made of polypropylene pipes, then you screw the adapter into the check valve. You did not forget that you connected the check valve with a union nut and a fitting, these are the necessary parts for connecting to pipes. Therefore, strictly speaking, you connect the coupling to the valve through a fitting, using a package to prevent leakage. Then solder with plumbing, this process is not very difficult even for a beginner. For this, a special soldering iron is used, and installation is also possible using ½ inch fittings and glue.
Iron pipes are a thing of the past, so even if your wiring is not modernized, it is better to connect the site with a polypropylene fitting and a pipe. Measure the length of the structure, step back another 20-30 cm from it and cut the pipe with a grinder or a hacksaw. After cutting, the pipe will be slightly wrinkled at the ends, straighten the circumference with a calibrator. Cut the thread on the pipe with lerks and connect this section with polypropylene fittings and a pipe. This option is also possible: screw the fitting into the check valve, then connecting it to water pipe using a flexible stainless steel hose (dy=15, length from 0.5 to 1 m. depending on the location), do not forget about packing.
The installed meter will have a rather heavy construction in relation to the pipe, so it is advisable to attach it to the wall with mounting clamps. This is necessary to eliminate the possibility of a fracture of the meter design and in case of accidental impact. We apply the corner to the sewer riser, mark the holes for the clamp, then drill and fix it. We place the counter on the corner with the help of clamps, fasten it to the connecting fittings.
We invite you to watch a video on the topic:
“HOW TO INSTALL A WATER METER WITH YOUR HANDS”