We are always striving for something better. This may be expressed in the acquisition of a new model of phone or tablet. Someone wants to have a new dress for every party or event. And such a desire does not bypass the decoration of our homes. That's why the renovations are starting. In fact, this is not bad, because modern building materials are becoming cleaner, in terms of ecology, which means they do not have such an impact on health. But the rework can only be started, and it takes years to finish, because in the process more and more new ideas appear.
Even a purely cosmetic intervention in the decoration of the walls cannot but affect the door jamb. If you leave the jambs as they are, then they will not be able to blend harmoniously into the interior and will be an eyesore. This is the reason why it is important to consider ways to finish the jambs. front door. Ultimately, it is by the entrance that the owner and his character are often judged.
A bit of theory
We remember what a door jamb is when we hook it with our little finger in the dark, passing from room to room. It is also called a box. Simply put, this is a rectangular or square frame on which the door itself is mounted. The door jamb serves as a layer at the junction of the door and the partition. It is necessary for a snug fit of the door plane. With regard to the front door, this allows you to reduce heat loss, as well as provide good sound insulation.
The material of manufacture of the jamb of the front door depends on what the door itself is made of. If this metal-plastic construction, then the box will be the same. The most commonly used wood or metal. In the first case, it is good if it is oak, beech or hornbeam. These rocks have a dense structure and are less susceptible to destructive actions. Along with this, they also require a lot of effort in processing. Metal jambs are assembled from a corner or less often from a square.
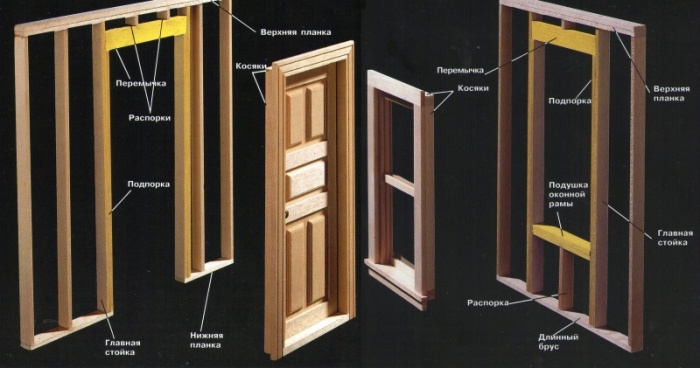
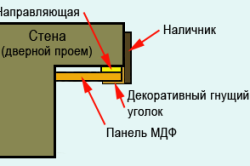
The main components of the finished door jamb are:
- door frame;
- dobor;
- door jamb catcher.
There are times when it is not possible to match the width of the box to the thickness of the wall. To close the remaining slope space, an extension or an additional bar is used, which is fixed nearby. The trim closes the gaps and material that remains between the jamb of the front door or the extension and the wall. Their color is matched to the color of the interior doors and their architraves, only in this case it is possible to achieve the required harmony.
Note! In carpentry, a door jamb is understood to be a wooden box, in everyday meaning under door jamb the ends or slopes of the doorway are implied.
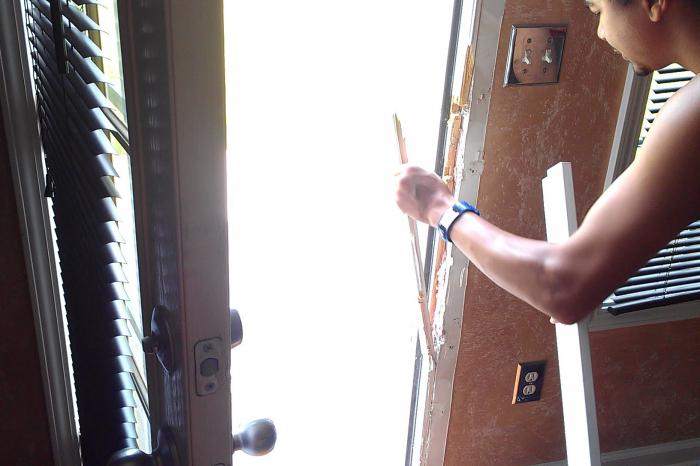
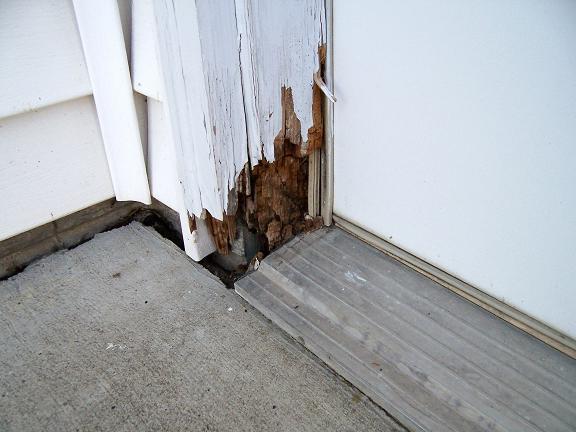
Repair or replacement
Important! If you notice that a shashel has started up in the box, then it must be replaced. After that, a careful inspection of adjacent jambs of internal doors is carried out and disinfection is carried out. If this is not done in a timely manner, then everything that is made of wood in the house may suffer.
With metal door frames a little easier. Replacement is required only in such cases:
- deep-seated rust;
- serious damage.
If none of these factors apply to your situation, then the restoration and restoration of the door frame is carried out.
Mounting
If you have the necessary machines and the skill of a carpenter, you can make a door frame completely on your own. But this is more an exception than a rule, so it will be cheaper and easier to purchase a ready-made door frame. Before you go to the store, you will need to take certain measurements:
- door width;
- the width of the opening without taking into account the box;
- the height of the opening, excluding the box;
- doorway width.
These numbers will help you choose a product that will require less refinement. The door frame kit usually comes with two vertical posts and a horizontal lintel. When the door is double, you will need two complete sets or one more lintel if it can be purchased separately.
To carry out the installation of the door frame, you will need the following tool:
- hacksaw or electric jigsaw;
- level;
- mounting foam;
- anchor dowels;
- self-tapping screw or screwdriver;
- plane;
- square;
- miter box;
- roulette;
- pencil or marker;
- perforator with a consumable.
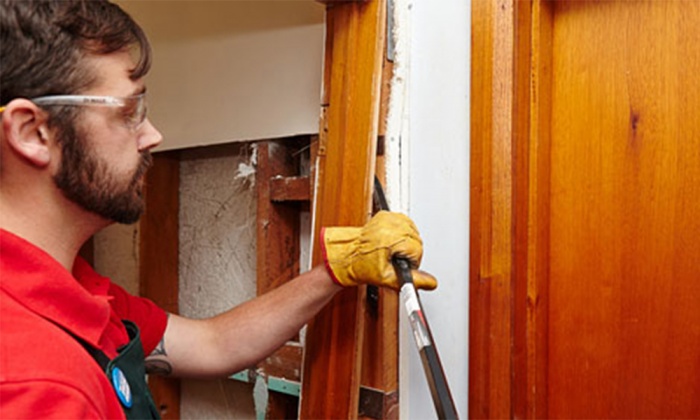
First you need to dismantle the old door frame. Do not rush to throw away its components, you may need them as additional temporary spacers when installing new door jambs. The condition of the slopes is assessed. If they have a cement-sand composition that is sprinkled, then it is better to knock it down before a stone or brick appears. Next, the process is:
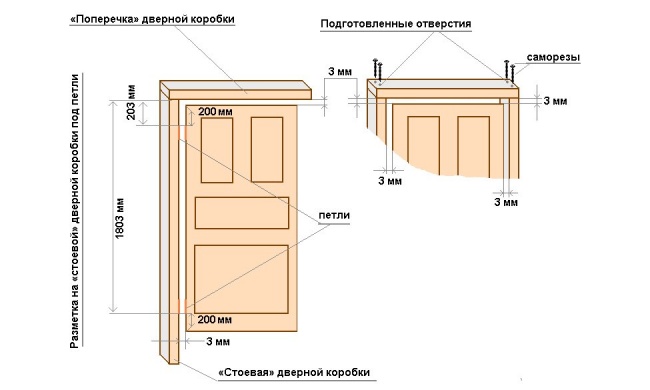
- Once again, measurements of the doorway are made. The parts of the box are laid out as they will be mounted. Dimensions are transferred to the risers and the crossbar of the door frame. They are usually made with a margin, so you can cut off excess parts with a hacksaw. To draw a straight line, you can use a square or miter box. It is worth considering that the height of the side parts should be less than the thickness of the crossbar.
- All components of the door frame are joined together. To comply right angle you can use a metal square.
- Using a screwdriver, several self-tapping screws are screwed in so that the structure becomes one-piece.
- In the side faces of the wooden box, several holes are drilled with a drill, through which anchor bolts will be threaded.
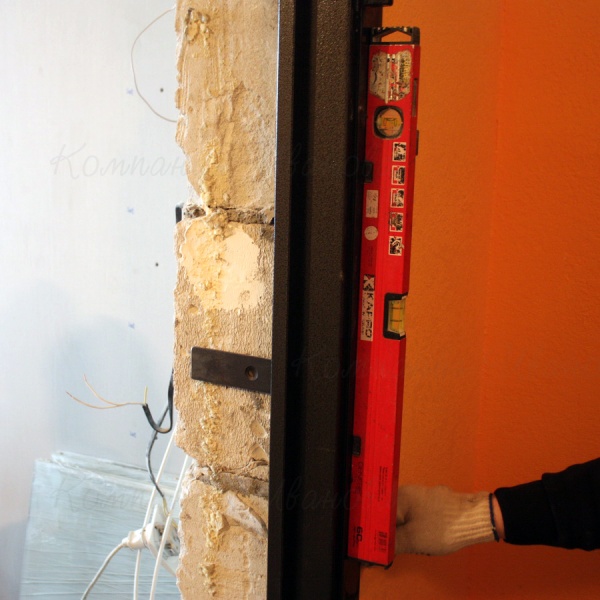
- The box is inserted into the entrance doorway. With the help of a level and a plumb line, the correctness of its positioning is checked.
- A wall is drilled with a puncher through the finished holes in the door frame and anchor bolts are installed. The level is checked again.
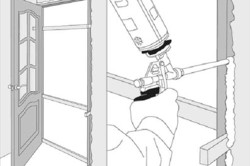
- The space between the box and the slopes is blown with construction foam.
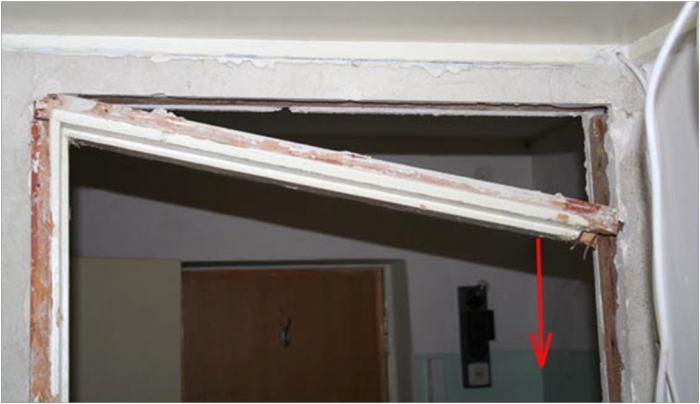
- A temporary transverse bar is mounted, which will not allow deformation to occur.
- In this position, it is necessary to leave everything as it is until the foam has completely solidified.
Note! The installation of the metal box of the front door is carried out according to a similar algorithm. The difference lies in the need for additional tools, such as a grinder and a welding machine, if the box itself is assembled on site.
Finishing
Installation by installation, but the aesthetics of the front door should be on top. To achieve this, the door frame can be painted, opened with varnish or duct tape. The first and last options are suitable in cases where the door frame has a nondescript appearance, for example, many chips or other defects, or you need to choose a specific color to harmonize with the internal door jambs or the overall interior. In other cases, you can use varnish. To do this, the door frame is cleaned with fine-grained sandpaper, the first layer of varnish is applied, then the raised fibers are cleaned with fine sandpaper and a layer of varnish is applied again. This will need to be done three times. After complete drying, the door leaf itself is mounted.
If the width of the wall is greater than the width of the door frame, then the slopes also require finishing. To do this, you can use the extensions mentioned above. They are leveled and attached to the wall with self-tapping screws and dowels. Instead of extensions, a wooden or plastic lining is suitable. If there is a desire to paint the door slopes, then they can be plastered and puttied or mount drywall. Door slopes can also be overlaid decorative stone, for example, a savage or naked. The final touch will be the installation of the front door trims. To make the docking points look neat, it is recommended to cut them at an angle of 45º. A miter box or square will help with this.
With a strong desire and the availability of time, all work on finishing the jambs of the front door can be done independently. This will raise self-esteem and gain experience that will definitely come in handy in life.
During the repair of an apartment or house, the problem of restoring old doors and jambs often arises; in some cases, they need to be replaced. Which doors to choose, how to properly and tastefully finish them? There are many questions. If it is not planned to implement an exclusive design project for a home, then this article may provide an answer to some questions of interest.
What is a door jamb
The door jamb, or box, consists of two pillars and a cross member; the box also includes a special bar that helps stop the door leaf. The most popular material from which they are made door jambs, is a tree. Except wooden structures, boxes are metal or made of special materials. The width of the jamb is equal to the thickness of the partition. Slotted jambs, cross bars and special slats are cut to size and boxed at the factory.
Strengthening the door frame
Sometimes delivered in a collapsible form, it will need to be assembled and firmly connected at the corners with nails. It is clear that this applies only to wooden jambs.
Before making a jamb, it is important to know that it needs to be strengthened, for this you need to frame it around the perimeter with a metal corner and fix it to the wall with iron pins about 120 mm long at a distance of 700 mm.
An iron door, that is, a box, is welded along the circumference to metal pins, which are firmly embedded in the doorway. must be reliable and made of durable material, preferably steel. Fastening is usually carried out with screws, screws or welding, it all depends on the material from which the door frame is made.
When the door opens outward, end hooks or anchor pins are installed on the side of the hinges. This device interferes in case of trimming the loops. Hooks are made of a metal bar having a cross section of 6-8 mm. When reinforcing door jambs, it must be remembered that the door leaf must be made of high-quality and durable materials.

How to make your own door jamb
In the manufacture and installation of door frames, certain requirements and technologies must be observed. Before making a jamb, you need to prepare thick logs. If you have building skills, then this will be quite easy to implement. If there is no such experience, then in this case it is best to seek help from specialists in their field.
The logs are split into 2 or 4 blocks using wedges. Four-rolled bars are machined from the obtained parts. On one side, a groove is made for fastening to the wall, and on the other side, one quarter is removed, into which the door leaf will subsequently fit. This example of making a door jamb is applicable for wooden house. The next stage is sawing spikes from the ends of the logs, corresponding to the dimensions of the grooves on the bars. Fitting must be done very accurately so that during further use marriage does not appear - loosening of the door frame and the appearance of cracks. After all preparatory work it is necessary to install the jamb on the prepared place, that is, on the finishing of which in the future will be carried out according to your taste and preference.
Necessary tools for making a door jamb
Tools that are useful for making a door frame:
Hacksaw;
Building level;
Roulette;
Pencil;
Plane;
Chisel.
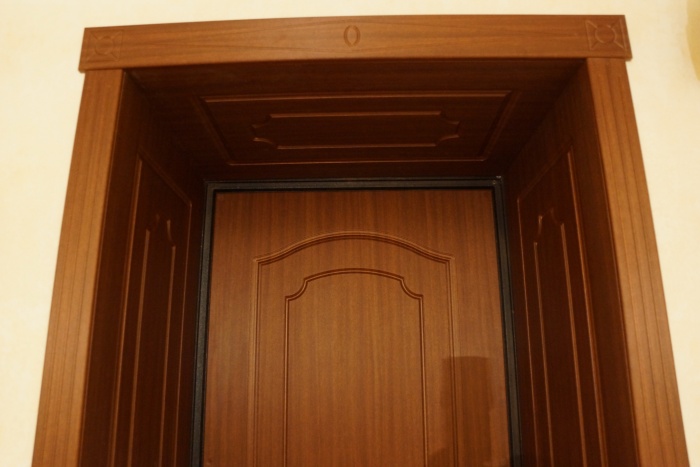
External door jamb
Existence of external finishing of a door jamb gives the finished look to all aperture. In construction magazines, you can find various finishes: how to arrange or jamb (photos of which are presented in large numbers). It is necessary to carry out external decoration with your own hands in stages:
1. First, the door frame is measured, after which the dimensions are transferred to a separate bar, which will later serve as an external jamb. Color and texture are chosen in accordance with their taste preferences.
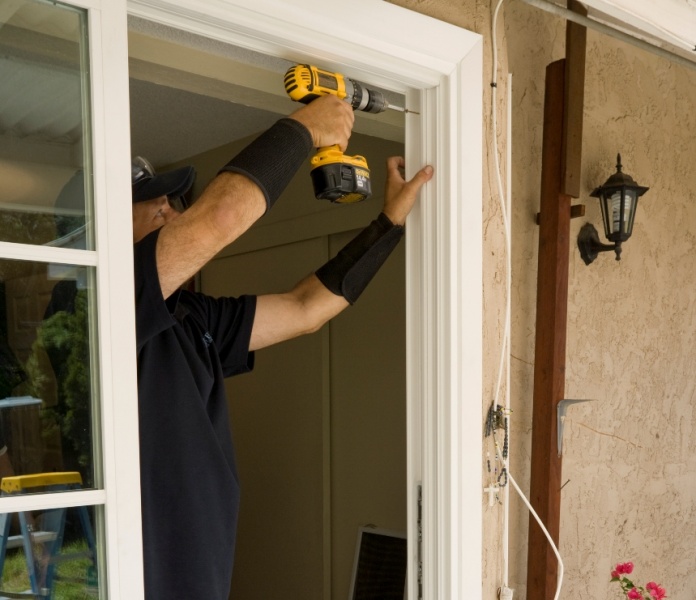
2. The planks are sawn to size, aligned along the outside of the opening and the necessary measurements are made using a level and a square, observing an angle of 90 degrees. When everything is done, the slats can be nailed onto the door jamb, the photo of which is presented below. First, mount the top bar.
3. The final stage is the threshold, which closes the inner area of the doorway. It must be manufactured and exactly aligned with the outside of the box.
![]()
Some nuances when installing platbands
It is necessary to install platbands or a finishing frame on the doorway, the finishing of which will give a finished and aesthetic appearance to the structure. You can choose the required trim from a large number standard, presented in the hardware store. They are fastened with finishing and liquid nails, self-tapping screws. Some tips that will make it easier to install trim on doorways:
1. Self-tapping/nail heads or small cracks can be covered up with wax corrector or acrylic-based sealant.
2. The gaps at the junction of the planks with each other can be eliminated with one finishing nail.
3. Large defects in the door frame can be hidden with wider architraves.

Ways to finish door jambs
There are cases when it is necessary to change only the canvases, and the door frame remains the same. In this situation, it is recommended to repair the door jambs so that the new leaf does not particularly stand out against the background of outdated and deformed platbands. You can finish the jambs for every taste, it all depends on the chosen end result. There are many ways to make a door jamb so that it matches the overall interior of the home, here are some of them:
1. Paint the jamb. To do this, you need to walk on its surface with sandpaper or sandpaper, first coarse, then finer. This will remove the top layer, which has already peeled off in some places or is simply damaged by time.
2. If the jambs do not have openwork patterns, they can simply be sanded with a machine. Then it is necessary to cover all cracks and recesses with a special putty for wood, after drying, varnish.
3. Cover the jambs with self-adhesive paper. To do this, remove the door from the hinges. Remove all dust and dirt, and possibly grease, with detergents or alkali. It should be borne in mind that door jambs, that is, their surface, must be painted or varnished. Next, strips of the required size are cut out, the bottom paper layer is removed and glued to the work surface.
Common materials for finishing doorways
High-quality guarantees an aesthetic appearance, as well as sound insulation and tightness. Materials that are in demand for finishing doors:
MDF panels or laminated fiberboard. These materials are durable, environmentally friendly and hygienic. They have excellent sound and heat insulation qualities.
Drywall. Before making a jamb, you can see photos of various modifications in advance, and you may choose the right option for finishing the doorway. Drywall is a great alternative to plaster. This finish is a simple, fast and aesthetic way to decorate a surface.
Sandwich panels. This material has excellent noise and sound insulation properties. Most modern method finishes.
Basically, this material is used to decorate door jambs without using doors, for example, arches.
The classic version is plaster. This type of finish, in addition to its aesthetic properties, retains heat well and has high strength.
As you can see from this article, there are many design options. doorways. The main thing is to choose the most suitable one according to your tastes and preferences. In addition, the finishing method must meet all technical requirements and criteria, then it will delight the eye with its appearance for a very long time.
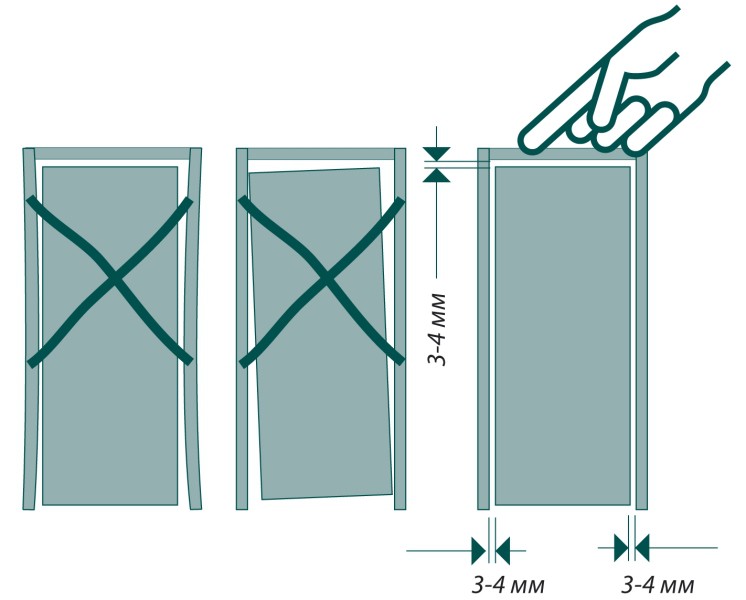
Doors are one of the few types of joinery that does not forgive mistakes. If you took the dimensions incorrectly or cut the parts at the wrong angle - that's it, you won't be able to correct the dimensions, you will have to redo everything again and use new materials. If the sawing angle does not match, then it is useless to seal the resulting gap with sealant. It may become invisible (although this is unlikely), but the strength of the structure will be significantly reduced. The individual elements of the box will not touch over the entire surface, but only at a few points. Accordingly, the loads on the bars increase significantly, such a door will not last long. Moreover, you have to use the door very often and with various efforts.
We mean that all work on assembling the door frame must be done very carefully and carefully. Technological gaps between the canvas and the box, the threshold and the floor are 2 ÷ 3 millimeters, with the same accuracy it is necessary not only to measure, but also to cut off all individual workpieces, to make accurate allowances for the width of the cut.
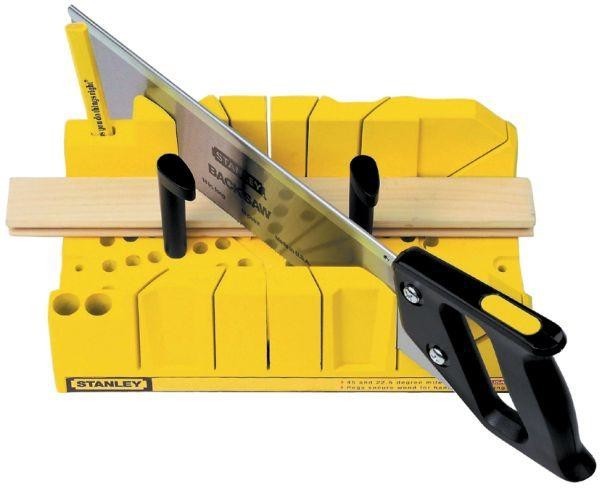
You must know your instrument and its " specifications". The tool must be sharp and serviceable, and the hand "firm and confident." We strongly recommend that all cuts be made with an electric saw with a rotating table.
Why not in a chair? The answer is simple. If you use a miter box, then with great confidence you can say that you rarely do gashes, otherwise you would have bought an electric saw a long time ago. And since you rarely trim materials at an angle, then there is not enough practice.
Quite often you can hear another name for door jambs - these are decks, as professional builders will say. When installing jambs, all technologies and requirements must be observed.
Features of getting started
To make a door jamb, the tools are first prepared:
- level;
- hacksaw;
- roulette;
- plumb;
- pencil or marker;
- chisel;
- plane;
- axe.
To make a door jamb, it is necessary to prepare thick logs. If you already have certain skills in the construction field, then this will not be difficult, in the absence of such, you should trust the specialists.
First of all, the logs are laid out with wedges into 2 or 4 blocks. After that, four-rope beams are machined from the blocks obtained: on one side, a groove is made on it for fastening to the wall, and on the other side, one quarter is removed, into which the door leaf will subsequently fit.
Spikes are cut from the ends of the logs, which should correspond in size to the grooves on the timber. Fitting must be done very precisely, since, apart from the spikes, the door frame is no longer fixed with anything.
Usually wooden doors are chosen for the house, but since they are the heaviest, they can turn the decks out when fully opened. This leads to loose closing of the door, which, in turn, causes loosening. With ill-fitting grooves, the marriage of the door frame will begin to manifest itself immediately: loosening will begin, the formation of cracks through which the room will be blown.
After all the preparatory work, they proceed directly to installing the door frame in its rightful place. On both sides, the width of the door frame is made to the depth of the spike (fastening). The depth of the spike will depend on which decks are wide. After that, two development options are possible.
In the first case, an opening is cut out along the manufactured door frame, in the second case, an opening is first cut out, and a door frame is made directly under it. Some professionals over many years of practice have developed the ability to do everything “by eye”.
The hole is made using a plumb line to accurately determine the vertical on the frame and mark everything with lines that will mark the future opening. Using the level, they also mark the top and bottom, after which they begin to cut through the doorway according to the markings. If the sawn element is wide, then sawn-off bars will help you to install the deck, which will act as a kind of wedges. Thanks to this, the doorway can be not only rectangular shape, but even in the form of a trapezoid.
Execution of the outer door jamb
Having an external jamb on the door adds a finished look to your renovation. In order to work on exterior finish doors, you need to take a few steps:
- The door frame is measured, after which the dimensions are transferred to a separate bar, which will serve as an external jamb. The color and texture is chosen by the customer from a huge variety building materials on the market today.
- The sawn planks of the required dimensions are aligned along the outside of the doorway, after which measurements are taken using a level and a square. This is done to accurately maintain the angle of 90 degrees. If everything is done correctly, then you can nail the strips, starting from the top. The planks are nailed either with decorative nails, or with a special compressor.
- After completing all the work, you can proceed to final stage work - the threshold. It closes the inner area of the doorway. It needs to be aligned exactly with the outside of the box so it doesn't "stumble".
Reconstruction of door jambs and doors
Each of you during the repair faced the problem of a complete replacement of the door frame or a small reconstruction that can completely change the appearance of your door.
Availability in the house wooden door gives a lot of room for the imagination of the homeowner. The easiest way to restore can be grinding surfaces. With the help of grinding, you can level the surface and get rid of small chips and cracks. Sanding can remove not only paint, but also varnish. After the work has been completed, the surface is cleaned of dust and the reconstruction continues.
If there are deep cracks and potholes on the door, they must be leveled.
This work is done with a spatula using a special composition - wood putty. The mixture is produced both in a ready-to-use composition and in a powder that will need to be diluted.
After the surface is puttied, you need to wait until it is completely dry, and then perform another stage of grinding. If the door cannot be restored, then it can be completely closed, for example, with a chipboard sheet. This option is one of those that is called "cheap and cheerful."
The only problem with this option is the weight of the structure, but not critical. The chipboard sheet needs to be adjusted very precisely so that it does not interfere with opening and closing the system.
After all the work carried out, further decor depends only on your imagination: the door can be painted in any color, decorative trim putty or paste over the door with wallpaper. In any case, the design will depend on the general mood of the room and your imagination. After completing the decoration work, the door is varnished, which will significantly increase its service life.
The construction of a house or cottage on a turnkey basis implies the complete readiness of the building for occupancy in the shortest possible time. Team of professionals high level, high mechanization of labor, the presence of a special tool - components of high rates of work. Despite the obvious advantages, due to the high cost, such a service has not received wide distribution.
In order to save money, more often choose phased construction allowing some of the work to be done independently. The more the future owner of the house or cottage takes on such a load, the less burdensome the construction will be for the family budget. Installing door jambs can be on the list of avoidable costs. You only need to visit the interior doors store and choose the model you like.
The choice of jambs depends on the design of the house
If the house is a log or lumber building, the walls shrink during the drying process of the wood. The value largely depends on the initial moisture content of the material, the type of wood, and the place where the trees grow. For freshly cut coniferous species, a decrease in transverse dimensions within 5% can be conditionally considered. The length of wooden products does not change when dried.
This means that with a doorway height of 2 meters, it can decrease to 1 meter 90 cm. If this moment is not taken into account, the upper row above the jamb will eventually "sit" on it and with further shrinkage of the frame, a gap will appear in the wall.
It should be noted that when drying, the wood warps and the shrinkage of the log house, respectively, and the edges of the doorway, does not occur in a straight line. Walls, especially openings between windows, begin to bulge inward or outward. This is prevented by a device in the jamb of the groove, which is mounted on the tenon of the wall element. It turns out a kind of guide for the walls during shrinkage.
Houses and cottages of frame and stone buildings are not subject to such a process, and when installing jambs, you should only decide on the presence of a threshold, since this is decisive in the installation technology. The non-threshold scheme is appropriate for buildings with forced ventilation. In other cases, the practical load does not carry.
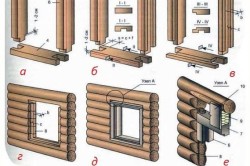
Jambs in a log structure
It is difficult to imagine a carved interior door on a rough jamb, which is called by the builders "deck". The problem should be approached in the following way:
- do doorway with the calculation of the installation of the deck and the subsequent fastening of the jamb that comes with the doors on it;
- the width of the decks is taken one and a half to the thickness of the wall. This will smooth out the unevenness of the walls at the interface;
- the lower element is a side base, mounted on it in a spike;
- the upper deck is placed in a thrust and hammered with wedges until it is connected into a spike with the side decks. A distance of about 7-10 cm should remain on top, which is subsequently clogged with sealing material.
A direct door jamb is mounted on the installed deck. The sequence of work is similar for houses of frame or brick construction.
Jambs in frame construction
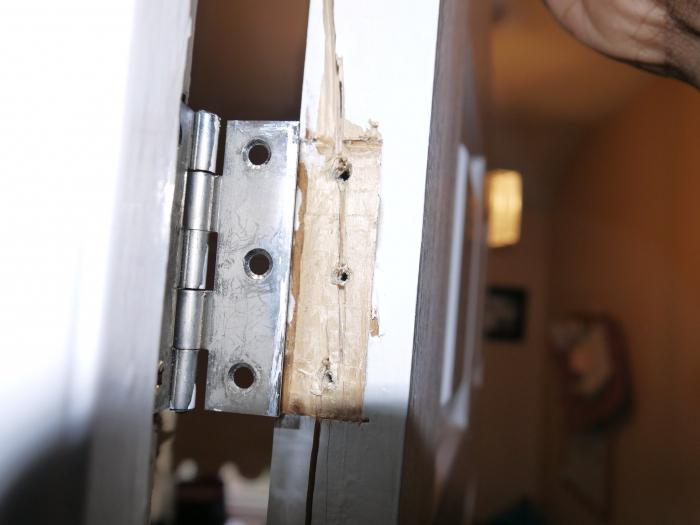
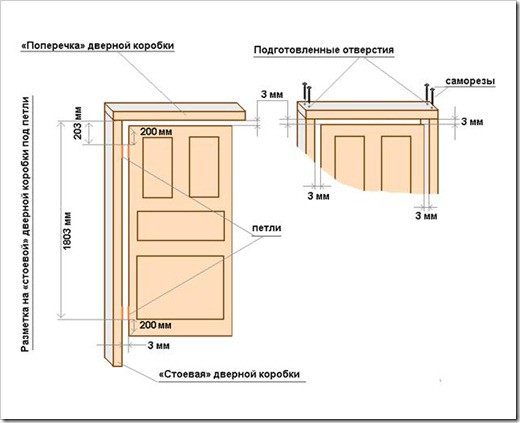
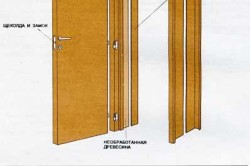
Initially, the jamb is assembled separately. The lower and upper elements are the seat of the side profiles. After they are cut to the size of the door, the structure is knocked down into small nails. After that, the jamb is checked by applying to the opening and laying the doors. At the same time, marking and installation of fittings is carried out: canopies, locks, handles.
The assembled kit is installed in place and fixed by wedging. The resulting cavities along the perimeter of the jamb are filled with mounting foam. The door should be kept closed to avoid sagging of the jambs. Pre-make the substrate on the groove. This will prevent tight shrinkage under the action of the foam. With this method of installation, additional fastening of the jambs to the wall is not required.
If the structure is non-threshold, both side profiles must be attached to the wall with self-tapping screws. The scheme of actions, with minor changes, is similar to the one above. To avoid the error, you can change the process a little:
- the jamb elements are cut out and coordinated with each other and with the doors;
- a restriction on the upper bar is fixed on the side profile, after which the door is applied to the mark and the installation locations of the fittings are marked;
- installation of canopies, handles, locks;
- the equipped side panel is attached according to the marking to the opening;
- the door leaf is hung and the side element is installed on it, and then the top one.
It remains to install the socket for the lock latch. Door tightness guaranteed.