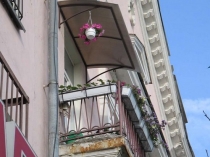
Often, there is no roof over single balconies, as well as over balconies located on the upper floors, so many home craftsmen take on its arrangement on their own. On the one hand, there really is nothing complicated in this, but on the other hand, this operation contains many nuances that you must first familiarize yourself with. Therefore, further I will tell you in detail how the roof is mounted on the balcony, and I will also share with some of the secrets of this work from professional craftsmen.
Is roofing worth it?
First of all, I note that the roof makes the balcony much more practical and comfortable, as it performs several important functions at once:
- protects from precipitation;
- provides shade on the balcony in the summer;
- prevents debris from entering
Besides, glazing can only be done on a balcony over which there is a roof. As you know, the glazing of balconies with a roof allows you to use additional space even as a living space.
That's why, so that the balcony can be fully used, the roof is simply necessary. Accordingly, all the costs of finance, time and effort for its construction are fully justified, especially if there is a lack of space in the apartment, for example, in Khrushchev.
Roof construction options
Before you make a roof on the balcony of the last floor, you need to decide on the type of its construction.
Thus, the choice depends on how you are going to finish the balcony in the future and its size. Therefore, further I will tell you how to make a roof of both types with your own hands.
Making an independent visor
Regardless of what type of structure you decide to install on the balcony, the entire construction process can be divided into several stages:
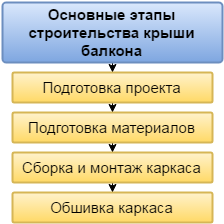
Project preparation
In the design process, it is necessary to determine, first of all, the dimensions of the future roof, which depend on the size of the balcony itself. In other words, the width and length should match the length and width of the balcony.
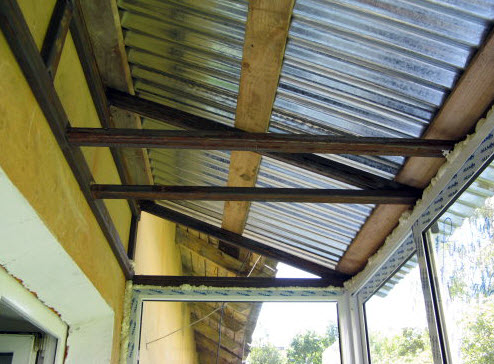
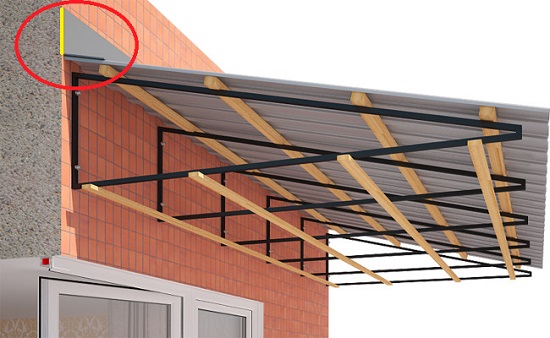
As for the design of the visor, it is based on a frame, which can be metal or wood. The frame, in turn, consists of several main elements:
- brackets - are an L-shaped part. The long rail of the bracket should correspond to the width of the balcony, and the short rail should be about 30 cm. The longer it is, the larger the slope angle, respectively;
- rafters - attached to the brackets, as a result of which the latter take on the form of a rectangle. Rafters with brackets form roof trusses, i.e. the basis of the roof frame;
- strapping - allows you to tie the brackets and rafters into a single structure.
Before starting the installation of the frame, you should draw a simple drawing of it. In this case, it is necessary to indicate the dimensions of all parts in millimeters on the image.
Preparation of materials
Based on the existing drawing, materials for the future roof should be prepared. If the frame is wooden, then for its construction you will need:
- timber with a section of 40x40 mm;
- beam with a section of 20x40 mm;
- metal corners for connecting parts from a bar.
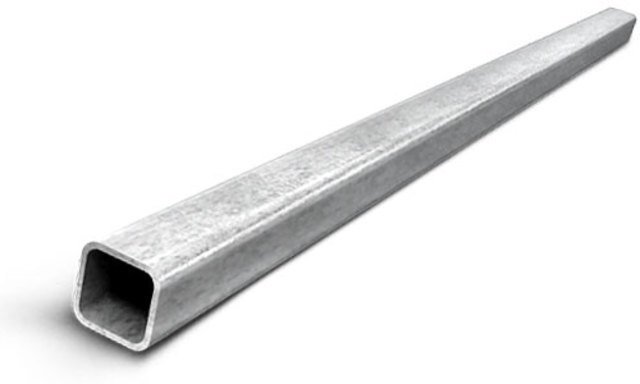
If you have a welding machine, you can make a metal frame from profile pipe 20x20 mm and a steel corner.
As for the roof sheathing, for this you need to prepare:
- roofing material - it can be slate, corrugated board, polycarbonate, etc.
- waterproofing film;
- wooden slats;
- tin corner for roof waterproofing;
- construction;
- heat-insulating material - will be needed only if heat and sound insulation of the balcony is planned.
Frame assembly
The instructions for mounting the frame depend on the material from which it is made. If the frame is metal, then the work is performed in the following sequence:
- first of all, it is necessary to make blanks from the profile and corners, cutting them into segments of the desired length;
- next you need to make brackets and immediately weld the rafters to them. The result should be finished farms in the form of rectangles. Their number is calculated taking into account the fact that the distance between farms should be no more than 40-50 cm;
- then at a height of about two meters from the floor of the balcony, a horizontal line must be drawn;
- on the line you need to indicate the location of the farms;
- now it is necessary to fix the welded trusses on the wall with anchors, having previously drilled holes in them;
- at the end of the work, the brackets must be connected to each other with a strapping, welding a corner or a profile pipe to them.
The visor should not be placed too high, as in this case the likelihood of precipitation on the balcony increases. The best option is a height of 2 meters.
If the frame is wooden, then you can assemble it with your own hands right on the wall by following these steps:
- work should begin with marking the wall, which is performed according to the scheme described above;
- then, on a horizontal line, it is necessary to fix the beam with self-tapping screws or anchors. The distance between fasteners should be 15-20 cm;
- now you need to fix the second beam on the wall parallel to the first, but 25-30 cm higher;
- to increase the strength of the structure, vertical posts should be placed between the beams in increments of about 40 cm;
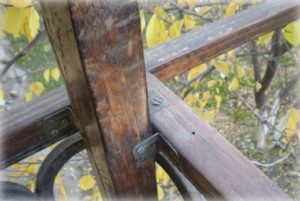
- after that, opposite the racks, it is necessary to fix the planks in a horizontal position, which will serve as wooden brackets. Their length should correspond to the width of the balcony. To fasten these strips, you should use metal corners;
- the edges of the fixed planks must be connected to each other with a rail, which should be located in one horizontal plane with a beam located on the wall;
- then you need to attach rafter legs to the resulting structure, which should be located above the brackets. The result is the same rectangular trusses as in the previous case.
Before you make a roof on the balcony of the last floor, as well as any other, you must obtain permission from the BTI and the housing inspection.
This completes the installation of the frame.
Frame sheathing
When the frame is installed, you can proceed to its sheathing. The work is done like this:
- First of all, you need to cover the visor with a waterproofing film. As a rule, this requires one sheet, however, if you combine waterproofing, then it should be overlapped. In addition, the joints must be glued with adhesive tape;
- a crate is attached over the waterproofing. To do this, you can use wooden slats, which are located along the visor;
- now you need to attach roofing material to the crate using nails or even self-tapping screws. When installing a profiled sheet or slate, do not forget that the fasteners must be located at the top of the ridge.
- to make the roof over the balcony airtight, a tin corner should be installed at the junction of the roofing material with the wall. And the place of its contact with the wall must be treated with building sealant;
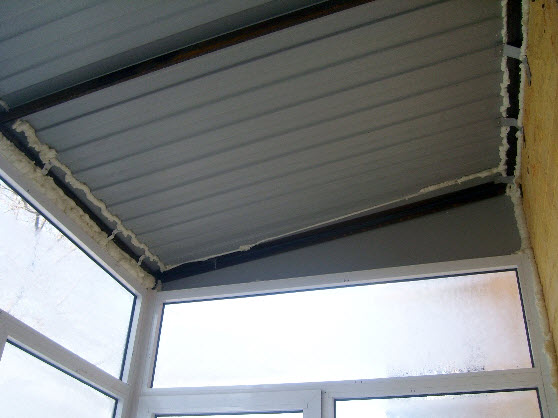
- now from the bottom on the ceiling you can also make a crate, for its further finishing with clapboard, plastic panels or any other material.
Before attaching the support poles, it is necessary to repair the fence, if, of course, there is a need for it.
On this, the construction of the roof in the form of a visor is completed. It must be said that the process of installing the roofing and sealing the junction is carried out from the side of the roof. In a private house or on the ground floor, you can do this work yourself.
On top floor apartment building it is better not to do the roof sheathing with your own hands, as this will require special permission, not to mention the fact that such work is very dangerous. Therefore, do not spare money and seek help from specialists.
The price for such services is on average about 500 rubles per square meter.
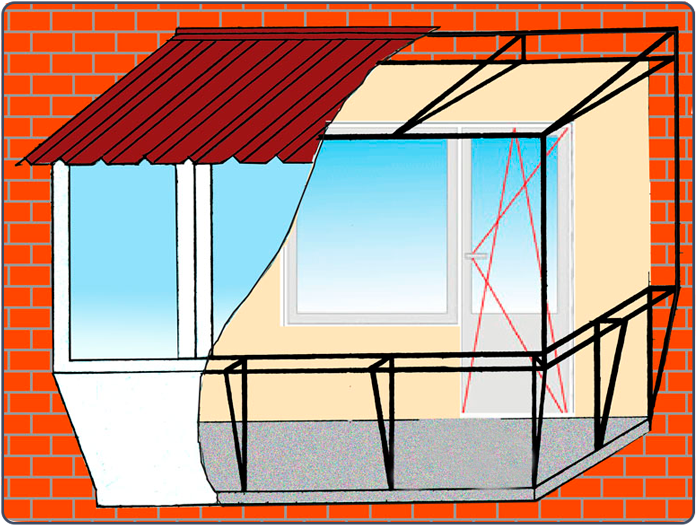
Roof construction on supports
The roof on supports, as mentioned above, can be installed on a loggia or balcony in order to subsequently perform glazing. I must say that in general, the installation process of this design is similar to the installation of an independent roof.
In particular, the same farms in the form of rectangles are used for this. The difference lies in the fact that the roof frame is attached not only to the wall, but additionally relies on racks.
Therefore, the work is carried out as follows:
- First of all, the racks are installed. The front pillars must be 200 cm high and the rear 230 cm. As racks, you can use wooden bars or a profiled pipe.
The front posts are attached to the slab and the fence, and the rear ones, as a rule, only to the wall;
- now the upper ends of the rear pillars need to be connected with a beam, which is additionally attached to the wall;
- then the rear pillars should be connected with another beam located 30 cm lower - this will be the ceiling level;
- now you need to connect the front struts with a rail located in the same horizontal plane with a beam mounted on the wall;
- after that, the front rail must be connected with jumpers to a beam fixed on the wall. As a result, all four racks will be connected into a single structure;
- now on the resulting frame it is necessary to fix the rafters in increments of 40 cm, in addition, jumpers should be located under the rafters, which will increase the strength of the structure.
This completes the frame mounting process. Now it remains only to sheathe the structure according to the scheme described above.
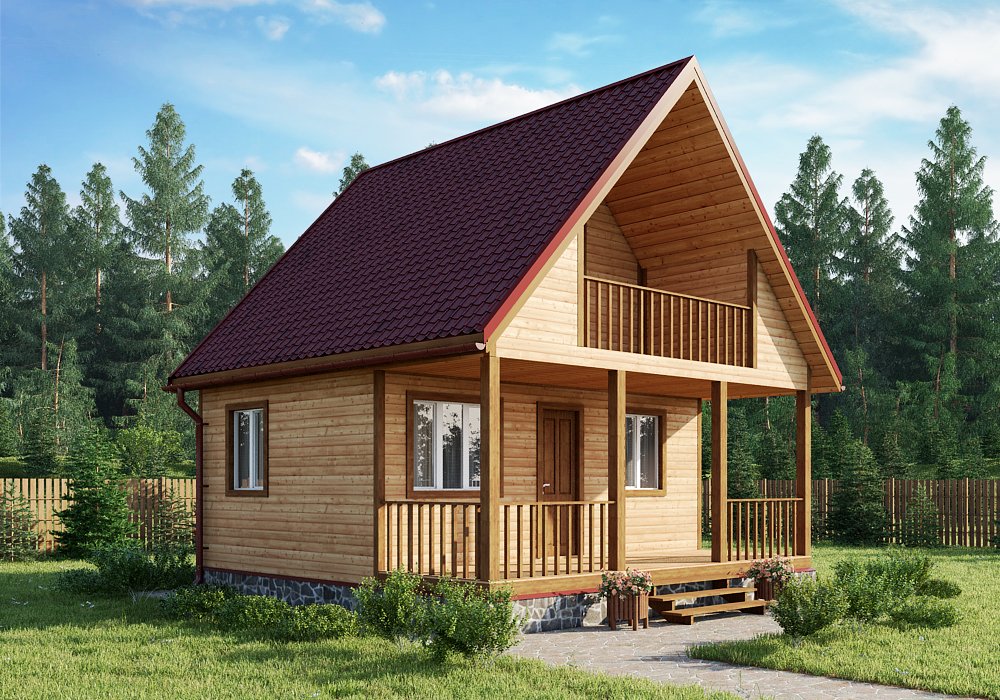
People who are planning to build a small suburban housing, for example, a 6x6 m house, can be recommended to place a balcony under the same roof as the main room. This solution is practical and visually appealing.
Conclusion
The roof on the balcony as a whole is installed quite simply, especially for those operations that can be performed from the inside, i.e. from the side of the balcony. High-altitude robots, it is better to entrust specialists. In any case, all costs are fully justified, since in the end your apartment will receive several "precious" square meters which you can put to good use.
For more information, see the video in this article. If you have any difficulties during the installation of the roof or some points are not clear, ask questions in the comments, and I will be happy to answer you.
September 12, 2016If you want to express gratitude, add a clarification or objection, ask the author something - add a comment or say thanks!
Modern projects multi-storey buildings provide for the arrangement of roofs over the balconies of the uppermost floors, which are so lacking for apartment owners in houses of earlier development. The fact that in summer it rains on the balcony, and in winter it is covered with snow, even if the roof of the house hangs over the balcony, there is little pleasant. That is why many, when landscaping their balcony, if they are not engaged in its full glazing, then at least make a roof over it.
Roof options over the balcony
There are only two options for roof structures.
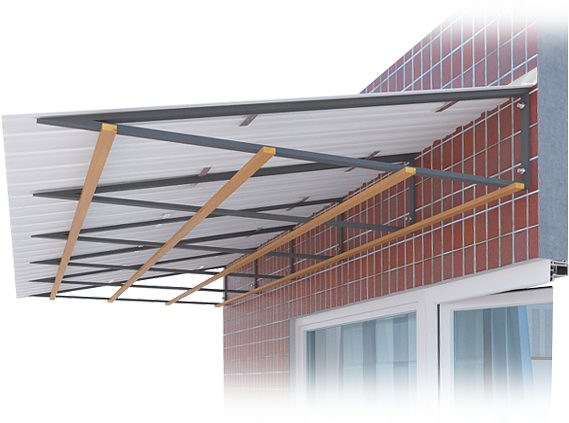
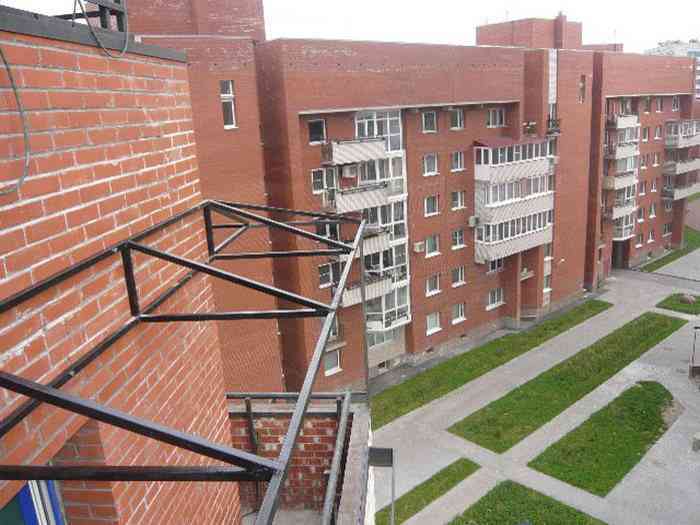
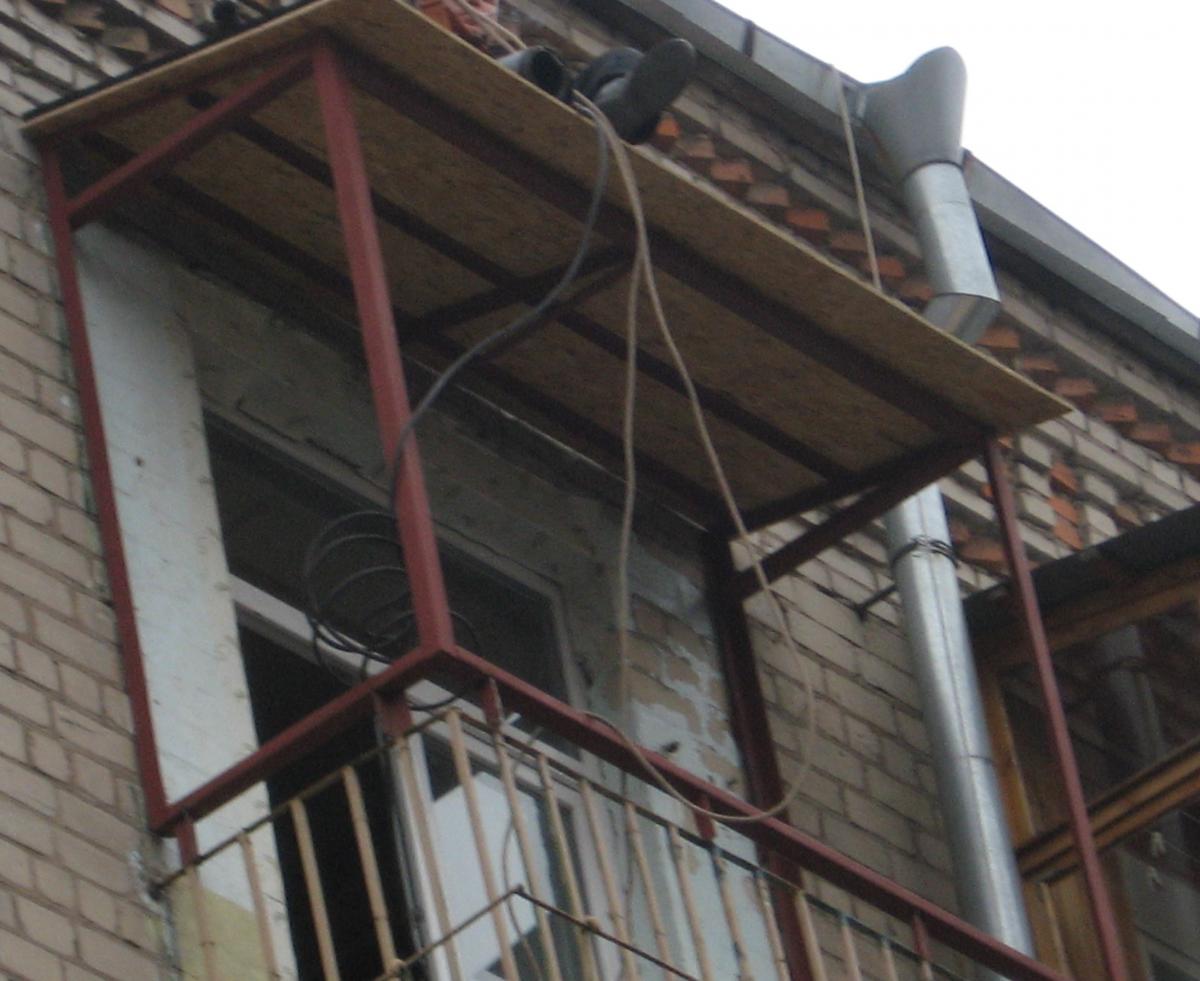
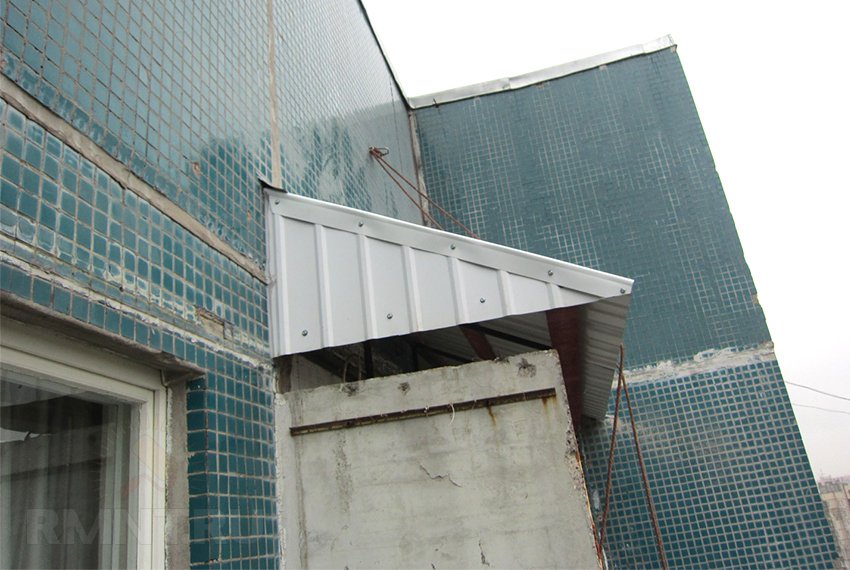
First option- this is the so-called independent roof structure, when several consoles are made in the form of a triangle, which are tightly attached to the wall above the balcony. The selected roofing material is already laid on these consoles. This design is not associated with a balcony and does not have any supports in the form of racks.
Such a roof on the balcony of the last floor is simple in terms of design, involves the use minimum quantity building materials and may well be built by unwise building experience common man able to hold essential tool. Actually, for such a roof, the name is quite suitable - a visor over the balcony.
When erecting such a structure, it must be taken into account that in order for the canopy over the balcony of the last floor to have the desired strength, it is necessary to use a sufficient number of consoles. The longer the balcony, the more consoles you will need.
Undoubtedly, the relative cheapness of the design and the ease with which the visor is installed on the balcony attracts, but this option also has disadvantages. No matter how firmly the consoles are attached to the wall, it is better not to use heavy roofing material such as slate or ceramic tiles. Lighter materials (carbonate sheets or something like that) will be more appropriate.
If in the region of residence it falls in winter a large number of snow, then such a roof for a balcony may not withstand the weight of a snowdrift lying on it. Snow from it will have to be raked regularly.
A serious load for this version of the balcony roof will be large icicles formed on it. They also need to be cleaned regularly.
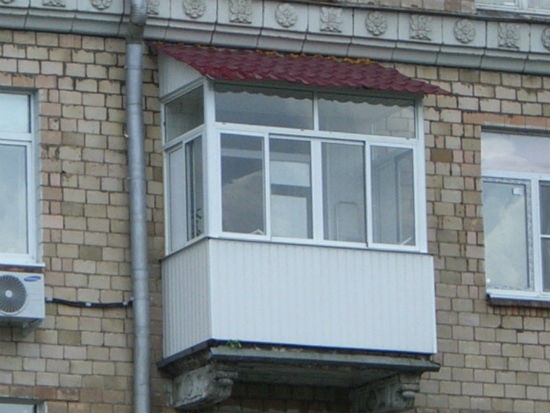
Second option roof structure over the balcony is called dependent. In this case, the roof is connected directly to the structure of the balcony glazing frame, or simply rests on racks rigidly connected to it. Such a roof on the balcony of the last floor is much stronger and can withstand significant loads.
The most acceptable option would be the arrangement of a dependent roof structure above the balcony, together with its glazing. In addition, glazing a balcony with a roof is the only option. Without a roof, balconies do not glaze. After the roof is mounted and the balcony is glazed, you can start warming and finishing them as a whole.
This roof option can be built over a balcony of any length. The rigidity of the structure allows you to use any roofing materials and use the most different variants insulation and decoration of the balcony.
Material selection
In order for the balcony roof to be reliable and last for a long time, it is necessary to choose the right materials from which it will be built. As for the consoles and pillars, as well as the balcony glazing frame, wooden bars were almost always used for these purposes.
Of course, it is easier to work with wood, but it is more reliable for these purposes to use a metal corner or, which has recently become very popular, a metal pipe with a square or rectangular section.
The consoles and racks made of them have an attractive appearance. They are more reliable than wooden bars and will last much longer than the latter. If a corner is used, then the width of its shelves must be at least 50X50 mm. A square pipe is taken for these purposes with a cross section of at least 40X40 mm.
A mixed version is often used, when a rigid structure is made of metal, and the roofing material is attached to wooden blocks or boards fixed to this structure.
Metal parts are best joined by welding. The seams of the joints are cleaned with an angle grinder (grinder). After that, the structure must be primed and painted, one hundred will ensure its long life.
Bars or boards used for fixing roofing material must be treated with preparations that prevent the occurrence of wood decay, and then also painted.
Roofing materials in construction stores it is presented in a huge assortment. When choosing one of them, it is imperative to take into account the type of roof structure chosen.
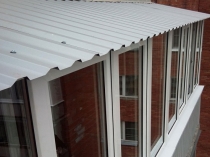
A very common material is corrugated board, which is sheets of profiled galvanized iron with a polymer coating or painted in various colors. It is used for a variety of purposes, including as a roofing material. Sheets of corrugated board are not heavy and are quite easy to install.
The roof on the balcony from corrugated board looks very good. The practicality and service life of this material is also on top. There is only one drawback - raindrops falling on such a roof make a loud sound, reminiscent of a drum roll. Soundproofing the roof of the balcony will help get rid of this. To create such noise protection, a layer of one of the special materials is laid under the sheets of corrugated board, the range of which is quite wide.
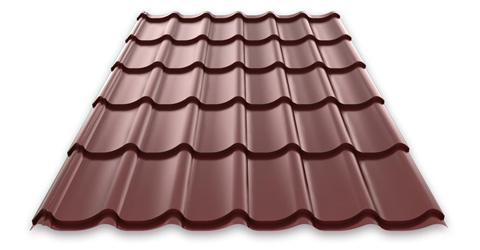
The metal tile worked well. Stamped metal sheets of such tiles are covered with several layers of polymer coating, which provides them with a long service life. Such a roof will also require sound insulation, for which the inside of the tile is glued with a layer of one of the necessary materials.
![]()
The well-known asbestos-based slate for roofs of balconies is almost never used due to the heavy weight of this material. More often they use "euro-slate", which in our country is called ondulin (although it would be more correct to say onduline). This material is quite light and easy to install. Since it does not have sufficient strength, sheets of plywood, chipboard or other similar material are usually laid under it.
For those who want to have a transparent roof over the balcony, there is a fairly wide selection of materials for its arrangement. You can use polycarbonate sheets, which can be either cellular or monolithic. Or cover the roof of the balcony with transparent PVC slate. The benefits of a transparent roof are obvious.
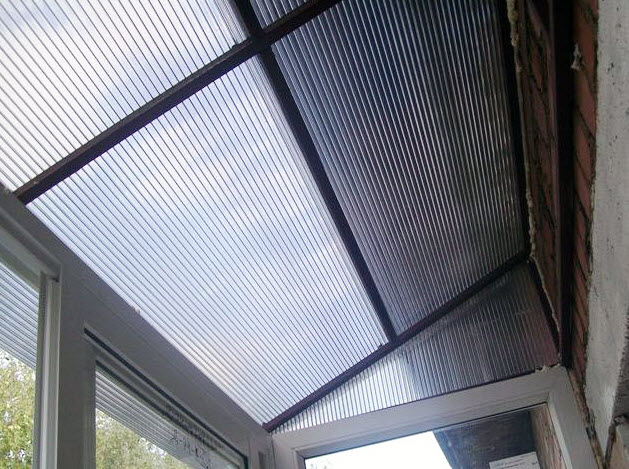
The illumination of both the balcony and the apartment practically does not decrease, such a roof looks original and presentable, and the service life of such materials is no less than opaque ones. Even without glazing, the polycarbonate visor above the balcony looks quite modern and beautiful.
Finally
If desired, the roof on the balcony of the last floor can be completely built on its own. It is only necessary to remember that the installation of a roof on a balcony is associated with a certain degree of risk both for those involved in the installation and for people under the balcony. Therefore, it is necessary to work extremely carefully, and, preferably, to enclose the area of a possible fall of materials and tools.
The need to equip the roof on the balcony most often arises from the owners of apartments located on the top floor. The type of roof structure is selected depending on whether it is planned in the future. Particular attention should also be paid to the choice of roofing material.
You can see photos of finished balcony roofs in our gallery.
The choice of material and installation of the balcony roof with your own hands
The first and most important thing to decide before installing the roof is the type of construction. There are two types.
Independent balcony roofs
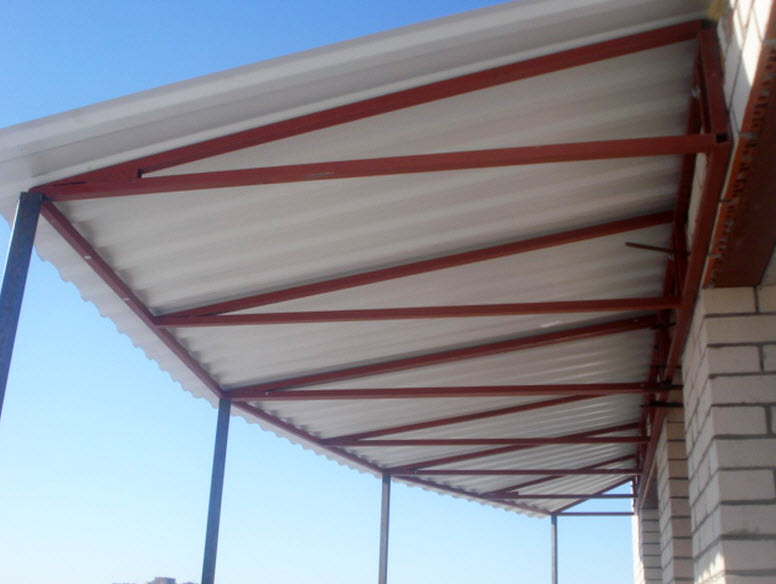
Such structures are attached to the wall of the house. They are also called consoles. Independent balcony roofs consist of a metal frame and roof battens, on which the finishing material is mounted. It is better to entrust the manufacture of the roof frame on the balcony to specialists, since the reliability of the entire structure depends on this part. It is most often made of a metal profile, which is interconnected by welding or bolts and screws. The first method is more reliable.
Installation of the frame of the balcony roof is carried out by attaching it to the wall of the building. To do this, it marks the points of support, in place of which holes for the bolts are drilled.

Frame independent design
Worth considering: The number of support points varies depending on the size of the balcony. The larger it is, the more reference points are required. Using this rule, you will get a roof that will not sag under the snow.A wooden crate is installed on the frame, to which the roofing material is easily attached. Before proceeding with its installation, a layer of material intended for the roof should be placed on the frame. Insulation of this type of structure is not required, since it is not suitable for, due to the inability to withstand heavy loads.
Wooden lathing and corrugated board on the cantilevered roof
Dependent balcony roofs
Such a roof of a balcony on the last floor is called a cantilever-support. These designs are recommended to be used on, as they are able to withstand heavy loads. The frame of the dependent roof has a more complex device. It consists of racks and supports for the visor. Racks are ideally suited for the subsequent installation of a double-glazed window.
The visor of this type of construction is brought under the main roof of the house. The joint between the two materials is sealed to prevent possible leakage.
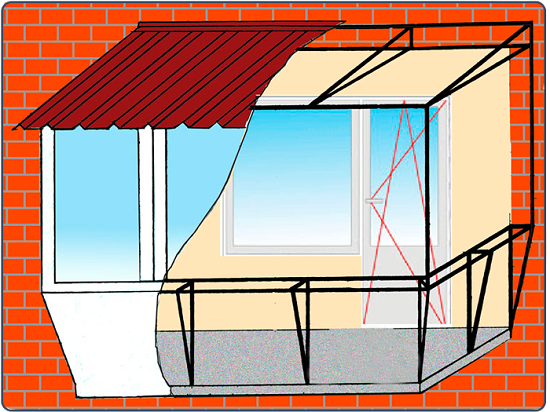
Diagram of a cantilevered roof
Before you make a roof on a balcony with racks, you should measure and calculate the angle of inclination. It should be the same as at the roof of the building. The frame of the cantilever-support structure is made of metal. Its constituent parts - racks and supports for the visor, it is desirable to connect to each other by welding. Such a balcony roof has more support points, since it is attached not only to the wall of the house, but also to the base plate.
Its device requires the use of not only waterproofing, but also thermal insulation. The material that protects the roof from leakage is laid on a metal frame and covered with a finishing layer. exterior finish. Thermal insulation is most often mounted from the inside after glazing. All joints and seams are treated with mounting foam or sealant.
It is important to know: Soundproofing plays an important role in the arrangement of a balcony roof. It is produced by laying on the frame of special materials with sound-absorbing ability. Noise isolation reliably protects the glazed loggia not only from the sounds of rain or snow, but also from unpleasant street noise.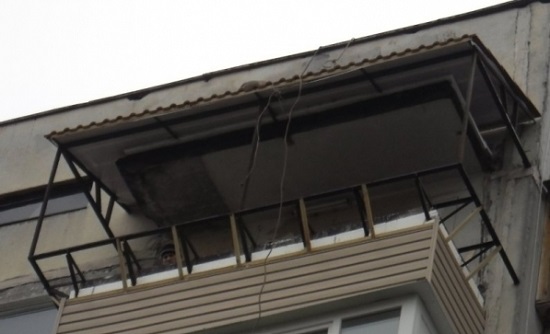
Dependent roof frame
What roofing material to choose?
When choosing a material for the roof of a balcony, it is necessary to take into account the type of construction. Independent roofs do not withstand heavy loads, so lighter types of materials should be used for them. It's about about ondulin and polycarbonate. The latter allows you to make the roof transparent. Balcony roofs made of polycarbonate can also be used if the structure is dependent. However, this option is not suitable for glazing.
For the cantilever-supporting roof of the balcony, corrugated board is most often used. This material has an excellent ratio of relatively low price and high quality.
The roof of the balcony from the profiled sheet
Balcony roof repair
Balcony roofs of the upper floors of old houses often begin to leak and require repair. Most often this happens due to the fact that the roofing material is leaky. In this case, most likely, you will have to completely replace it.
Balcony roof repair should begin with the identification of emergency areas. This may require partial or complete dismantling of insulation and waterproofing material.
When repairing the roof, it should be remembered that the waterproofing material is laid on the insulation. At the same time, its edge should definitely be brought a little higher than the level of thermal insulation.
As a waterproofing material, you can use a dense polyethylene film or roofing material. During their laying, you need to monitor the seams and joints. The edge of one sheet of waterproofing material must overlap with another. This is to reliably protect the roof of the balcony from leaking.
Overhaul of the roof of the balcony with a profiled sheet
First of all, the classification: the roofs of balconies are usually divided into dependent, that is, structures partially embedded in the wall of the building, and independent - fixed to the wall using various kinds of mounting means. This division is relevant only for construction work. When repairing and glazing balconies, it is almost impossible to arrange a dependent roof, and there is simply no reason to do this - it is easier to use light hinged structures. Therefore, it will be correct to classify the roof of the upper balcony according to the presence of glazing on it.
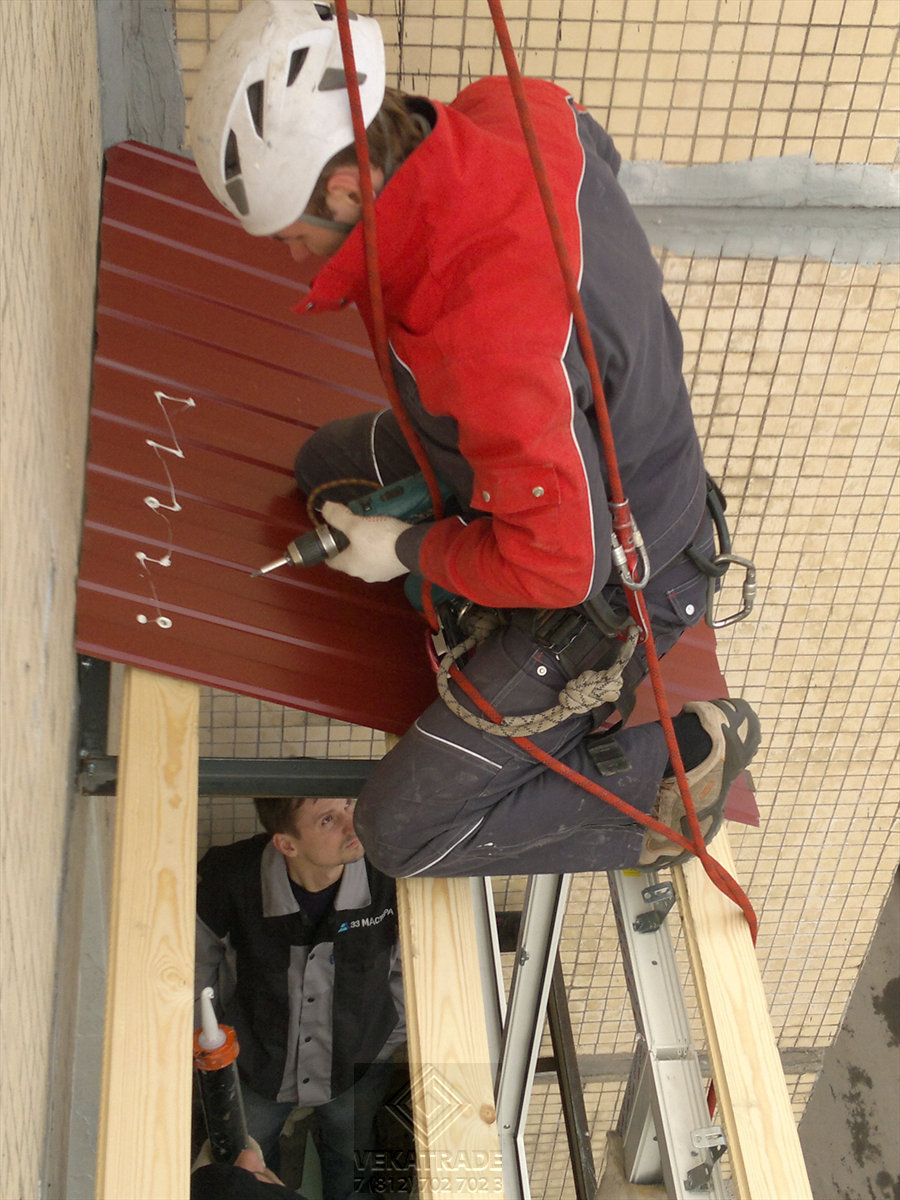
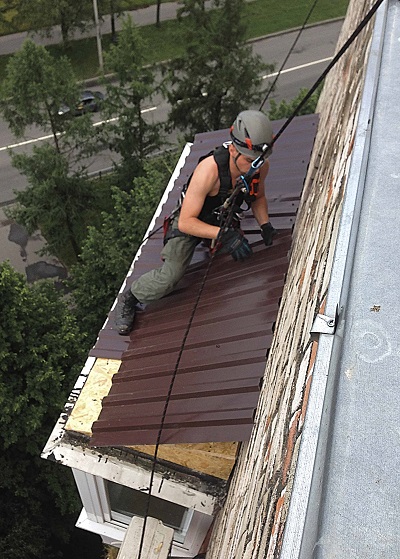
Safety at work at height
Please note that doing this kind of work yourself without professional training and equipment can have disastrous consequences. Do not attempt to arrange fall arrest yourself and do not work from the side of the roof. To exclude the very possibility of a fall, all installation should be carried out from the inside of the balcony, except in cases where this cannot be done due to design features.
Of these exceptions, the most common are the laying and fixing of roofing, the installation of ebbs and the protection of junctions. This scrupulous work is difficult for an unprepared person, being at a height, to perform. It would be more correct to turn to the services of industrial climbers: if you mounted the frame and crate yourself, you have everything necessary materials(including consumables) and a pre-prepared laying scheme and technology, the services of climbers will cost a minimum.
The device of the frame associated with the glazing
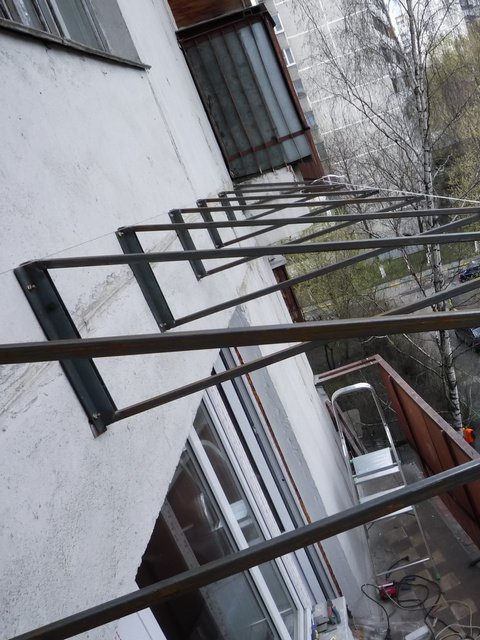
The roof on unglazed balconies is made up of triangular trusses welded from a 40x40 mm square pipe. All the complexity of manufacturing comes down to calculating the required slope of the slope (on average - 30 cm per 1 m), the length of the cornice overhang (25–35 cm) and the optimal step for installing trusses (70–100 cm).
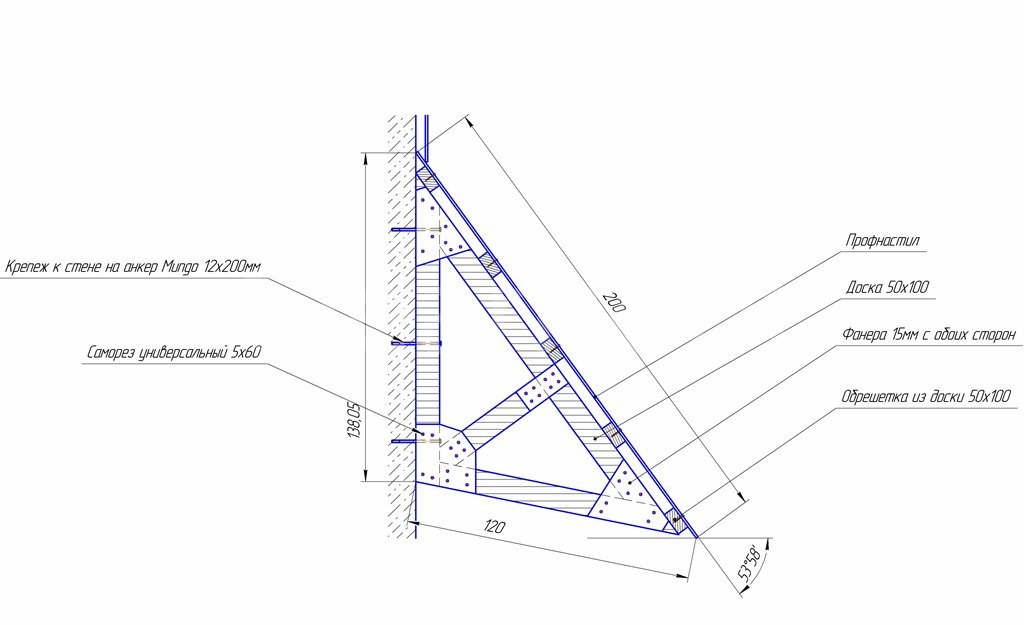
In the case of glazed balconies, it is necessary to provide space for laying insulation, so the truss should have the shape of a trapezoid with a shorter base length along inside not less than 50 mm. The length of the trusses should be such that they rest against the glazing frame. Naturally, in order to properly isolate the junction in this place, it is necessary to carry out glazing even before laying the roofing.
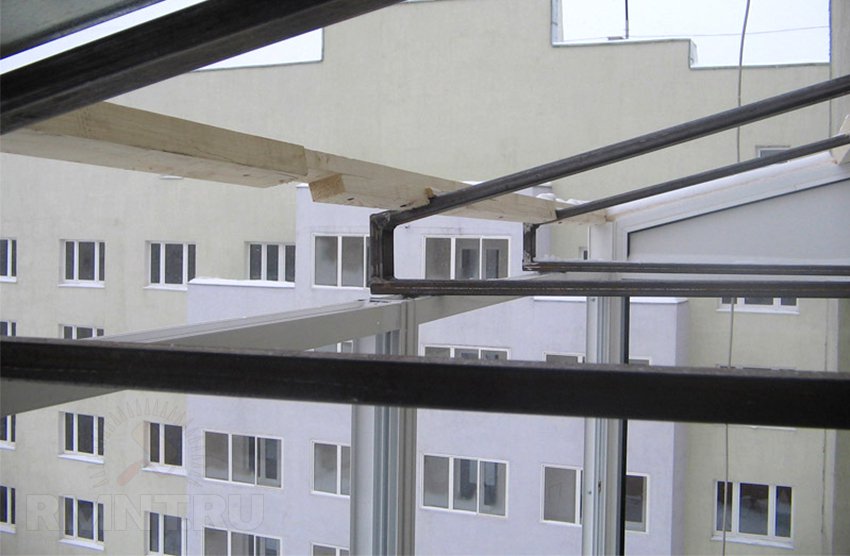
Due to direct thrust window frames trusses provide absolute resistance to frontal wind loads. Reverse wind loads are compensated by connecting the frame to the trusses by means of steel plates with a thickness of at least 3 mm. The side posts are resistant to gusts of wind by being fixed directly to the wall and by means of an angled profile to the front frame.
Lathing installation
To fasten the roofing, wooden beams or boards with a thickness of at least 40 mm should be stuffed over and across the metal trusses. The length of the slope usually does not exceed 1.5–2 meters, so in most cases only three rails are enough, but they must be solid. The task of fixing them is quite trivial, but on the balcony it has its own specifics.
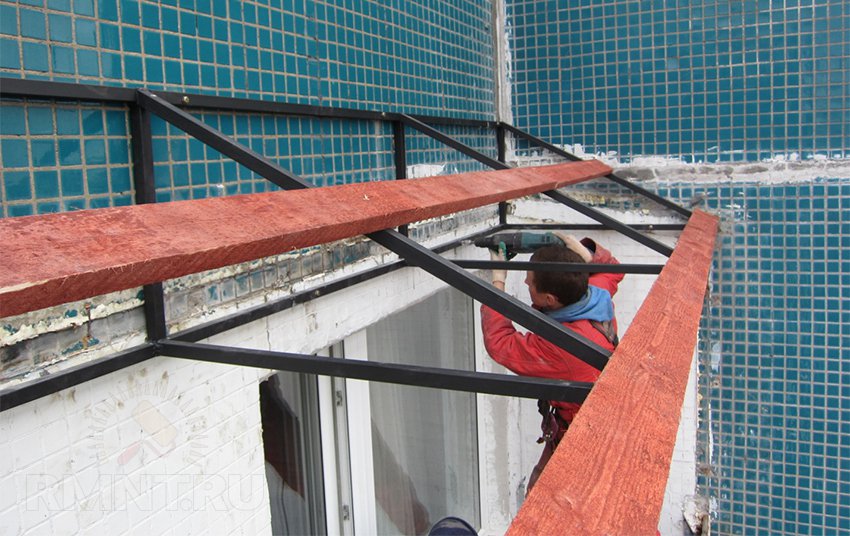
First, the crate is laid on top of the trusses and temporarily fixed with clamps or wire. Fastening is carried out using metal corners, which are connected with a bolt through the truss pipe, and on the other side are attracted to the bars with two self-tapping screws. After the crossbars are temporarily fastened with two planks, then the crate is removed from the fasteners and lifted to the roof with ropes.
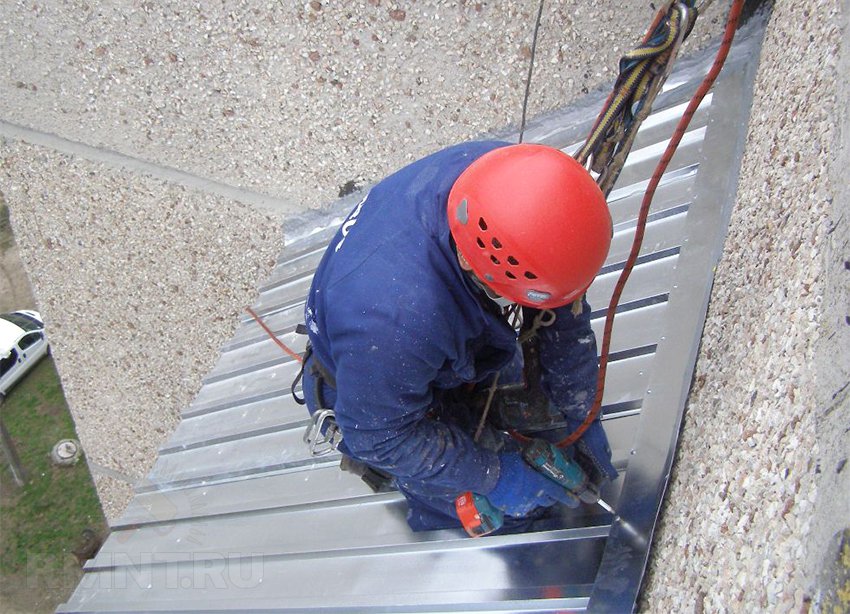
Roofing
The roof of the upper balcony has almost no access for maintenance, so the coating must be resistant to precipitation, temperature fluctuations and mechanical stress. Appearance, on the contrary, is not important, so it is better to cover the balcony with ordinary profile sheets. The coating should have the highest reflectivity possible, so matt white and metallic silver are the preferred colors.
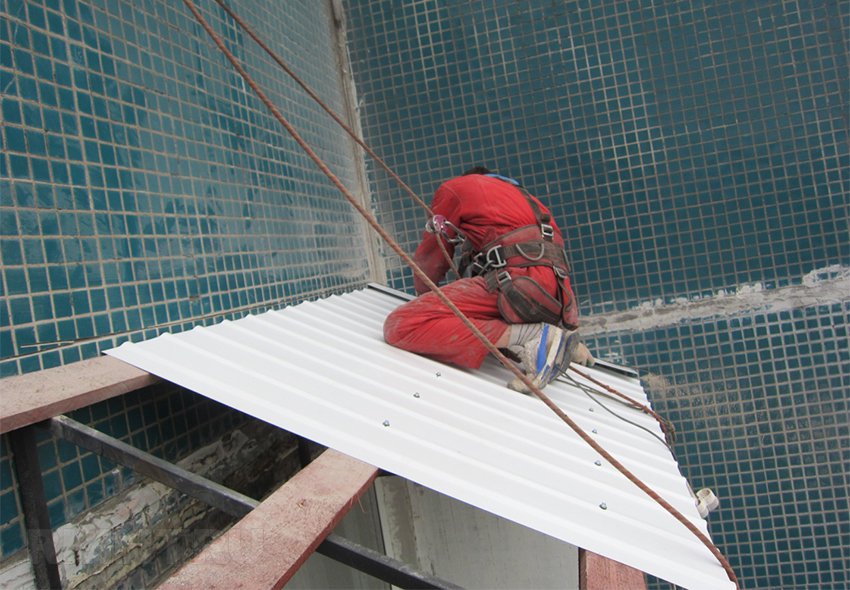
Now you can conveniently and without risk fix the roofing, and then the insulation. Sheets have a cut edge to the top of the slope, the last sheet is placed whole and with a large overlap. Then the assembled structure is fed back and bolted to the trusses.
Landings and skates
When arranging the roof, it is critically important to perform the junction points with high quality, eliminating the infiltration of moisture inside. One of the most problematic places is the outer corner between the roof and the wall. It often happens that water flowing down the building gets under the protective ridge and saturates the insulation, or flows further along the inner wall.
The problem can be solved for sure: in the wall it is necessary to make a cut with a diamond blade to a depth of 50-60 mm, completely fill the gap with sealant and insert a Z-shaped ridge for the profiled sheet into it. This sealing method supports corner joints and is guaranteed to protect against leakage even when adjacent to brick walls where thick seams cannot always be sealed with sealant.
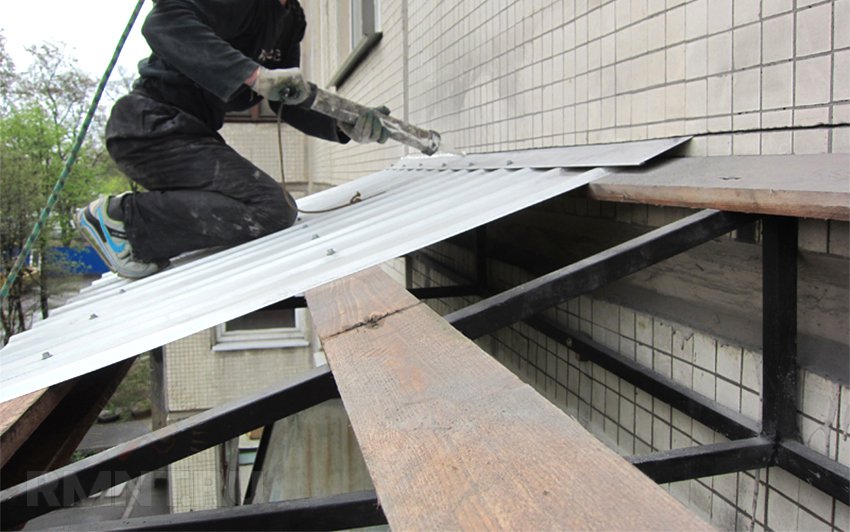
The front and side overhangs of the roof are hemmed with a corner ridge for a profiled sheet. The space between the window and the roofing should not have a single gap: it is filled with foam, which, after curing, is cut along the frame. The open section of the foam is abundantly covered with roofing or ordinary bituminous mastic, then a corner flashing is attached to the self-tapping screws.
From the inside, it is necessary to re-treat all joints and adjoining walls and glazing with mounting foam, in the corners a rim with a thickness of at least 40 mm should be left. If the frame consoles protrude beyond the glazing line, they must be hemmed with the same metal ridge, cut off on one side along the thickness of the console edge. The narrow space in the corner under the roof overhang must also be completely filled with foam.
Balcony roof lining
Insulation under the roof of the balcony is not laid to preserve heat. A balcony, in principle, cannot be warm: three outer walls cannot be thoroughly insulated without a significant loss of internal space. Nevertheless, even on non-insulated, but glazed balconies, it is necessary to lay some layer of thermal insulation under the roof.

This is done to maintain a healthy microclimate on the balcony in summer. On hot days, the roof will inevitably heat up to 50-60 ° C, greatly heating the air inside. To avoid this, a roll of mineral wool will suffice. The insulation is pushed into the gap between the roof and the trusses, densely filling the space between the battens of the batten and breaking the resulting clods of cotton wool.
It is not always convenient to attach siding or other finishes directly to the trusses, so they are knocked out from below with wooden blocks of minimum thickness. It is possible to install a draft ceiling made of OSB or plywood, in which case it is necessary to carefully fill the seams with polyurethane foam, which, after cutting, is covered with a protective layer of alkyd paint.
The Prestige Balcony company offers you services in installation of a roof on a balcony in Moscow and the Moscow region.
2 roof option for balcony
Mounting the roof on the balcony: features
The roof protects the balcony, and hence the apartment from precipitation, wind and dust. It can be used to save interior decoration balcony and make it suitable for year-round use. Roof installation is required if you live on the top floor or only partially cover your roof. If you are thinking of taking out a balcony, then you will need to install a special canopy. Repair work on the installation of the roof is carried out in parallel with the glazing of the balcony.
Varieties of roofs on the balcony
Depending on the type of construction, the roof on the balcony can be of the following types:
- dependent,
- independent,
- supported by racks.
The dependent roof of the balcony is mounted on load-bearing beams. It may also be part of the aluminum frames used as support structures. An independent roof on the balcony is a frame made of metal corners of different lengths, which are fixed to the wall with the help of anchors.
A roof supported by metal studs is an intermediate type. Here the roof frame is made of welded corners. The edges of the frame with the help of metal racks, welded from a profile square pipe, abut against the parapet of the balconies. Such roofs are used in cases where the roof recedes from the facade of the house for a considerable distance.
Materials for installing a roof on a balcony
To install a roof on a balcony or loggia, the following roofing materials are most often used:
- steel sheets (corrugated board),
- metal tile,
- ondulin,
- keramoplast.
Turning to the specialists of our company, you will receive a roof made of special metal profiled sheets that imitate the texture of tiles. A corrugated sheet roof is strong and stable, it will need repairs at least after 10 years.
When installing the balcony roof, we also use galvanized steel corrugated board. Steel sheets can be used to install both independent and dependent balcony roofs. This material is a more affordable option for a balcony. Experienced craftsmen will carry out high-quality replacement of the roof of the balcony, which will serve you without repair for quite a long time.
Ondulin roof can be made in different colors. Ondulin is a material that has a wave shape and is characterized by good sound insulation and easy installation.
New on the market roofing materials is a ceramoplast. This is the perfect option for installing a balcony roof. Lightweight and flexible ceramoplast is characterized by water resistance, frost resistance, high noise and heat insulation.
The progress of the installation of the roof on the balcony
After the project has been developed, the materials and cost have been discussed, the craftsmen proceed to the installation of the roof. The whole complex of works consists of:
- frame manufacturing,
- coating laying,
- sealing,
- ceiling finishes.
First of all, load-bearing structures made of durable metal are installed on the balcony. Subsequently, they will serve as a frame. These metal structures, having a triangular shape, are attached to the walls of the building using anchor bolts. It turns out that they are under the roof and, properly distributing the load, securely hold it.