There are many options and opportunities for building a garage. There are also many different materials from which it can be built. But before proceeding with the construction, or selection building materials, it is worth considering everything from the very beginning - from the moment of design.
preliminary planning
Initially, as soon as the idea of \u200b\u200bbuilding came up, you should not think about what it is better to build a garage from, first you should consider its design, layout, dimensions, etc.
You should be aware that garages can be divided into many types and subspecies. They can be:
- Freestanding, temporary structure;
- Detached, capital construction;
- Adjoining directly to the house;
- Temporary building adjacent to the house.
How free-standing temporary and capital garages look like can be seen in fig. 1 below.
On the left, you can see a capital brick building, and on the right, a metal building. You have probably seen such garages more than once. It is about them that we will talk.
As an example for the article, we will take a garage that stands separately.
Garage building plan
If you are going to build a garage, you should initially carefully consider its dimensions - height, width and length. Again, if you plan to put a car in the garage and no longer use the garage space for any purpose, it’s worth dissuading you - make a small margin - it will certainly be very useful for you in the future. It will be possible to put, say, winter tires, spare parts, tools, etc. there. There will never be extra free space.
Again, there are no specific standards for building a garage, but you can consider them. On fig. 2 you can see several options for garage sizes, each of which will allow you to save money, get the most usable space and convenience, or find a middle ground.

Now that you have decided on the dimensions, it is worth starting to choose the materials from which we will build the garage.
Materials from which you can build a garage
Like the types of garages, there are many different materials from which you can easily build your garage. The main options include:
- Brickwork;
- Wood, boards, beams, etc.;
- metal sheets;
- You can use slag concrete;
- Reinforced concrete structure.
All of these options are acceptable for building a garage, however, you should consider all these options separately, as each of them has its own advantages and disadvantages.
For example, brickwork has always been relevant. If you want to build a garage, then it is this material that is publicly available, it does not have a high price, such a garage, after taking care of the foundation, can be built with your own hands, without resorting to the help of professional builders. Such a design, of course, depending on the quality of work, will be able to serve for a long time, will not require constant repairs, etc. Brick buildings are reliable and practical.
In the figure below you can see a variant of the garage, built purely of bricks. 
If this option does not suit you, you should start considering others.
For example, you can take cinder blocks as a material for a garage. In this case, you can save a lot. Slag concrete will cost you much less than brick, but you will also face a number of difficulties. For example, cinder blocks are much more difficult to work with than bricks, you will spend much more time and effort than in the case of bricks. Again, with regard to the safety and reliability of such a building, it will be significantly lower than when building a brick garage.
Wood, boards and similar materials
Unfortunately, this material is not entirely suitable for building a garage. Despite its cheapness, this material is very whimsical. In particular, in the future, you will have to update the design very often:
- Change rotten boards;
- Paint the walls of the garage;
- To patch holes that will invariably appear;
- Such a design will be very unreliable in terms of hacking.
However, such a design will be optimal if you have enough wood from which to make a garage. You do not need to buy other building materials. Again, if the garage is located next to the house, on the site, then this option is quite acceptable. The garage will always be in front of your eyes. Then this option can be accepted and proceed with the construction. If the garage is far from home, out of line of sight, then other materials of manufacture should be preferred. How the garage from the boards will look can be seen below.

Here are the options for creating a garage from boards, bars, an option adjacent to the house, detached.
Despite the obvious impracticality of this option, it is preferred by many, due to the primary cheapness. But, in the future, after a few months, new stocks of boards will be required, new investments in the construction, restoration of the garage.
Metal sheets and reinforced concrete
Many, in the distant 90s, preferred to build free-standing garages from sheets of metal. There are several production options here:
- It is possible to make a one-piece structure, with the possibility of quick dismantling;
- You can make a preliminary frame on which the sheets will be installed.
Whichever option you prefer, you should know that the sheets need to be fitted very tightly, even when overlapping. If one of the edges of your sheets starts to rust, you can get a hole that will have to be repaired with something. In this case, you will have to buy a new sheet of metal and attach it to an existing structure. Also, take care to purchase quality metal sheets that can withstand weather conditions, humidity, frost, heat, etc.
The optimality of this option will also be high due to the fact that you do not need to invest large sums, building a garage from this material will not hit your budget. Another plus is the ability to build a garage very quickly. Perhaps metal garages are much faster and easier to build than any other materials.
An example of such a garage can be found below, in the figure. Surely you have often seen such garages in your area, in the city. Such designs were once very popular in garage cooperatives.

In the case of reinforced concrete, you will get a reliable structure that can be easily and easily disassembled and dismantled. Such materials also cost relatively modestly, but the reliability of such a design is very high. In the figure below, you can see a reinforced concrete building.

When choosing materials for building a garage, you should not forget about what the foundation of your garage will be like. An important point and useful clarification will be the layout of the garage under the gate. Do not be too lazy to make metal loot in the gate of your garage. In the future, you will be grateful to yourself, because it will be much easier to install any type of gate, both to weld ordinary, swing, and to install sliding, lifting, sectional, etc., depending on your preferences.
An example of the foundation and preparation of the gate in the figure below.

Useful video - what is better to build a garage from
A garage is a necessary purchase for every car owner. It allows you to leave the car in the parking lot in optimal conditions, provides protection from negative influences of various kinds, allows you to carry out maintenance and repairs in comfortable and convenient conditions. Only by leaving the car in the garage, you can not worry about the fact that it can be stolen, damaged, opened and stolen valuables, etc. No one will argue with the fact that having a garage is convenient, practical and pleasant. But not all car owners can buy a garage in modern economic conditions.
In such a situation, you can try to build a garage yourself. But not all materials and types of construction provide truly significant savings. Capital construction in any case will be expensive, since the materials themselves and the technologies used require significant investments. But among modern building materials and available technologies, you can choose those that will make the construction of an inexpensive and practical garage possible. Many craftsmen have been using such buildings for more than a year. In this article, we will tell you how to build a garage cheaply and quickly with your own hands, what materials to choose for this and what technology to use. Choose what suits you and build a modern and inexpensive garage for your car!
The widest range of the modern construction market allows you to choose the best type of materials for any type of construction. You can choose from among traditional options, for example, brick or wood, and among relatively new proposals, for example, corrugated board, sip panels, etc. We invite you to consider the materials that are best suited for building an inexpensive, aesthetic and practical garage.
The first thing that comes to mind when it comes to garage building material is brick. Indeed, most often capital garages are built from this material. Of course, the properties of this material are at their best: it is strong and beautiful, reliable and durable, and allows you to create high-quality worthy buildings. But allow yourself brick garage not everyone can, since its construction costs a decent amount. And the construction itself takes a lot of time. Therefore, if you want to build a garage quickly and at no extra cost, then pay attention to more affordable materials:
- Tree. This is one of the most traditional materials for the construction of buildings for various purposes. Wood construction technologies have been honed and improved over the centuries, and today they have reached the highest level development. Among the excellent properties of this material are environmental friendliness, reliability, durability, ample opportunities for implementing architectural ideas, etc. A special atmosphere reigns in rooms built of wood, a pleasant microclimate is maintained, and optimal humidity is maintained. Build from modern wooden materials- pure pleasure! You can order at the manufacturer's factory a ready-made set of wooden elements according to your project with ready-made fasteners and connections. You just have to put the parts together to get a beautiful, reliable and high-quality garage. In some respects, wood even surpasses brick, and first of all, in terms of construction costs. The tree provides ample opportunities for the construction of cheap and high-quality buildings;
- cinder blocks. This material has gained wide popularity relatively recently. The main advantage of cinder blocks is low cost and ease of use. Perhaps this material is not able to provide sufficient quality for the construction of a residential building, but its properties are optimal for a garage. Among the strengths of cinder blocks can be noted a long service life, a high degree of reliability. And for a garage, these properties are the most important. Therefore, you can safely choose this material for building a garage;
- Decking. Universal option, which has found the widest application in solving various problems. Roofs are covered with it, fences and fences are built from it, and household buildings are erected, including garages. You can build a garage from corrugated board on a finished base in a matter of days without outside help. The building is neat, tidy, reliable and practical.
These materials can be called the most suitable for independent budget construction of a garage. Next, we will talk about how to build a garage cheaply and quickly with your own hands, a video tutorial will help you understand the basic principles of working with each of these materials.
Choosing wood as the main material for building a garage, you make a choice in favor of an aesthetic appearance, absolute safety for humans and the environment, affordable cost, ease of processing and use. Wood makes excellent garages, but when planning such a construction, you should also be aware of the special nuances that distinguish working with wood.
For the construction of a garage, two modern wood construction technologies are optimally suited. In the first case, an affordable rounded log is used, and in the second, frame technology is used. Buildings made of round logs are distinguished by a high degree of reliability. They are strong and beautiful. But the construction of frame technology- more affordable. In this situation, you need to correlate your preferences, goals and objectives with the characteristics and features of a particular technology. This will help you choose the best option that suits you.
Features of building a wooden garage
Construction work always begins with a preparatory stage. It is very important to analyze your capabilities and requirements, correctly choose a place for construction, and think over a project for a future building. And it is also necessary to decide whether your garage will stand separately or be attached to the house, there will be an inspection hole, a cellar and other elements in it. And also immediately you need to decide on the type of gate and think through all other aspects to the smallest detail. This is necessary so that in the future the work is carried out according to a clear, well-thought-out plan, quickly and efficiently.
When you draw up a project and think over the sequence of work, it is necessary to prepare the selected site for construction work. It needs to be leveled and compacted. The evenness of the site affects the quality of the future structure.
On the prepared site, a solid and high-quality foundation for the garage is created. You will need to prepare trenches around the perimeter of the planned building, form the formwork, fill in and compact the pillow of gravel and sand.
The most important step is to strengthen the base. For this, metal rods are used, which are laid on top of the sand and gravel cushion. After that, the base can be poured with a solution. The foundation is gaining strength for about three weeks. After this period, you can proceed to perform other work. The first thing that needs to be built is the lower reinforcing belt from a 50x100 mm beam.
Keep in mind that untreated wood has no protection against moisture, fungus and pests. Therefore, before construction, all wooden elements must be treated with antiseptic compounds.
To frame the frame, you will need a beam, which is convenient to make racks and gate leaves, as well as boards 50x100 mm, suitable for all other parts of the building. On the lower harness, the step should be no more than 120 cm.
Corner struts that will support the harness will additionally strengthen and strengthen the structure. As a result, the foundation of the building will turn out to be strong, stable, reliable. It is important to do all the work as accurately as possible from the very beginning, since mistakes in the initial stages will certainly make themselves felt later.
In wood construction technology, the most costly and complex stages are the construction of the foundation and the creation of the frame. The frame requires both better material, and more time and maximum accuracy. And you can even perform sheathing from an ordinary board or lining. It will not take much time and will not require any special skills from you. Finishing a wooden garage can be done using almost any material. Do not forget about the need for high-quality performance of hydro and vapor barrier. To do this, you can use polypropylene or polyethylene film.
There is nothing difficult in the construction of a wooden garage. You will need a little patience and basic knowledge in the field of construction.
Cinder block garages are quite common today. If you decide to build such a garage, then you need to know that cinder blocks are different:
- Domain cinder block. It has good properties, has a long service life;
- From the brick fight;
- Shell rock.
Sometimes cinder blocks are made with the addition of polystyrene, perlite and other components that can improve the performance properties of this material.
For the construction of a garage, cinder blocks could be called an excellent material, if not for one of its drawbacks - moisture absorption. Due to the penetration of water into the material, it quickly collapses and loses its properties. Therefore, it is best to choose cinder blocks for construction on dry ground. In such conditions, buildings made of cinder blocks can last up to 50 years, retaining their properties. If groundwater is encountered on the territory of future construction, then it is better to refuse to use cinder blocks, since there is no processing or other reliable way prevent water intrusion.
Do not forget to also take into account the classification of cinder blocks by configuration. They are full-bodied and hollow. The first type is for building walls. The second can be used for building foundations. If you use the blocks for other purposes, then your building may turn out to be of poor quality and unreliable.
Features of construction from cinder blocks
Just as in the case of the construction of a wooden garage, cinder block construction begins with preparation: the area is cleaned, leveled, compacted, and a project and a detailed work plan are developed.
A wooden building requires a flood foundation, while cinder blocks do not need such a solid foundation. For a cinder block garage, the best option would be. For its device, it is necessary to remove the upper layers of the earth and prepare a trench. Its depth should reach 50 cm, and its width - 45 cm. After that, a layer of sand and broken bricks is laid out at the bottom of the trench. After that, the foundation is poured with mortar.
There is another way to build a strip foundation. After preparing the trench, it is laid out with a layer of moistened sand. This layer makes the base stronger and more resistant to temperature extremes, moisture and other negative impacts. Then he performs the strengthening of the structure and its filling.
It takes about a month for the tape base to gain strength. After that, you can proceed to the construction of walls. But there is another way to do strip foundation. This is the simplest technology, which differs in that instead of sand, the trench is laid out with rubble stone and immediately after that it is poured with mortar, grades 150 m higher.
When the base is ready, it is necessary to put hydro and vapor barrier materials on it. The optimal choice for solving this problem is roofing material, an affordable and time-tested material.
After that, the work is carried out in the following order:
- Wall construction;
- floor device;
- Roof device;
- Gate installation.
It is necessary to lay cinder blocks according to the same principle as brick. But in this case, the work will be carried out much faster and easier. There are two types of masonry - the spoon method, in half a stone, and the poke method, in one stone. Use masonry in two and one and a half stones. You should focus on your own skills and capabilities, choosing one or another type of masonry. Do not forget that the features of the masonry are reflected in the characteristics of the finished structure, its strength, resistance to negative factors, durability. For example, a garage built of one stone will freeze at low temperatures, even if it is heated from the inside with several heaters. And the design, laid in one and a half stones, will turn out to be quite warm and comfortable.
Wall laying starts from the corners. After that, a string is stretched between them, and the masonry continues along its level.
The finishing work in the construction of a cinder block garage is to carry out the necessary communications and finish the building from the inside.
Decking is a practical versatile material. Fences and various outbuildings are often erected from it. Garages made of corrugated board are strong and reliable, have a pleasant appearance and good features. But, when planning the construction of garages from corrugated board, it is important to choose the right material. Do you want to build an inexpensive but reliable garage? Then choose corrugated board, grade C or PS.
In order to make the right choice, you need to understand the labeling of the material. It is carried out by means of letter and number designation. The material marked with the letter "C" is intended for walls. The number marked on the material indicates its rigidity. The larger the number, the higher the rigidity of the sheet. For the construction of a garage, we recommend that you stop at the material marked "C-20".
Some sellers may recommend that you replace C-20 with C-10 or C-8. We do not recommend making such a choice, because a garage made of this material, although it will cost less, will turn out to be short-lived and unreliable. In winter, thin sheets will quickly freeze, and it will be quite difficult to warm them up. And also this material does not cope well with wind loads. These are all unsuitable properties for good garage. Therefore, for the construction you need to take only twenty. As for the thickness of the sheet, the optimal choice is 0.5 mm.
Features of building a garage from corrugated board
To build such a garage, you need to purchase:
- Concrete for the base and reinforcement for its reinforcement;
- Frame details: timber, metal rods, corner;
- Gate elements;
- Fasteners.
As for the tool, for the construction of corrugated board you will need:
- Welding machine;
- Screwdriver;
- Scissors for metal;
- Bulgarian;
- Electric jigsaw.
The first stage of work on the construction of a garage from corrugated board is the foundation. For such a building, the best solution would be to make a monolithic base. To do this, the upper layers of the earth are removed. Moistened sand is poured into the resulting pit. For frame racks, it is necessary to provide special wells, which will also play the role of foundation racks. Wells must be driven into the ground to a depth of half a meter.
Thanks to these elements, the foundation will turn out to be stronger and more durable. It will cope well with ground movements.
After that, work is carried out according to the standard scheme. A formwork is installed along the perimeter of the pit, reinforcing rods are attached to it, interconnected by wire. After that, frame racks are installed in the prepared wells.
Before this, the lower parts of the racks are treated with bitumen to prevent moisture penetration and reduce other harmful effects.
During the installation of racks, you must carefully monitor their level. They must be strictly vertical. This should be regularly checked by the building level. After installing the racks, the base is poured with M300 concrete. For the construction of a garage from corrugated board, this choice will be optimal.
It is recommended to allow the foundation to gain strength within three weeks. Although some masters believe that it is possible to proceed to further work in a couple of days after pouring the base. But such a rush can lead to cracking of the foundation, which will completely disable it. So it’s better not to rush and wait for the allotted time so as not to negate all efforts.
After the foundation has gained strength, you can mount the metal frame. First you need to prepare pipes according to the dimensions corresponding to the project. You can cut them with a grinder, a jigsaw, connect them with welding. If you have previously had experience with welding, then you will need less than three days to mount the frame. If you are just learning this equipment, you can assemble the frame in a week. Be sure to check the dimensions of the material with the project to avoid annoying mistakes.
Horizontal elements are welded to the installed racks. Welding is carried out at three points. If you plan to make a wooden frame, then special fasteners must be welded to the racks. Between themselves, the bars are fastened with self-tapping screws.
Sheets of corrugated board are also attached to self-tapping screws with a special rubber gasket. You can cut the material with a jigsaw. For this stage of work, it is advisable to enlist the help of two or three people. It is much easier for a team to perform sheathing with corrugated board.
After assembling the frame, you need to consider installing the gate. This part of the construction is very important, since any inaccuracy can lead to the fact that the garage doors simply will not open. You can weld the gate frame from metal corners, and use sheets of corrugated board as sheathing.
The best option for a roof for an inexpensive garage is a shed. The material for the frame will be the crossbars made of wood or metal, and the lining is suitable for the crate. When choosing materials for your roof, be sure to consider the climate in your area. For southern places, you can use a light crate. For colder areas, you need to pay more attention to the creation of the roof, because it must be designed for strong winds, precipitation, snow, etc.
Now you have an idea of how to quickly and inexpensively build a garage. Choose the option that suits you and get started! We wish you good luck!
Every atomobilist knows well how important a garage is for the safety of the car.
In addition to reliable protection against theft, this structure allows you to comfortably service a car and at the same time performs a number of useful economic functions.
In the garage, you can equip a mini-workshop, a workshop for the manufacture of carpentry or upholstered furniture, an inspection pit, a cellar, and even a cozy rest room from household chores and a grumpy wife.
The direct economic benefit from the garage is also important.
The annual cost of its maintenance is incomparably less than the constant fee for a parking space in a car park. Therefore, not only motorized citizens, but also owners country cottages and cottages are trying to realize their plans for the construction of capital shelters for the car.
There are a lot of options for the construction of this object, so the final choice depends only on your budget and skillful hands.
Today it is possible to build a garage in a country house or in a city not only from brick, but also from foam block, cinder blocks and timber. Light structures made of sandwich panels and frame options using corrugated board have proven themselves well. Consider the advantages of each structural system in order to select the best in terms of cost and ease of construction.
We note right away that, according to the established gradation, all existing shelters for cars are divided into capital and temporary. The difference between them lies in the possibility of quick dismantling and disassembly and transportation to another installation site. It is clear that a garage, the walls of which are built of aerated concrete or bricks, is much more difficult to disassemble without damaging the material than a lightweight structure made of corrugated board or sandwich panels assembled on threaded joints.
At the same time, both capital and temporary garages need a solid foundation and foundation. The first one is needed in order to transfer the load from the walls and floors to the ground, and under the second ones, the foundation is usually done to level the ground for the installation of wall modules. Accordingly, the depth of the foundation for a permanent garage will be several times greater than for a prefabricated structure.
Brick

Answering the question of what to build a garage from, you need to not only evaluate your financial resources, but also decide on its purpose. If this structure will not be used in the winter, then it should not be insulated. If you plan to use the garage year-round, then both the material and the method of insulation should fully comply with this goal.
Cold brick garages are most profitable to build in a cooperative, since in this case there is no need to build thick walls for paneling and protection from intrusion. The "cellular" structure of cooperative garages is very simple: each wall of your garage is also the wall of a neighbor, so all construction costs are divided in half. Such a garage is covered with wooden beams or logs, along which a crate is laid from a board, after which slate or metal tiles are laid.
If the garage will stand separately on suburban area, then the cooperative version of the wall half a brick thick will not work. Here it is better to build more powerful walls, at least one brick (250 mm) thick, and make ceilings from hollow reinforced concrete slabs. By doing this, you will not only protect the garage from intruders and get a good storage for the gifts of the garden. Let's make a reservation right away that a brick garage is very laborious in construction and requires good practical laying skills.
Foam and aerated concrete

These materials are in last years strongly pressed the brick, inferior to them in three main indicators: ease of masonry, speed of construction and energy saving.
Therefore, choosing from what you can make a garage cheap, first of all, consider aerated concrete or foam concrete. The large size, light weight and excellent geometry of these blocks does not require much experience to build a good and warm car shelter.
If you will cover the walls with reinforced concrete panels, do not forget to finish the last row of masonry with a monolithic reinforced concrete belt at least 10 cm high. It will protect the fragile aerated concrete from bursting. Thanks to smooth edges, a wall of light blocks does not require finishing, but aerated concrete will have to be treated from the outside with an acrylic primer or other deep penetration impregnation. It will protect the material from moisture, which can destroy it when it freezes.
The internal structure of foam concrete voids, unlike gas blocks, is not linear, but closed, so it does not need additional protection from moisture.
Log and timber

In the last century, firefighters recorded these materials as not recommended for garage construction. However, today's abundance of flame retardant impregnations and flame retardant finishes has made timber and logs quite suitable for car shelter.
Therefore, having built a cottage or a cottage from rounded logs or planed timber, you will ideally complement the landscape of the site with a garage of the same material. To improve fire resistance wooden walls from the inside, they can be insulated with a semi-rigid basalt wool slab, and then lined with moisture-resistant plasterboard or glass-magnesite sheets.
When making the floor, be sure to insulate it with expanded clay screed, and lay the heating cable on top under the grout. This option is optimal for any garage design, as it provides comfortable warmth and excellent safety of the car body.
Decking and sandwich panels

Most car owners can afford to make an inexpensive aerated concrete garage, but the option of a prefabricated structure also deserves attention. by the most simple option is the assembly of a frame from a metal profile, followed by sheathing with corrugated board.
This technology is used to build cold shelters for cars. But for high-quality wall insulation, you will need to choose a step of frame racks equal to the width or length of a rigid mineral wool slab (50 or 100 cm). In this case, the insulation will evenly and accurately fall into place, after which it must be sewn up with any sheet material. For example, flat asbestos-cement sheets, cement-bonded particle board, OSB, flame retardant-treated wooden clapboard, or galvanized steel.
Multilayer panels are divided into two types: a classic sandwich of steel corrugated board with mineral wool, polystyrene or polyurethane foam insulation and constructions of OSB sheets with foam.
You can purchase a ready-made "constructor" for self-assembly (metal frame, panels, gates, additional elements and fasteners). Anyone who does not want to pick up a welding machine and a screwdriver can order installation immediately upon purchase.

When building with your own hands, the cost of a garage made of sandwich panels is comparable to the price of a foam block option. It will take 3-4 days less time to build it, since not only the walls, but also the roof is assembled from multilayer panels and does not require insulation.
Important points on which the quality of the construction of sandwich panels depends - the accuracy of pouring concrete base and frame assembly. If these works are done correctly, then the installation of walls and roofs takes no more than a day.
If you are going to buy a car, then you will need a garage for it. Such an acquisition is significant for many, so the newly minted owners of their own vehicle are trying to build a cheap garage with their own hands. Modern technologies construction allows you to build it in the shortest possible time, spending a minimum of funds.
Material selection
The cheapest solutions for walls will be cinder blocks and foam blocks. The latter are easier to lay, which is why consumers choose most often. If you are thinking about how to build a garage cheaply, then you should pay attention to the foam block, which has a small weight, so even one person will be able to handle the work process. For such a garage, a strip foundation made of concrete is suitable, while the width of the structure can be approximately 200 mm.
When thinking about how to build a garage cheaply, you should remember that it is better to make the foundation low, which will reduce the cost of construction. Three cubes of concrete will be needed to build a standard garage with dimensions of 3 x 6 m. At the same time, the base will need to be deepened by 0.9 m. It should be remembered that this parameter is not standard, because the foundation must be located below the ground freezing line.
If you want to build a cheap garage with your own hands, you also need to take care of an inexpensive roof. Traditionally, it is single-pitched with a wooden frame system and slate coating. For maximum cost reduction, it will be enough to install only a crate under the slate. It is better to refuse the use of ondulin, because it will almost double the cost of roofing.
Construction of aerated concrete garage

If you are thinking about the question of what to build a garage from, then you can choose aerated concrete. The foundation can be not only lightweight tape, but also monolithic. Experts recommend using it. With its help, it will be possible to distribute the load as evenly as possible, which will reduce sedimentary deformation to a minimum.
If you are aiming to reduce the cost of construction as much as possible, then it is better to use a strip or combined foundation, which is made of reinforced concrete and a columnar monolithic belt. After the foundation is completed and the concrete has hardened, you can begin to build walls.
The first row should be carried out on a pre-laid layer, and if you decide to use a monolithic reinforced concrete slab, That aerated concrete blocks placed directly on the base surface. This will allow for high-quality waterproofing using roll material. Experts recommend purchasing hydrostekloizol, which is laid on top of bituminous mastic.
Walling

If, when deciding what to build a garage from, you chose aerated concrete blocks, then their laying should be carried out with bandaging of the seams. Use as masonry mixture you can cement mortar or glue. The latter option will cost a little more, but working with this mixture is much more convenient and easier. The thickness of the seam can be a limit of 3 to 5 mm, while when using a solution, this parameter will be increased to 1 cm.
Every two rows of masonry, a metal reinforcing mesh should be placed, its edges should protrude a few centimeters beyond the walls, which will allow you to control the laying of the reinforcement. When aerated concrete is used, jumper beams are laid over the opening for the gate. For one machine, the width of the opening will be approximately 3 m, while for two machines it is possible to make a common opening with a width of up to 6 m.
The jumper should be made of two profile corners, the shelf of each of which will be 100 mm. The corners should be placed along the edges of the blocks and fixed to each other or to the reinforcement in several places. Then the elements must be coated with a primer. The jumper should be laid on the same solution that is used when laying aerated concrete blocks. The edge of the beam on both sides should be located on the walls for a length of 200 mm. If you plan to equip a wider opening, then you will need to calculate the beam, taking into account the bending load.
When building a garage from aerated concrete, you will have to complete the construction of the walls, only after that you can proceed to tying them with belts. Their design will depend on the type of roof, floors and wall features. In this case, loads must be taken into account. If it is planned to build a second floor, then it will be necessary to lay reinforced concrete. To equip the roof from wooden roof trusses, it is necessary to lay a mauerlat, which is a log or wooden beam. It should be fixed, and before laying the strapping beam on the walls, it is necessary to lay waterproofing from bituminous mastic and roll material.
Addition in the form of a viewing hole

Aerated concrete garage may require the construction of a viewing hole. For this, a pit is dug, the dimensions of which will be as follows: 1.5 x 0.8 x 1.8 mm. The inner walls of the pit must be lined with bricks, and then covered with plaster. To carry out such work, it is necessary to use slag brick, which has high water resistance.
For plastering, it is necessary to use a part of cement and 4 parts of sand, diluted with water. On final stage walls are painted. Along the perimeter, you can install a frame welded from profile corners. For concreting the floor, you can use the same solution as for arranging the foundation. The layer thickness will be approximately 70 mm.
Building a cinder block garage: building a foundation

A cinder block garage can be built on a rubble concrete foundation. It will be not only cheap, but also the easiest to perform. To begin with, a trench is dug, on the bottom of which rubble stone is laid in layers. Layers should be filled with cement. It is necessary to use a solution of brand M-150 or higher.
For self-preparation, Portland cement 400 must be mixed with sand and water. The liquid will need such an amount to achieve the mobility of the mixture. To install a plinth along the perimeter of the trench, it is necessary to install a wooden formwork. A waterproofing layer of two layers of roofing material is laid along the basement.
Building walls and roofs

Having bought building materials cheaply, you can start building walls. Up to this point, gates are installed, which will be strengthened into masonry as it is erected. When installing cinder blocks, it is necessary to observe the dressing of the seams. It is necessary to start the installation of products from the corners, pulling the cord between them.
I-beams 120 mm should be used for overlapping. Their length should be 25 cm more than the width of the room. The elements are located across the garage in 80 cm increments so that the elements repeat the slope of the long wall. After completing these works, you can start sewing the floor. Below are 40-mm beams, on top of which roofing material is laid.
At the next stage, slag, a semi-rigid mineral slab or expanded clay is laid. When building a cheap garage with your own hands, you should make sure that during operation it does not require repairs and additional costs. To do this, when laying the roof, it is necessary to bring it out at the back and front by 20 cm. Such visors prevent the walls from getting wet during rain. A screed is made on top of the roofing material and slag, the thickness of which should be 20 mm. At the final stage, the roof is protected from moisture with rubemast or aquaizol.
Features of building a garage from a metal profile

Garage from profile pipe costs only 30,000 rubles. To assemble the frame, you can use a welding machine or bolted connections. After the assembly of the frame is completed, its surface must be protected with a primer and a layer of paint applied at the final stage.
The finished frame is sheathed with sheets of profiled metal. To protect the frame, you can use special dyes that are suitable even for rusty surfaces. This choice will save not only money, but also time. When applying a paintwork material, a protective layer is created that eliminates corrosion.
Construction of a wooden garage
The garage from the boards will be able to withstand which will also act as a strong floor. After the mortar has hardened, the bottom strapping should be made of boards, the size of which is 100 x 500 mm.
For the construction of gates and corner posts, it is necessary to use square bars with a side of 100 mm. To increase the strength of the frame in the corners, it is necessary to install struts. To build such a garage, building materials will cost you cheap. After completing the work on the frame, you can begin the construction of the roof. For this, boards 100 x 25 mm are used, which are sheathed with profiled sheets.
Conclusion
You can build a cheap garage with your own hands by installing wooden gates. Their cost compared to metal will be lower, as well as reliability. Without interior decoration the price of the garage can be reduced even more. But if you do the work yourself, you can save on the services of specialists. You can decide which material to prefer by reading the information in the article. Below will be presented the technology of building an inexpensive garage.
This article - personal experience on the construction of a garage, supported by photographs. This summer, my father-in-law and I built a garage. I am still a novice builder, and 20 years ago he completed the construction of the house himself. It must be said that everything was done so thoroughly that for all this time of years not a single crack or problem with the structure has arisen. Therefore, the garage was built in the image and likeness.
Foundation
For a very long time we thought about the project plan, weighed all the pros and cons. Construction began in early April. The planned free-standing garage should be 6 meters long and 3 meters wide. The height without a roof is 2.40 m. We have a passenger car, so there was no point in building a garage higher.It all started with the fact that we hammered 4 pegs in the corners of the planned garage and pulled a silk thread around the perimeter.
Then we dug a foundation 40 cm wide and 50 cm deep for 4 days. You need to dig very carefully so that there are no collapses. If some part of the pit collapses, then more concrete will be spent on the foundation.

Then, at the bottom of the dug trench, we covered the sand with a thickness of 5 cm, filled it with water and rammed it. Father-in-law in his youth was often in construction teams. So the seasoned Soviet foremen said that compacted wet sand holds together - best base for the foundation.
 Next, reinforcement is laid out at the bottom. The rods should be 6-8 mm in diameter, and must be placed in different planes and directions. So they will better "hold" the foundation. Well, then the process of concreting begins.
I advise readers of MirSovetov to get a concrete mixer. Now there are many ads where concrete mixers are rented. Payment - daily. Concreting is a very difficult job. The two of us and with a concrete mixer spent 2 days on it. It is hard to imagine what it would be like without such a quick assistant.So, the mortar for the foundation is 1 part of cement, 2 parts of sand, 5-6 parts of crushed stone. All this is loaded into a concrete mixer, kneaded, and then water is added. This is the consistency of concrete.
 It is very important to choose the right gravel and sand. Crushed stone should be fine, and sand - necessarily sea. Clay comes across in river sand, but it is useless in solution. And it’s easy to distinguish them: river sand orange color, and the sea is almost white.
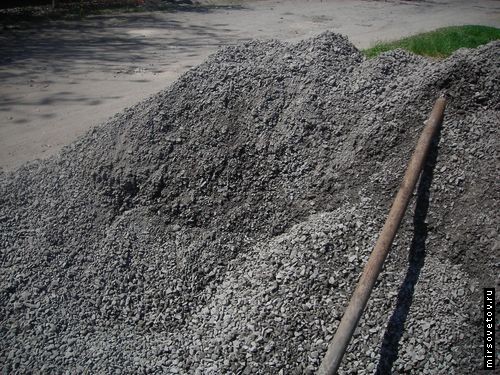
 Here is a device we came up with to drain the solution from the concrete mixer. So it is easier for him to give direction, and the solution does not splatter.
  It is important to pour the foundation into the level. It is very difficult to lay on an uneven foundation. Our site is not perfectly level, so we had to come up with this. We put cinder blocks around the perimeter (inside and outside the foundation) and covered them with an old film, we got a good formwork. So in the right places we brought the foundation to zero.
 More reinforcement was placed on top of the concrete (now in the form of a grid). In general, you should try to shift the foundation over the entire height with reinforcement.
  In the place where the entrance gate was planned, a board of the required length was “drowned” in the center of the foundation. This is how it all looked:
  This design should stand for 30-40 days. The first two days you need to protect concrete from rain. But then it is useful to spray it from a watering can at least once every two or three days. It is very bad if the concrete dries quickly. Therefore, let it stand for a month and stand well. True, after a week the cinder blocks and the board can be removed.
 Wall masonry
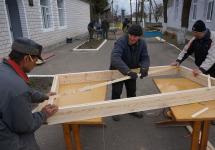
Before you start laying the walls, you need to cover the entire foundation with roofing material, so that it protrudes a couple of centimeters on the sides. This will provide good waterproofing, and the walls will not be damp from the foundation.The next step is to install and secure the gate. Our gates turned out to be very heavy, we put them together with four people. Attached with boards to a nearby grape frame. The main thing is to strengthen so that they do not fall. Usually this is done with the help of spacers, but we have already acted according to the situation.
We ordered the manufacture of gates to professionals. By ourselves, such a thing is not possible. Gate dimensions - 2400x2000mm. And one door is wider than the other for a simple reason - next to standing house would not let the doors of the same width swing open.

 I'm looking ahead - a photo of the gate leaf.
 Well, now it's time to put the cinder block. We calculated that the garage would need about 600 cinder blocks, but in the end there were still 80 left.
 I advise you to buy a used cinder block. The fact is that now new cinder blocks are being poured to anyone who is not lazy, the quality is disgusting. But the cinder block "from the past", even the used one, is simply pleasing. And yet, I forgot to say, the cinder block garage is the warmest!To tell the truth, it only seems that laying the cinder block is easy. After 7-8 rows (and there were already 12 of them), it becomes very difficult to raise it. And in order to drive out all 2.40 m, you will need goats. The masonry took 5 days (from dusk to dawn).
"Recipe" of the solution: 1 part of cement + 4 parts of sand + water.

 The laying of cinder blocks starts from the gate. Each cinder block is leveled. Laying method - dressing; as you can see, the vertical seams are not aligned.
  In the last row of the cinder block, logs (we have pine trees) need to be embedded, having previously dried them. Logs should be located at a distance of 90-100 cm from each other. And in the 11th, penultimate row of the cinder block in the places where the logs are planned, a wire with a diameter of 6 mm is inserted into the cavity of the cinder block. It should be in the form of an inverted letter "P". With its help, the log is fixed, in other words, twisted, the excess ends of the wire are cut off.
And one more thing - I will remind the readers of MirSovetov that it is necessary to provide ventilation holes. We made one near the gate at the top and another one at the far end of the garage, also at the top. According to the rules, one hole should be at the bottom, the other at the top, then the air will circulate perfectly. However, in our case, the lower hole was moved under the roof, otherwise it would be heated during rains or snowmelt. The holes are closed with a special grate with a valve (sold in building stores) from the inside and a mesh from the outside.


How to make a roof
I will say right away that after laying the walls, my family and I went to the sea. And the father-in-law hired a neighbor-roofer, he would not have coped alone. The camera was with us at sea, so the photos are not step by step. But I will try to describe the meaning of the process in detail.So, after laying on top of both six-meter walls of the garage, “overtaking” (or Mauerlat) is placed on the mortar. This is such a board, 30-40 mm thick and 150 mm wide. In our case, the board was again pine. When the solution dries, the roofing process begins. Rafters are knocked down from boards (at least 30 mm thick) or thin logs - structures in the form of a printed letter "A". There should be as many of them as those logs that we have built into the walls. Two boards are sawn at the top, fastened with nails, and across the whole structure is fixed with another board. Next, the rafters are put on "overtaking" (and reinforced with 120 mm nails or special staples). I want to draw the attention of MirSovetov readers to the fact that the rafters must be installed so that they do not reach 3 cm on each side to the outer edge of the overtaking. Otherwise, after laying the slate, large holes will remain under it.

Our rafters are knocked down from logs, so it was difficult to level them. But, nevertheless, a strict vertical must be observed. Check it out for sure!Next, boards (sheathing) 20 mm thick are stuffed onto the rafters. In general, there are several options. The first - the boards are stuffed with a continuous layer. The second - roofing material (additional insulation) is placed on top of the boards. But in our area, a board is an expensive pleasure, so we chose the third option: we filled the boards at the top of the rafters, at the bottom and 2 longitudinal rows exactly where the nails will be hammered when laying the slate.
Boards must be placed strictly horizontally. This is checked using the rule - such a tool made of aluminum strip, 1.5-2 meters long. You can, in principle, check with the help of a level, but such long levels are rare. What happens if the boards are not filled horizontally? When laying the slate will crack, and then, in further operation, it may swell.Next was the slate. We have it 8-wave. In front and behind the garage, a slate overlap is made (so that the wall does not get wet during rain) about 30-40 cm, on the sides - 25-30 cm.

 Each slate sheet has a marking - a red inscription, so when laying it should be on top, overlapping only one wave of another slate sheet. The slate is fixed to the lathing with a slate nail (100 mm) with a flat head.
And further. When hammering a nail, try not to get 2 nails in one wave. This cannot be allowed. In general, at least 4 nails are hammered into each sheet of slate.At the same time, a slate or galvanized ridge is stuffed with slate nails. It is laid flat. Again, make sure that the nails do not fall into the same wave of slate.
Here is the entire structure.
 After the completion of the roof, it is necessary to lay out the gables. It is very difficult to lay them out of cinder block, it is easier if it is slag or white brick. To reduce the load on the foundation, the brick is placed "at the end" (in other words, sideways).
  Here, in principle, the garage is ready.
 Attic, viewing hole
We also planned to make a small attic, planned a viewing hole. Therefore, I had to stuff the ceiling (with a board, 30 mm thick). To do this, they first pulled a thread along the garage, a kind of level, and stuffed the ceiling with nails. This is not an easy job, because you have to beat yourself. In principle, you can only fill the slats and smear them with clay. So to speak, the light version. Then they dug an inspection pit, 80 cm wide, 150 cm deep, and 180 cm long. They overlaid it “in half a brick” with slag brick (it is waterproof, which is important, given that it is usually damp in the pit) and plastered. Along the perimeter, a frame was welded from a corner (50 mm), a “mustache” made of wire was welded to it, which were then (during the concreting of the floor) embedded in concrete. The pit is closed with a board (magpie), which is laid across, not fastened with anything, and, if necessary, removed (it prevents moisture from evaporating from the pit and protects the bottom of the car from corrosion). The board also needs to be polished. A ladder was also welded from the corner. Sorry for the photo quality.
  Here is the final view, however, boxes for vegetables are temporarily stored in the pit.
  The floor is concreted with the same concrete solution as the foundation. Floor thickness 7-8 cm.
  Further, before, electrical wiring is done. And then the walls are plastered. The solution (1 cement + 4 sand + water) is thrown with a trowel, leveled with a trowel and smoothed with a special plank. You can then paint the walls if you wish.
  In principle, the garage is ready.
 Outside, around the perimeter of the garage, it is also worth concrete to wastewater did not wash the foundation.
Garage decoration
And another important aspect of construction is the official one. The building must be registered in the BTI. In principle, our garage is considered a self-construction, for which the BTI requested a fine. Only here, in addition to the garage, there are other unauthorized buildings on the site. So, calling an expert and registering buildings (buildings with a foundation) cost us 1000 UAH. For all three buildings. It turns out that at least one unauthorized building, at least three, is still 1000 UAH. We live in Ukraine, if you are from other countries, check the details of registration. It may be cheaper in other countries to register a building plan before construction begins.I want to express my gratitude to my father-in-law, who shared with me many of the nuances of construction, gleaned back in Soviet times. Perhaps some new technologies have appeared now, but then they built, as they say, for centuries. Yes, and everything has been checked - an extension to the house, built using this technology, has stood safely for 20 years.
That's my whole story. I will be glad if it is useful to someone from the readers of MirSovetov. Keep in mind that construction is not cheap and not fast. The entire garage cost us 12 thousand hryvnia plus 1 thousand for registration, and the construction lasted 3.5 months. By the standards of our city, this is cheap, because a garage in a cooperative costs 3-4 thousand dollars. So we saved. And the garage near the house is a very convenient thing.