- Balcony Balcony and Loggia Repair Dreams of a home owner about a warm, comfortable balcony or loggia are feasible. One has only to want, having required amount bills, and dreams will turn into reality. Combining a glazed, insulated balcony with a room and a kitchen, turning a loggia into a winter greenhouse or into a separate living space - all this can be done, and with your own hands. In this section of the site you will find step by step instructions for insulation and glazing, as well as installation and installation of the finishing of the balcony and loggia. They will help you carry out the work yourself or professionally evaluate the repair work performed by qualified builders.
- Bathroom Bathroom renovation While taking a hot bath, you probably want to relax. A beautiful ceiling, luxurious walls and floor are very conducive to this process. Few owners of square meters» refuse to use high-quality sanitary ware, faience sanitary ware, household appliances and equipment. The publications collected in this section of the site will help you choose the right household appliances, plumbing and finishing materials for you. Even in Khrushchev, this room, whose area does not exceed 2 square meters, with proper planning, can look great and meet functional requirements.
- doors Entrance and interior doors - selection, installation, installation My home is my fortress. This is how the English lawyer Edward Kok once described the feeling of security in his home. But not a single outpost will be reliably protected without strong, and sometimes even armored gates. A modern apartment, like a medieval citadel, needs protection in the form of front door. We think that if you protect the entrance to the apartment with a modern door unit, you will feel a sense of security forever. But that's not all. Members of a large family, who have their own personal space in the house, instinctively want to isolate themselves, at least for a while, even from their own people. And here it is impossible to do without interior door. This section of the site contains publications on the selection and installation of entrance and interior doors.
- Kitchen Kitchen renovation The kitchen is undoubtedly the most popular room in a modern apartment. We cook in it, and often eat food, unless, of course, a dining room is provided in the house. During the preparation of culinary masterpieces, the hostess spends almost all of her time in it. free time. It is important that the necessary kitchen utensils, household items and equipment are at hand, and the furniture is located so as not to hamper the movement of the cook. In this section of our website, we will talk about finishing materials compatible with food and their application. Our step-by-step instructions will allow you to do your own kitchen renovation or teach you how to supervise the work of a hired repair team.
- Repair materials The choice of building materials and their description Materials for repair is a capacious concept that implies thousands of names, hundreds of groups and dozens of categories of building materials. They help to realize the wishes and dreams of a comfortable, functional and convenient housing that meets the requirements. Wherein appearance and the quality of the elements of your home directly depends on the chosen building materials. In order not to regret the money spent in vain, when a poor-quality finish falls off or loses its decorative properties, purchase only repair materials tested by professionals. The publications collected in this section of the site will help you make the right choice.
- Window Windows and balcony frames An important element of a modern apartment is a window. And the question of what it is made of plays an important role in ensuring a comfortable stay in this apartment. Indeed, in addition to protecting the room from atmospheric phenomena, the window protects from street noise, especially when the room is facing a busy highway. This section contains materials on the manufacture, appearance and features of windows and balcony frames for your apartment or private house.
- Floor Repair and finishing of the floor An integral part of the interior of the dwelling is the floor. The problem-free living of households is associated with the state of the basis of sex and floor covering. Even the health of the inhabitants of the apartment directly depends on whether the floor is warm or cold. This is especially true for young children who spend most of their time in games, on the floor. Modern building materials require absolute evenness of the base on which laying is planned. This section of the site combines publications in which we describe and show the process of preparing, installing and installing screed, "warm floors" and finishing.
- Ceiling Repair and decoration of the ceiling It is known that ceilings in modern apartments are not very even. The team of our site, relying on vast experience, will tell you many ways to repair, level and finish them with finishing building materials. Stretch - PVC and fabric, suspended - plasterboard, coffered, armstrong and grillto, pasted over with wallpaper and painted with paints. Each type of ceiling can become a real masterpiece. Step-by-step instructions, photos and videos about the installation or installation of each type of ceiling are collected in this section of the site. With the help of these materials, you can easily do everything yourself or professionally control the craftsmen hired to carry out the work.
- Walls Erecting, leveling and finishing walls Having a roof over your head is certainly great, but it would not hurt to lean on strong walls built for centuries. In apartments of block and brick high-rise buildings, they are naturally strong, but crooked, like a janissary's saber. Therefore, before finishing, they need to be leveled, and at the same time soundproofed to isolate themselves from noisy and reckless neighbors. And the walls bordering on the atmospheric environment also require insulation. In this section of the site, we have collected descriptions of building materials and step-by-step instructions for installing, assembling and fixing the finish, as well as sound, noise and even waterproofing walls.
- Toilet and sewerage Renovation of the toilet The age of the Internet and urbanization, super speeds and stress leaves little room for solitude and the opportunity to calmly reflect on the complexity of life. Household chores are also not conducive to special philosophical activity of the brain. However, during the day, even a super-busy person finds time for solitude and calm reasoning. This time is dictated by nature itself and the place for it, no matter how ridiculous it may be, is the toilet. This section of our site contains publications on the arrangement of the toilet, sewerage, on the choice of plumbing and its installation.
Anyone can install a curtain rod! To do this, you must clearly follow the instructions and take into account what material the walls or ceiling are made of.
An important part of the design of the room is the decor of the window opening. It is impossible to produce it without cornices! At the same time, their choice should be approached with all seriousness. After all, even a couple of centimeters of poorly placed curtains or curtains will spoil the overall impression in one fell swoop. So, let's consider what a cornice is and what should be considered during installation.
What can be cornices
- round;
- strings;
- profile;
- rolled;
- flexible;
- baguette.
According to the type of fasteners, they are divided into:
- wall;
- ceiling.
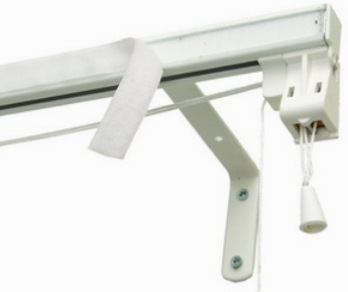
How to choose a fastening method? The ceiling cornice includes guides and a profile. In this case, the curtains move on hooks and along the entire plane of the guide. The profile is made of aluminum or plastic. Installation of curtain rods for curtains is the same as for the ceiling.
The design can be rail, rod or string. For string products, the suspension thread is a strong string. For rod products, a round rod is installed on the mounting bracket. Rail devices "move" curtains "on rails".


Wall cornices: "cozy" rod
Not sure how to install and choose a curtain rod? Then you should pay attention to wall products. Such devices are a rod or pipe. The material from which the products are made: natural wood, metal or plastic.
The main advantage of the presented option is the ability to choose the color of the curtain fabric to match the color of the rod. How to choose a cornice? First of all, pay attention to the weight of the curtains. The plastic option, if you prefer long curtains, should be excluded immediately. A good choice- a metal item.

Installation: instructions for use
Before installing the cornice, you need to familiarize yourself with the characteristics of the material from which the walls or ceiling are made. Installation of string, round, profile or rail products begins with marking the ceiling or walls. To carry out the work you will need dowels and screws. First, see if the eaves will interfere with the window.
See if there are heating pipes near the window. Mark up using a level. The distance between the edge of the window and the bar must be equal. Next is the installation itself:
- for a metal product - for 3 self-tapping screws;
- for plastic or wooden - for 1 dowel and 1 self-tapping screw.
It will be necessary to drill a hole in the wall for the dowel and install the dowel itself into it. Next, the bracket is fixed to the self-tapping screw. The second bracket is attached in the same way. The rod is fixed. Flerons are put on the edge of the bar.

Don't know how to install ceiling cornice for curtains, if the ceiling is made of plasterboard? Installation work is carried out in the same way as described above. In this case, special fasteners are used - the dowel "molly" and the dowel "butterfly". The feature of the presented dowels "spread their wings" contributes to reliable fastening in drywall or plastic panel. With wall mounting, the load can be up to 8 kg, and with ceiling mounting - 5 kg.
Useful video
Before installing a ceiling cornice, you should familiarize yourself with some rules. The device must be 40 cm larger than the width of the window. The distance between the product and the window is 5 cm. This is the only way the window will open without any problems.
Keep in mind, before choosing a cornice, you need to decide which curtain you will hang on it, for example, if you choose jacquard curtains, then you have only one choice - a wall cornice.
More details about the classifications of cornices, their parameters and selection conditions →
Have you chosen a cornice? Then first familiarize yourself with his device. Assemble the product and see if there are enough dowels and screws. If mounting is to be brick wall, dowels should be replaced with wooden plugs.

The distance from the rod to the wall should be approximately 15 cm. So the curtains will not come into contact with the batteries. The main difference between mounting to the ceiling and mounting to the wall is that in the first case, the distance from the wall to the cornice has to be taken into account. The rest of the fastening occurs in a similar way.
So, every person is able to carry out the installation. However, before that, it is recommended that you familiarize yourself with the presented rules. Do not forget that the cornice must support the weight of the curtains, which means that you need to take into account the material from which the product is made! Well, do not forget to remove the dust after work before hanging new curtains!
We have already talked about in one of the previous articles.
The choice is made, it remains to buy a cornice and install it correctly, according to your idea.
It is better to mount the cornice after the completion of construction and repair work, after pasting the walls and painting the ceilings.
Today we will talk in more detail about the methods of attaching ceiling and wall cornices and the difficulties that you may encounter.
Going to the store, we take measurements
Before you buy your favorite cornice, take the necessary measurements: the width of the window or wall as a whole. The distance from the side walls to the cornice may differ for each type of cornice.

If you intend to hang light curtains, consisting of one or two parts, which will elegantly frame the window opening, then the cornice can be hung over the window with protruding edges by 10-25 cm. A wall cornice consisting of one rod is suitable for this.

The cornice should not interfere with the opening of the window; therefore, it must be placed at least 5 cm above the opening. When installing a multi-row cornice, it is important to take into account its removal from the wall, the curtains should not touch the window handles, the battery and the protruding part of the window sill. Moreover, measurements must be made from the row closest to the window.
You can also fasten the cornice to the entire width of the wall with a window opening: from one side wall to the opposite, it all depends on the design of the curtain. So some types of cornices, for example for roller blinds, are attached directly to the window frame.
Let's start installation
Usually cornices are sold with a set of fasteners. Now consider the features of mounting various systems.
The cornice rail can be mounted both on the wall and on the ceiling.


How to attach the cornice to the wall? We mark the places for fastening and put marks for the holes. We drill them with a drill. The width of the drill should correspond to the width of the dowel, the depth of the hole should correspond to the length of the dowel. The short cornice is mounted on two brackets, with a rod length of more than 2.4 m, it is recommended to install an additional bracket in the center.
A plastic or metal tire can also be attached in two versions. If the installation of a ceiling cornice for curtains is not possible (stretch ceilings, uneven ceilings or plasterboard ceilings not designed for heavy curtains), then use special brackets directly to which the tire is attached.
Mounting the cornice to the ceiling
![]()

Through the holes in the eaves with a pencil, we make markings on the ceiling (places for drilling holes for dowels).
Fixing the rail to the wall bracket


Eaves-tires can be installed with rotary elements. Special plugs are installed along the edges of the cornice, round-shaped plugs close the places where the screws are screwed.

Often the length of standard cornices may not be enough, so there are connecting elements on sale. Cut off the desired length of the missing part and connect it to the main one. The two parts are tightly adjacent to each other, without interfering with the movement of the hook-runners. Additionally, plastic tapes are sold for decorating or masking the cornice.

Baguette cornices look more decorative. They are attached in the same way as ordinary cornices.


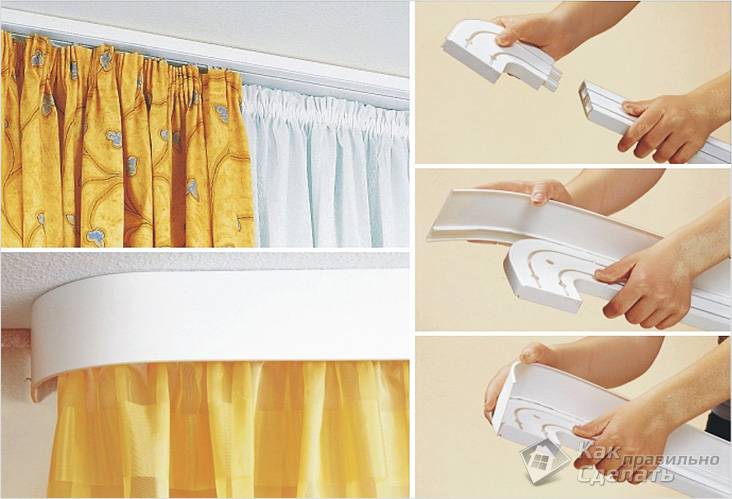
It is possible even at the stage of repair to provide a special niche for mounting the ceiling cornice. Here are a few options for hiding the ceiling cornice.

If you do not plan to mount suspended and stretch ceilings, then you can hide the cornice by arranging a niche in this way: a wooden block is attached to the ceiling, sheathed with plasterboard or simply painted.
To prevent the beam from looking far-fetched, frame it and the walls around the perimeter with a ceiling molding (skirting) made of foam or polyurethane. Its width should correspond to the width of the bar. A simple and original solution.

This option is similar to the previous one. The difference is that here suspended ceiling from drywall.
Such a ceiling is satisfied in several cases:
- alignment of ceilings (correction of curvature when floor slabs do not lie flat);
- installation of additional spotlights;
- an additional soundproofing device, which is sewn up with plasterboard sheets.

A variant of a niche device for a ceiling cornice when installing a stretch ceiling. The profile for fastening the stretch ceiling canvas is attached to the bar. The ceiling cornice is freely attached to the concrete base.
In all three cases, decorative lighting can be arranged in a niche by laying led strip. Instead of a wooden bar, you can make a frame of metal rails that are sheathed with drywall. In this design, spot lighting can be provided.
The mechanism of a Roman or roller blind is attached in several ways. For example, on the upper slope, in the depth of the window opening. In this case, the length of the eaves should not exceed the width of the opening. Or above the window opening, where the cornice usually protrudes 5-10 cm beyond the opening. In the first case, this is a ceiling mount, in the second - a wall mount.

The instructions included with the kit will help you figure out the lifting mechanism. But you can also make a Roman blind with your own hands using improvised materials (wooden beam-cornice, Velcro tape, metal or plastic washers, cord, curtain fabric).
Cornice for Japanese panels differs from the usual cornice by a system of special guides to which the panels are attached with Velcro tape. The guides move along the eaves and can be controlled mechanically or automatically.

The guide rails are installed in the grooves of the eaves like hook-runners and move freely along them. The number of slats varies from two to five. The cornice is fastened like a ceiling or wall rail with dowels and self-tapping screws.
And in conclusion, I would like to give an example of design arched window without using a cornice.

Hooks are mounted around the arch, they are screwed into pre-driven dowels around the circumference of the window at equal distances. And a curtain on the eyelets is put on the hooks. The distance between the eyelets exceeds the distance between the hooks, as a result, the curtain is assembled into even vertical folds.
Additionally, the curtain is intercepted with a bow or cord. Simple and original.
Each time after the repair, I want to make the maximum variety in the design of the room, and very often cornices and curtains act as this innovation. But it’s not enough to choose the accessories you like in a good store, you need to think carefully about how to install curtain rods in such a way that you don’t have to regret the idea of \u200b\u200bchanging them.
Curtain rod is an integral part of the room. However, in order for the curtains to look beautiful, it is necessary to properly install the curtain rod.
Installation of cornices can be quite difficult, and not every home master can handle it.
Of course, there are people for whom the installation of any kind of cornices with their own hands, whether string or profile, is not difficult, like any other, but not everyone can boast of such skill. Therefore, we advise inexperienced craftsmen to pay attention to simpler cornices, for example, round ones. One of the reasons why we recommend this type of installation is due to the fact that the package usually includes all the necessary elements, up to the last fastener.
According to their design features, cornices can be divided into one-, two- and three-row. The former are intended either for curtains or tulle, the latter for both, and the three-row ones, among other things, can also carry lambrequins. The cornices themselves can be not only the most different kind, but the material used to create them is very diverse: wood, metal, plastic and a combination of these components. The more rows the cornice has, the more difficult its installation, but at the same time, due to the multi-layered composition, it is the three-row version that has the most impressive beauty and volume.

For greater reliability, epoxy resin must be placed in the slots for self-tapping screws.
Consider a few important features of the installation of cornices that you need to remember for everyone who decides to install it on their own, whether it is an experienced craftsman or a beginner. The most important thing in fastening the cornice is reliability. And the more complex the device, the more rows it has, the higher its mass, which means that you need to mount it as securely as possible. After all, such a massive structure can be dangerous for people in the event of a collapse.
It will help to increase the reliability of attaching a heavy curtain. epoxy resin or other reliable adhesives that fill the slots for self-tapping screws. In this case, their fastening will be more reliable.
Before proceeding with the installation of the cornice, you need to stock up on some tools: a ladder, a screwdriver, a puncher, a tape measure, a level, self-tapping screws and dowels, as well as a pencil with a tape measure.
- Before starting the installation, you must first take some measurements. Measure the protrusion of the window sill. This is done so that the cornice bracket protrudes at least a little, but more, then the curtain will not cling to the window sill (usually 10-15 cm).
- Check if the structure will interfere with the opening of the window.
- It is also necessary to calculate the parameters of the heating pipes, the curtains should not touch them.
- It is necessary to make sure that the cornice and the window opening are symmetrical, on each side the curtain should protrude beyond the window borders by at least 15-25 cm. Although this is a general wish, and you can find some original solution of your own.

The number of fasteners also depends on the severity of the entire structure as a whole. Lightweight plastic or wooden cornices they will be held with one self-tapping screw and dowel per bracket, and massive structures made of metal and with heavy curtains sometimes need three times as many fasteners.
We mount round cornices

The dowel is installed first in the prepared hole, and then the bracket is fastened with self-tapping screws. Before attaching the second or third bracket, check the accuracy of the preliminary measurement of the attachment points. Then we attach the bar to the installed brackets. Rings must be strung on it in advance. It is better to attach hooks for hanging first to the curtain, and only then to the rings on the bar.
To fix the rings and decorate the whole structure, various decorative plugs (fleurons) are put on the edges of the cornice, which not only perform restraining functions for the rings, but also decorate the picture as a whole.
Usually, along with the cornices, the fasteners corresponding to them are also sold, but sometimes it is better to replace the proposed standard set with another one that is more suitable for your particular situation. For example, for walls that are excessively loose, it is better to purchase more reliable screws and dowels.
If the length of the entire cornice does not exceed 2 meters, then two brackets for fixing are enough for a secure installation, a longer length requires an increase in the number to three, or even up to four pieces.
During the final installation of the cornice and hanging curtains, make sure that the edges of the latter go beyond the boundaries of such elements of the room as a window sill, a window or a radiator of a heating system.
We mount rail cornices

Scheme of ways of fastening rail cornices.
The rail model of the cornice can be attached to both walls and ceilings. The whole device as a whole is so versatile that it can be installed even in bay windows.
A sufficient number of screws, runners, rollers, rings, limiters and brackets are always sold in the kit for the eaves.
There are several models of such a device. Some of them even make it possible to close the curtains overlapping each other. This is achieved through a special device with which the runners can jump from their rails to neighboring ones. The only disadvantage of this innovation is the possibility of using exceptionally light curtains.
Installation begins with markings, while it must be assumed that the bracket will be installed 5-7 centimeters above the window, the distance from the wall to the very eaves, both for wall and ceiling mounting, should be about 10 cm.
It is necessary to mark not only the edges of the entire web, but also the places where the staples are fixed, this is approximately every 0.25 m of the length of the device. The same rail is already attached to the brackets, which is aligned with the help of special adjusting screws. The last step is to set the limiters.
We mount the profile cornice

The profile cornice is distinguished by a huge variety of colors and is suitable for both wall and ceiling mounting. Thanks to a wide choice of colors, it can be made almost invisible.
This is facilitated by the fact that in expensive varieties of profile cornice, fasteners hidden inside the structure are used, which, for better job and slides are Teflon coated.
If you plan to hang a very massive and long curtain, then you can use the mechanism for adjusting the position of the curtains to facilitate it.
The installation itself proceeds in a manner similar to the previous version.
We mount the string cornice
The basis for fastening the curtains in this variety is a heavy-duty string, usually it is made of steel, but options are also possible with polymeric materials. Despite the fact that the cable is very strong, it is still not suitable for heavy weight due to sagging, and only light curtains are hung on such a cornice.

But such structures can be multi-row, and they are usually mounted to the ceiling.
Installation is not particularly difficult. It is necessary to hang fasteners on the driven dowels through which the strings are threaded. Then, using a special mechanism, they are pulled, and then the entire filling is covered with panels. The curtain is held at the top edge with clips.
We mount a baguette cornice
A baguette cornice is a combination of two main elements - a hollow tire and a plank, which can be made of polymeric materials or wood. At the beginning of the installation, you need to connect these two elements together, then install the sidewalls.
Drill holes on the marked wall and insert the dowels on which the brackets are installed. Most often, the baguette bar is also screwed to the ceiling, but not in all models.
Hooks are fixed on the rollers located in the niche of the tire, on which the curtain is hung. After installing the rollers, special plugs are installed on the sides to prevent the rollers from falling out.
We hope our tips are helpful to you.
Modern technology for fixing them offers to use wall cornice. It is easily attached to the ceiling of any material, allows you to hang curtains and curtains in several rows and is a decorative interior detail.
Classification
The cornice on the ceiling visually increases the height of the room and allows you to hide small defects on the walls behind a layer of curtains. Products can be divided into several types.
By material:
- Wooden, combined with the interior in a classic style.
- Metal - durable cornices for decorating rooms in a modern style.
- Plastic - lightweight and inexpensive products that can remain invisible or become an interior decoration if a baguette bar is used.

Mounting method:
- through a hole in the tire;
- with brackets and hangers.
Profile design:
- single-row - have one track for attaching curtains;
- multi-row - a system that includes from two to four tracks, which allows you to create a multi-layer composition of curtains, tulle and lambrequins.

By form:
- corner;
- straight;
- rounded.
When choosing a curtain rod for curtains, you need to find out how much weight it is designed for. Under a significant weight of the fabric, the plastic cornice can bend; for heavy curtains, it is better to use metal fasteners.
The size
The distance of the removal of the eaves from the wall should be sufficient so that the hanging curtains do not touch the window sill, window handles and radiators. When fully opened, the curtains should completely free the window opening.
Features of installation to concrete

After choosing a product, you need to decide how to fix the ceiling cornice? Installation of the product to the concrete ceiling begins with the markup. Then the cornice plank is cut to the desired length with a hacksaw. The ends of the bus are fitted with plastic plugs that come with the kit.
In the middle of the cornice, a hole is drilled for a self-tapping screw, and drills of two diameters are used - first according to the size of the screw head, and then a thinner drill. Further, such holes are made along the entire length of the bar. Their step is 60 cm, if you need to hang heavy curtains, the distance between the fasteners is reduced.

The cornice is applied to the ceiling parallel to the window opening. A mark is made on the ceiling through a hole in the middle and a dowel hole is punched with a puncher, a self-tapping screw is twisted. Having leveled the bar, mark and drill the remaining holes. The cornice along the entire length is fixed with dowel-nails.
Installing the product on brackets

If mounting the cornice on the ceiling is not possible, then it is attached to the wall using brackets. This is even easier to do as there are far fewer holes to drill.
- All parts are assembled into a common design.
- The plank is applied to the wall at the installation site and the attachment points are marked through the holes in the brackets.
- Holes are drilled with a puncher and dowels are inserted.
- The cornice is screwed to the wall with self-tapping screws.
Plasterboard ceiling installation
There are two ways to fix the ceiling cornice on drywall:
- Install the embedded beam during the installation of the suspended structure.
- Fix the anchors, the length of which allows you to capture 5 cm of the ceiling.

A plank for light curtains can simply be attached to drywall using dowels "butterflies" and "umbrellas". This fastener, after screwing in the screw, opens and increases the supporting area. He will not hold a multi-tiered structure. For a multi-row tire, it will be necessary to mark points on the ceiling through the holes in the eaves and drill deep passages for the anchor.
As a bookmark under the eaves, a wooden beam is used, screwed to the ceiling. It should not protrude beyond the plane of the drywall, and its dimensions should exceed the dimensions of the ceiling cornice. Installation to the beam is carried out according to the technology of fastening to the concrete ceiling, only holes in it do not need to be drilled.
How to attach to a stretch ceiling

Installation of a ceiling cornice to a stretch ceiling is quite difficult to perform, because the canvas is not designed for the load. It is necessary to plan the installation of fasteners for curtains in advance and fill a wooden beam in the chosen place. Its bottom edge should be flush with the stretched canvas. Marks are made on the film at the place of laying, and the cornice strip is mounted on them.

There is a second installation method, it is more difficult, but provides the original appearance of the structure. The stretch ceiling is not installed close to the wall, but indented, resulting in a niche. Its size must correspond to the size of the installed eaves. The bar is fixed directly on the ceiling. Nearby, a wooden beam impregnated with an antiseptic is stuffed in 3-5 mm. A fixing profile for a vinyl film is attached to it from the side of the eaves. After stretching the canvas, the wooden block will be completely hidden.

Video
How to assemble and install a plastic ceiling cornice, see below:
AT stretch ceiling the cornice is mounted as follows: