A private garage is a specific space and is usually very cold in winter. Such a microclimate is absolutely not useful either for a person or for a car. At the same time, the use of standard electric heaters is often too expensive and inefficient.
It remains to make a garage oven with your own hands, choosing one of the appropriate options. We offer for consideration four ways of arranging stove heating, each of which has its own characteristics in the creation and operation.
Visual diagrams and video instructions will help you decide on the design of the furnace, assemble and connect the unit yourself.
A capital garage with insulation is not available to every car owner. Most often at the disposal of the owner vehicle it turns out to be a metal structure, devoid of any insulation. Any thermal energy leaves such a structure almost instantly.
When solving the problem of heating a garage room, you should not evaluate its need for heat, based on similar experience with residential building. And it's not just the lack of insulation.
There is a so-called square-cube law, which states that when the dimensions of a geometric body decrease, the ratio of the surface area of this body to its volume increases.
For normal storage of the car in the garage, the temperature inside the box should not fall below +5º and rise above +18º during the presence of the owners and the performance of repair work. Requirements are regulated by SP 113.13330.2012
This affects the size of the heat loss of the object, therefore, to heat one cubic meter of a small room, for example, a garage, more heat is needed than when heating a large house.
If a 10 kW heater may be enough for a two-story building, then a much smaller garage will need a unit with a capacity of about 2-2.5 kW of thermal energy.
To maintain a very modest operating temperature at 16 ° C, a 1.8 kW stove is enough. If you need to maintain only the optimum temperature for storing the car in the parking lot - 8 ° C - a 1.2 kW unit is suitable.
It turns out that the fuel consumption for heating a unit volume of garage space can be twice as high as for a residential building.
In order to thoroughly warm up the entire garage, its walls and floor, even more thermal energy will be needed, i.e. more powerful heater. But even with insulation, heat will leave the room too quickly. Therefore, it is recommended not to heat the entire garage, but only the so-called workspace.
The use of heaters: pros and cons
Economy class garages are almost never insulated from the outside for a very simple reason - it is too expensive for a room that is not constantly used. Yes, this is not always possible, for example, in garage cooperatives, buildings are placed very close to each other, the gap does not allow installation of insulation.

To insulate the garage, you can use materials such as fiberboard, which die out when ignited. The use of plastic in such a room is unacceptable
But the internal thermal insulation of the garage space can be problematic. When installing insulation material directly on metal walls, the so-called dew point occurs at the point of their contact, i.e. place for condensation. Almost always, when in contact with moisture, the insulation becomes unusable quite quickly.
And for the structure itself, such a situation can be disastrous. In a metal garage, insulation can be installed, but it is better to install a suitable material at a certain distance from the wall, about 20-50 mm.
From the floor should retreat 50-70 mm. It is best to use washers as a profile to avoid creating closed contours under the coating.
With this installation option, condensate will also appear, but due to air circulation under the insulation layer, moisture will gradually evaporate without causing any significant damage to the structure.
However, for a garage that is constantly heated, this option is not suitable, since the humidity inside the room will be excessively high most of the time. This will put at risk both the health of people and the condition of the car.

When warming metal structure between it and the insulating material, it is necessary to leave a ventilation gap for regular removal of condensate
As a material for such “ventilated” insulation, it is recommended to use boards, for example, fiberboard, chipboard, that is, wood materials that are self-extinguishing when ignited. The recommended thickness is about 5 mm.
Flat ondulin or its analogues are perfect. These materials have the ability to reflect infrared radiation, which provides efficient heating.
But plastic, even with attenuation properties, is categorically not recommended to put in the garage. Such materials, when ignited, emit toxic fumes, due to which people who escaped the fire can simply get poisoned. It is also forbidden to use plates containing asbestos as insulation.
When warming cold brick garage it is recommended to first plaster the walls with vermiculite to protect them from moisture. Walls metal garage should be painted in two layers, pre-priming the base.

The walls of the insulated garage must be treated with a water-repellent compound to protect the building from the damaging effects of condensate
Overview of options
For the garage, the following options for home-made stoves are most often used:
- brick wood stove;
- potbelly stove;
- bake long burning;
- working furnace.
Each of these do-it-yourself garage stove options has certain advantages and disadvantages. Some units can be combined to expand the possibilities for heating the garage and make this process more convenient and profitable.
In the construction of a small stove in the garage, you can actually use junk handy tools and materials, these are:
Image Gallery
Conclusions and useful video on the topic
Video presentation of the device in the garage of an autonomous heating system based on the stove:
The options for home-made stoves are quite diverse, and the designs of such devices are not particularly complicated. You will need skills in working with metal, a welding machine and quite affordable materials. A properly made oven works efficiently and lasts a long time.
Looking for effective method garage heating? Or do you have experience in making and using a stove? Please leave comments on the article and ask questions on the topic.
Most motorists have a garage, which often serves not only as a haven for their favorite car, but is also used as a workshop or a place for men's conversations. It often happens that in cold weather, warming up the engine takes more time than the trip itself, and as a result, the relevance of the planned trip is reduced to zero. And discussing the latest trends in the field of motor transport with friends is much more comfortable in a warm room. Agree that it is much better to carry out car repairs or other events in the heat. Therefore, be sure to take care of heating the garage space.
The right solution to the "cold" situation will be a do-it-yourself garage oven. It will not be difficult to prepare components and assemble them yourself if you have even small skills in working with different materials and tools.
When choosing the right type of oven for the garage, the main thing is:

What are the types of ovens?
Modern units for heating garages, on sale on the market, have certain characteristics that allow you to classify the equipment. The main factor is the type of heating material.
Based on this principle, the following types of heating equipment are distinguished:
Requirements for the design of the stove for the garage
To decide on the type of stove, answer the following questions for yourself:
- How much money are you willing to spend on a heater?
- What is the area of the proposed garage space for heating?
- How long do you plan to heat the garage?
Important! If the garage is an extension to the living quarters, then in this case we recommend installing a unit that is connected to a common gas or electrical network. If this is an autonomous room that does not have residential buildings with communications nearby, make a separate system. 
So that during operation the furnace does not bring inconvenience, the following characteristics will become the suitable parameters of the unit being created:

How to assemble a wood-burning stove with your own hands?
An economical wood burning stove, self-assembled, is considered the easiest to maintain and ideal for heating self-contained garage buildings. Often in the household of a motorist there is a heating structure called a potbelly stove. 
Benefits of a wood burning stove
Such a stove has a lot of advantages, among which are:

Features of the design of the stove-potbelly stove
A variation of the design of stoves of the "potbelly stove" type does not have clear regulations. 
Each master can build this design, taking into account their own preferences, but in any case, such a stove has the main structural elements:

Important! If you modernize the design of the potbelly stove, you will be able to significantly save firewood consumption. This effect can be achieved if the pipe is welded to the body of the stove above the door, and not, as is customary, at the back near the wall. Thanks to this installation of the pipe, the walls of the structure will be heated first of all, and only then the firewood will fall into the pipe. Due to this, the heat transfer time will increase, since a brick, concrete-clay or insulated metal pipeline cools much more slowly than a steel case. 
Materials for constructing a wood stove
To assemble wood stove on your own, you will need to purchase the following materials:

Mounting technology

How to operate a wood burning stove?
After assembling the furnace design, initially test it for proper functioning. Do the following:

Video
Watch the video, which clearly shows an example of the creation and operation of a wood-burning stove with your own hands.
Furnace in production
Against the background of other similar structures, an oil-fired garage oven stands out for its economy, easy operation and inexpensive combustible material. The design of the mining stove is similar to the design of the potbelly stove. 
Application Benefits
Among the characteristic advantages are the following:

Construction materials
The furnace for mining can be designed with your own hands, which will not require a lot of effort and will not take much time. To build a homemade garage oven, you will need:

Oil garage stove installation technology
To design a stove for "working out" with your own hands, follow these steps:

As a result of correctly performed work, you will receive a unit with the following parameters:

Rules for the operation of the stove in the "working out"
In order for the result of the stove to be justified and it to fully heat the garage space, carefully read the following operating recommendations:

How does an oven work?
To set up a homemade garage oven for mining, do the following:

Video
To more clearly imagine the principle of the device of such a furnace and operation, view the proposed video below.
The main criterion in relation to the construction brick oven is the observance of compact dimensions, and in all other respects the system of such a stove is similar to the previous options. 
To properly build a brick oven, be sure to adhere to the following recommendations:

Conclusion
Whichever version of the furnace design for the garage you choose, in any case, it will give the expected result. With the help of any simple unit proposed above, you can always maintain a warm climate inside the garage. And in comfortable conditions, it is more pleasant to carry out repair work and conduct conversations with friends.
Unfortunately, heating is not provided for garages (although, perhaps, fortunately, given the current tariffs), therefore, you have to heat yourself. Well, any heating is a stove. In this case, it should be small, but effective - you need to quickly move the room from a “minus” to a good “plus”. So when choosing a design, do not forget that the garage oven should ignite quickly and easily. It is also desirable that it could be heated with waste - it is very non-budgetary to buy good firewood, and there is nowhere to store it. Well, one more requirement - the design should be simple so that you can easily do it yourself.
What stoves can be made for a garage
In a cold garage in winter is very unpleasant. That is why heating is required. Garage stoves are usually small steel potbelly stoves. They are made from thick-walled barrels, pipe sections or from gas cylinders. Such garage ovens are simpler in execution, require only minor modifications, because the body, and sometimes the bottom, is already there. Furnaces are also made from sheet metal, but these are options for those who are closely friends with. Brick stoves in garages are not very common - they are still larger, they heat up less, which is not entirely suitable for this case.
The most common potbelly stoves that work on wood, everything that burns is laid in them. Such omnivorousness and fast heating are their main advantages. They also have many shortcomings, and one of them is gluttony, therefore, more economical long-burning stoves have recently begun to be made. Usually the top burning principle is used. They are good because one full bookmark (an oven from a 50 liter propane cylinder) can burn up to 8 hours. All this time it is warm in the garage.
They go separately. There is enough similar fuel in garages, but you need to be careful with mining - heavy metals are contained there and excellent traction is required so that they do not get inside.
Potbelly stoves - proven and simple designs
Potbelly stoves - a hit of the 20s of the last century. Then these stoves competed with brick ones and stood everywhere, even in apartments. Later, with the advent of centralized heating, they lost their relevance, but are used in garages, summer cottages, and for heating utility or outbuildings.

Potbelly stoves from a cylinder, barrel or pipe
The most suitable material for making a potbelly stove for a garage is propane tanks or a thick-walled pipe. Barrels are also suitable, but you need to look for a not very large volume and with a thick wall. In any variant minimum thickness walls - 2-3 mm, optimal - 5 mm. Such a stove will serve for more than one year.
By design, they are vertical and horizontal. It is more convenient to heat a horizontal one with firewood - longer logs fit. It is easier to make it elongated upwards, but the firebox is small in size, you will have to cut firewood finely.

vertical
First, how to make a vertical garage oven from a cylinder or pipe. Divide the selected segment into two unequal parts. Below is a smaller one for collecting ashes, above is the main one for laying firewood. The following is the order of work:

All in all, that's all. It remains to assemble the chimney and you can test a new stove for the garage.
Horizontal
If the body is horizontal, the ash drawer is usually welded on from below. It can be welded to the required dimensions from sheet steel or a suitable sized piece of channel can be used. In the part of the body that will be directed downward, holes are made. It is better to cut something like a grate.

Then in the upper part of the body we make a pipe for the chimney. To do this, you can weld a cut piece from a pipe of a suitable diameter. After a piece of pipe is installed and the seam checked, the metal inside the ring is cut out.
The next step is to install the doors. On the blower, you can cut a piece of metal, attach loops and constipation. Here without any problems. The gaps along the edges do not interfere - air for combustion will flow through them.
There will be no difficulties even if you make a metal door - welding the hinges is not a problem. Only here, in order to be able to at least slightly regulate combustion, the door needs to be made a little larger - so that the perimeter of the opening is closed.

It is problematic to install furnace casting. Suddenly someone wants to have not a steel door, but a cast-iron one. Then it is necessary to weld a frame from a steel corner, attach a casting to it with bolts, and weld this entire structure to the body.
From two barrels
Everyone who used a potbelly stove knows that very hard radiation comes from its body. Often the walls are heated to a red glow. Then next to her is impossible. The problem is solved by an interesting design: two barrels of different diameters are inserted one into the other. The gaps between the walls are covered with pebbles, clay mixed with sand (calcined on fire, covered only when it has cooled down). The inner barrel acts as a firebox, and the outer one is only the body.
This stove will take longer to heat up. It will not immediately begin to give off heat, but it will be more comfortable in the garage and after the fuel burns out, it will warm the room for a couple more hours - giving off the heat accumulated in the tab.
Long burning garage oven
All from the same gas cylinder, you can make a stove for a long-burning garage. Eat different designs, but the most proven and stably working is called Bubafonya - by the nickname of the author who invented it and posted it on one of the forums. It was about 5-6 years ago. Since then, many have had this miracle - a simple and original design, high efficiency and the fact that you can lay not only firewood, but also shavings and even sawdust. You can even modify Bubafonya for water heating in the garage, which has been done more than once (a water jacket around the body).

Wood-burning stove in a long-burning garage (diagram and photo)
This homemade wood-burning stove has only one drawback - in order to remove the ashes, you will have to turn the body upside down. True, there are already improvements that eliminate this shortcoming. With a welding machine, you can make such a stove in the garage with your own hands in a few hours - it is very easy to manufacture.
Design
This stove uses the principle of top combustion: firewood burns from above, the flame spreads down as the upper layers burn through. This explains the long period of time for combustion - the flame spreads down much more slowly. However, the heating is effective. Already in the first minutes, a sufficient amount of heat begins to be released.

This stove is traditionally round, vertical. The body is an ordinary cylinder with a bottom without a welded cover. The main focus is in the shape and structure of the moving part. It is often called "cargo", but this is only one of the functions. This part also brings air into the combustion zone. She represents a metal circle to which a pipe is welded in the middle. On the back side of the metal circle - from the center to the edges - corners or pieces of a small channel are welded. These are air ducts through which air enters the periphery of the combustion area. There is also a cover with a hole cut out in the center through which the cargo pipe is passed. The smoke pipe is welded almost at the very top of the body. Its horizontal part should not be more than 40 cm, then the pipe rises. The height of the chimney is at least 2-3 meters, but it must be determined by the draft - so that in any weather the smoke does not go into the garage.
Principle of operation
Having filled the body with firewood interspersed with shavings and sawdust, the bookmark is kindled. A lid is put on the pipe and, when the flame flares up, the lid is placed on top. Since the pipe is hollow, air is supplied through it to the combustion zone, which supports combustion.

The diameter of the “load” circle is slightly smaller than the diameter of the body - through this slot, combustion products enter the upper part (in the figure it is signed as a “secondary combustion chamber”). As you know, they are flammable themselves and can emit a large number of heat. In this zone, with a well-heated furnace, these gases ignite. Combustion air comes from a slot in the cover in the area of the pipe passage. Something can “pull up” in a circle. It's not that important. It is important that the lid should not be made airtight, and also that because of this, the draft in the pipe should be excellent.
The gases ignited in the upper part give no less heat than burning wood. This explains the heating efficiency when using this design. Burnt gases exit into the chimney. As it burns, the load sinks lower and lower until the entire bookmark burns out. After the stove goes out and cools down, you can lay a new batch of firewood and start the process all over again. It is necessary to take out the ashes after several fireboxes - the firewood burns out completely, only a small pile of ash remains from the bookmark and a couple of coals from the lowest firewood.

This oven for the garage is heated with such "wood"
Here is a brief summary of the principle of operation of this unit. As you can see, there is not only upper combustion, but also afterburning of gases. Very simple and really works well.
Manufacturing process
Most likely you have already understood how to do everything, but we will briefly describe the process. First, let's talk about the materials that are needed for this stove. Most often, 50-liter propane tanks are used. A barrel with thick walls and a piece of pipe with a diameter of 300 mm to 600 mm will do. The height of the case in finished form is from 110 cm to 200 cm. In addition, you will need:

This is all necessary materials. Now actually about what and how to do. We will proceed from the fact that we make a garage stove from a gas cylinder.

That's all. Do-it-yourself garage oven made.
Improvements
Design improvements swing ease of use. The most inconvenient thing is the need to turn over a heavy body in order to shake out the ashes. To get rid of this, an ash pan and traditional grates are made in the lower part. The solution is understandable, but this innovation can lead to the fact that the firewood will burn faster - air will be sucked through the door slots. If there is a lot of oxygen in the lower part, the firewood will burn quickly, and not in smoldering mode, as happens in the original design. The way out is to make the door airtight, with sides and a seal.

Efficient and economical garage oven - dimensional drawing
The second improvement concerns the number and shape of the ribs on the air duct disk. They are made not from corners or a channel, but from steel strips. They are bent and slightly displaced, so that passing the air, as it were, twists. 6-8 pieces are welded instead of the original 4. This alteration gives only pluses - air is more evenly distributed over the combustion zone, firewood burns evenly over the entire area.
Brick ovens give softer heat, but until they heat up themselves, they will not heat the garage. If you are going to heat daily, this option is good. If the garage will be heated periodically, it is better to make a metal stove - it is long and dreary to disperse a frozen brick stove, and it will start heating in two hours.
For those who decide to put a brick oven in the garage, we will lay out the order of a small (relatively) oven with a heating shield and hob(just in case).

Solid wood stove ceramic brick(not burnt). Without taking into account the battle, 290 pieces are required. Laying is carried out on a clay mortar, the thickness of the seams is about 0.5-1.8 cm.
A separate foundation is needed for this furnace - the mass will be under 500 kg. Its dimensions are larger than the dimensions of the oven by 15-20 cm.

Furnace lining is desirable (laying fireclay bricks for fireclay solution). Bricks are undermined for furnace casting. The dimensions of the bed for the grate, stove and doors should be larger than the dimensions of the casting. The gap is necessary to compensate for thermal expansion and also for laying a heat-insulating layer around the doors. This will reduce the formation of cracks next to them (due to different thermal expansion).
Asbestos cord has traditionally been used as a heat-insulating material. If you don't want to deal with asbestos, you can cut mineral wool cardboard into strips. He just has to endure high temperatures— up to 1200°C (minimum 850°C).
Installed in the 6th row, the valve allows you to switch the furnace into winter and summer modes. This is convenient in the off-season, when full power is not required, but it is already damp.

The height of the furnace can be increased by repeating the 14th and 15th rows.

See the video for the process of pre-laying a furnace without mortar (recommended in order to pick up bricks and understand what's what).
Drawings and diagrams
Describe all the designs for a long time. Much can be understood from the drawings.


For the correct operation of the furnace, for the entire period of the operational period, you need to know how to properly install the furnace in the garage. For reliable protection against a possible fire, you need to carefully determine the location, the method of removing the chimney and study some installation rules.
Collapse
Fire Safety Rules
Many people ignore the rules for safe installation, thereby endangering people and property around them. To ensure safety, during the operation of the stove, you should strictly adhere to the rules of fire protection, and observe the correct installation of the stove in the garage.
To avoid possible fire, follow the rules given below:
- The floor and adjacent walls must be made of non-combustible material: concrete, brick, metal or ceramic. Special heat-resistant plates made of refractory material are also used.
- The stove itself must be made of reliable and proven materials.
- In no case should there be substances and materials that are easily flammable or can explode near the oven.
- The garage must be adequately ventilated to ensure that combustion products are vented in the event of smoke.
- Do not install the stove close to the car, the distance should be at least 1.5 meters.
In fact, ventilation for the garage should come first. Due to insufficient oxygen, a fire can burn poorly and cause serious carbon monoxide poisoning or other serious and unfortunate consequences.
Exhaust ventilation must be and be in good condition. This will protect the garage from fire, and will not allow people present to suffer.
Where is the best place to install an oven in a garage?
When choosing a place where it is best to install it in the garage, you should stop at the placement in the corner of the garage, preferably on the opposite side of the gate. This placement will allow more efficient heating of the area of the entire garage, and prevents the garage from quickly cooling down when the gate is opened.

For safety, the chimney pipe running along the walls should be located at least 0.5 meters from the wall.
If the wall in the garage is built of wood, then the distance should be increased to a meter, and the wood should be protected with any fire-resistant material.
In the case of installation near the gate, the installed stove must be at least 1 meter from the gate, this is necessary to ensure safety if the sheathing is made of wood.
How to install a stove in a garage?
After choosing the installation site, before starting the installation, it is necessary to secure the base from accidental loss of coal by laying a steel sheet under the furnace, or erecting a brick base. If the floor screed is made of concrete, then the stove can be installed directly on it.
To increase the heat transfer time and at the same time safety, red brick walls are erected around the furnace. This increases the operating time of the furnace, it cools down much more slowly, allowing you to receive heat after the complete combustion of the fuel. This method is mainly used for square-shaped furnaces; in round-section furnaces, radiator plates are used throughout the body.
Let's consider in more detail how to properly install the oven in the garage:

Chimney outlet through the wall
There are two options for the chimney outlet: through the roof of the garage or through the wall. Now let's take a closer look at both options.
The output of the chimney through the wall has several advantages:
- Does not require high-quality waterproofing of the pipe passage, unlike the passage through the roof.
- Relatively easy and convenient installation.
The disadvantages include:
- Worse draft, in comparison with the direct installation of the chimney.
- The presence of turns and bends makes cleaning difficult.
- Needs more insulation.
Schemes for mounting a garage stove through the wall (2 options):


Installation Tips:

Chimney outlet through the roof
Scheme of the output of the chimney of the furnace for the garage through the ceiling / roof:


As in the case of installing a chimney through the wall, when installing through the ceiling, pre-assembly is first done in order to accurately indicate the future passage through the roof. As the mounting hole is made, a steel penetration through the roof is installed.
Further, in the same sequence, the pipe is assembled and the passage through the roof is laid with non-combustible material. The passage of the chimney through the roof requires reliable waterproofing so as not to encounter leaks in the future. It is necessary, as in the first option, to protect the pipe from moisture entering it, and to insulate the outer part of the pipe to reduce the formation of condensate. 

Conclusion
From all of the above, we can conclude that the installation of the furnace in the garage must be done competently, and all fire safety standards must be observed. Not only the long and normal operation of the heater itself, but also safety depends on the correctness of the work on installing the furnace.
All rules and requirements should be strictly followed to ensure normal, trouble-free operation of the furnace. It is important before the first flooding of the furnace, you need to carefully make sure that there are no leaky joints and connections, and if you find the slightest flaws, you should immediately eliminate them. This will help protect against carbon monoxide poisoning and fire.
If everything is done correctly, the stove will delight and give warmth for many years. It will be possible to forget forever about work or rest in the garage, which used to be more like an ice palace. In addition, the stove still remains a very efficient and economical heating device.
In addition to everything, the oven in the garage can be used for cooking. You can equip it for heating water, and use it for your needs. Based on the stove, you can make a full-fledged water heating of your garage, of course, this will only be appropriate if the garage is visited every day. If the garage is not visited often, it is not worth using water heating as an addition to the stove.
The easiest and most convenient way to heat the garage in winter is to install some kind of electric heater. Many car enthusiasts do this, but then they have to deal with electricity bills that are not comparable to the received heat due to the high tariff. On the other hand, a wood-burning or mining garage stove is not so comfortable to use, but it will certainly cost less. This material will outline how to save even more and make such a stove yourself.
Wood burning stove
There are very few requirements for such stoves:
- to give off heat well;
- was suitable for burning any wood;
- fit on the patch allocated for her.
Since simple garage ovens do not really need aesthetics, they are usually welded by home craftsmen from what comes to hand or can be found on scrap metal. So the shape of the body can be arbitrary, I found a piece of a large pipe - the stove will be round, I got it sheet metal Let's make a rectangle. By and large, it does not of great importance much more important than the design itself.

The Internet is full of drawings of various stoves, but they are all derived from the traditional metal potbelly stove. The body of the heater can be oriented in a horizontal or vertical plane, this has almost no effect on the efficiency of work. The fact is that a do-it-yourself vertical homemade garage oven takes up less space. While long logs are placed in the horizontal one, it burns longer with one load. Choose which option suits you best.
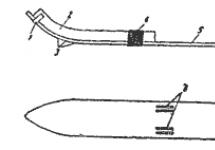
There is no grate in traditional potbelly stoves, this stove is a hearth. The chimney is located at the rear and is supplied from above, as shown in the drawing:

In a garage where flammable liquids and oils are stored, the lack of an ash pan is not the best option. When cleaning the hearth, hot coals can crumble, which is inconvenient to perform the procedure. For this reason, a simple wood-burning stove received grates, an ash pan and a cleaning door, and even a drawer. As for the pipe, it is boiled in the usual place or on the back wall.
But the improved two-way potbelly stove has a pipe in the front. The design of the furnace contributes to increased heat transfer, since the flue gases inside it make two passes in different directions, intensively exchanging heat with the metal walls.

The last course of gases ends at the front wall, so the pipe is in front. Such a furnace in the garage is very effective, it can be made according to the drawing presented above:

An increase in the exchange surface will additionally increase heat transfer. Craftsmen have long resolved this issue by welding 4-5 mm thick strip steel ribs to the body, as shown in the photo:

Without going into details and a description of the production of welding, we will give a few general recommendations:
- try to take thicker metal, if possible, then 4-5 mm. Then the wood stove will last longer;
- when attaching the chimney from above, it is better to strengthen the wall, this joint burns out most often;
- external ribs significantly improve heat exchange, they can be welded to any stove;
- inside you can install at least one partition, like a two-way furnace;
- it is better to make many small holes in the grate than large holes where unburned coals will wake up.
Waste oil furnace
The simplest used oil garage stove is well known to everyone. And, although her drawing is not difficult to find in RuNet, just in case, we will present it again:

As you can see, such a heater is not difficult to manufacture, but there are nuances in operation. The main enemy of such stoves is water, which, due to various circumstances, got into the used oil. A very small amount of it causes strong pops in the perforated afterburner (vertical pipe with holes), which can lead to a fire. It turns out that before use, the fuel must be defended in order to separate the water.
Important. Any mining stove, as well as a wood-burning stove, requires a chimney with good draft for stable operation, so it is recommended to raise it to a height of at least 4 m.
The second drawback of the heater is a pungent smell at the stage of ignition and heating. Otherwise, the use of a miracle furnace, as it is called on specialized forums, does not cause any particular complaints. She heats pretty well. But on the same forums, craftsmen have long proposed a more reliable and efficient design. And not as flammable. The principle by which such an oil stove functions is shown in the figure:

The fuel burns in a metal bowl located at the bottom of a vertically standing pipe (or gas cylinder). It is fed into the bowl in drops from a dosing device. Thanks to this scheme, if necessary, the oil-fired oven can also burn diesel fuel, you just need to adjust the air supply and dosage. Part of the oil vapor burns out inside a vertical perforated pipe - afterburner when secondary air is supplied. The furnace device is shown in the drawing:

As a housing, you can use a thick-walled steel pipe or a propane tank. The range of the rest of the metal is indicated on the drawing, we will not list it again. Instead, let's focus on the method of air supply, it can be of two types:
- natural, due to chimney draft;
- forced blowing by the fan.
A homemade drip stove from a pipe can also work at low traction if there is no way to raise the chimney higher. This is facilitated by the installation of a fan that blows air into the afterburner. Then, looking into the working furnace from above, we can observe the following picture:

The method is considered more effective and quite reliable, proven by more than one garage owner. If desired, such a diesel stove is enclosed in a water jacket, turning into a hot water boiler. This will allow you to arrange radiator heating in the garage and significantly increase comfort during a long stay indoors in winter. The caveat for oil heaters is the same as for wood-burning ones: if there is a high-rise apartment building in the immediate vicinity, then you will have to return to the idea of heating with electricity.
Self-installation of the stove in the garage must be carried out according to certain rules. Firstly, it is necessary to ensure the operability of the heater, and secondly, to take measures for fire safety. As for the first point, it concerns correct installation chimney, obliged to create a normal draft. Here are the recommendations:
- pipe height - at least 4 m, counting from the grate;
- turns - no more than 3, while avoiding the installation of 90º elbows, try to use 45 or 30º;
- if there is a horizontal section, then its length is not more than 1 m;
- it is better to insulate the pipe section on the street with basalt wool to prevent condensation;
- fasten the chimney to the wall so that it does not load the body of the furnace.

During the installation of a wood or oil stove with your own hands, observe fire safety requirements. Here is their list:
- on the floors under the stove, lay a sheet of metal protruding from the side of the door by 1 m;
- combustible wall structures near the stove must be protected with metal or brick screens;
- passing through the chimney wooden floor, provide a gap between it and the pipe of 250 mm, filling it with basalt fiber;
- in order to protect the flue from wind blowing, install a deflector or a special nozzle on it;
- natural supply and exhaust ventilation should function in the garage.
Conclusion
Compared to electric furnace garage heating is much more economical, and sometimes more efficient. But in the installation and operation of oil and solid fuel heaters, there are some peculiarities that must be taken into account. Making stoves with your own hands will not present much difficulty for a person who has the necessary skills. In extreme cases, the manufacture can be entrusted to a familiar master by choosing a suitable design.