How to make a paper box where you can store your valuables. A homemade box is an interesting decor decoration. How it will look like and how many departments it will have is entirely up to you.
book box
- Thick book;
- artificial flowers;
- stationery knife;
- brush and pencil.

If you want to build your own coffin like in old western movies, check out these free coffin plans. This coffin - also known as toe rot - is also suitable for Halloween or a stage prop. Making your own jewelry box can be a rewarding experience. The time spent by you or family members creating a jewelry box for a loved one can be memorable and therapeutic.
Before you begin, set your expectations for the time and cost of building your own box. These instructions will save you time planning and designing your jewelry box. If you are an experienced professional with some hand tools, you should plan 6-10 hours to build your first jewelry box, even if you have help. If you plan to line the inside of the box with pillows or linens, add that to your cost.
Box from the box
To create it you need:
- Cardboard or finished box;
- colored paper;
- Super glue;
- decorative ornaments;
The resulting box should have this size 11.25 x 15 x 12.5 cm. In this option, it is allowed to use finished box. If not, then you can do it.
Your finished handmade jewelry box can express any number of finishes that reflect the personality of your lost loved one. My grandfather's coffin was unfinished in the simplest of traditions, but yours can be painted, stencilled, painted, burned, stamped, carved, or filled with bumper stickers and photographs to express the life and times of the deceased.
Buying materials and collecting tools
Here is a shopping list with estimated prices for 8ft pine planks from your local home improvement store. Alternatively, we offer a box set that includes all wood pieces pre-cut to size and ready to assemble.


Creating a partition
A piece of cardboard is taken, while its size should be 10.6 x 14.4 cm. It is pasted over with colored paper and, when finished, the partition is placed in a box. To create another branch, you need to do the same steps again. And finally decorate the box.
Bamboo tissue box
The size may vary somewhat depending on the practice at the mill that cuts the lumber. The width of your boards can vary from 9 inches to 5 inches. When you're shopping for boards, try to make them the same width. Try to cut the sides and ends of 5 boards that are the same width. Save the uneven boards for the floor and top. In the spirit of our founding principle of encouraging sustainable practices for a smarter planet, we recommend saving the finest pines and other small hardwoods for longer lasting uses such as bookcases, home improvement and fine furniture.

Box with separate cells
To create it, you will need materials:
- Candy box;
- Gift paper of any color;
- acrylic paint white color, but it is optional. Acrylic paint is used if light-colored paper is used to decorate the box.

The lower grades of pine are suitable for grandpa's coffin. When choosing pine boards for your box, the larger the area of the material, the easier your assembly will be. There are generally 3 grades of pine available in lumber and leisure stores: pick, pick, and clear. These grades indicate the extent to which the wood contains knots and knot holes. The higher the class, the less likely that the boards will contain loose knots, knot holes, swirl or warp. The higher the class, the higher the cost.
Collect the following hand tools
We recommend using low or medium, pick or pick pine. Try to find unified boards in the selection pile. Tight openings won't be a problem and they will add character to your finished jewelry box. Hand saw, cross cut saw or box saw for titanium band bag material Various square hammer or rubber hammer Screw driver or wireless power driver Laundry equipment and warm water. Then cut and prepare the next boards.
Foam rubber box
To create you will need:
- box (you can use a cigar box);
- fabric (velvet or velveteen);
- thin cardboard (you can use a cover for a notebook);
- foam rubber;
- hot glue gun;
- ruler, stationery knife and scissors.
A rectangle is cut out of thin cardboard, it should be 3 mm smaller than the bottom of the box. Using a pencil, a mark is made where the foam cushion ends. Cut the cardboard at this point. Next, you need to line the cardboard base to create a soft pillow. The width of each strip should be 2.5 cm.
The first step is to assemble the frame for the floor. Finished frame dimensions are 24 inches by 5 inches. The frame consists of two side rails and 5 cross members. When you're assembling, focus on keeping the frame square. Why a decorated floor? We designed this box with a framed floor, to which the sides are attached with slip joints. The floorboards sit on top of the frame rather than being attached to the sides and ending in tension joints. This design provides strength and ensures that the bottom of your jewelry box does not fall out.

We take a piece of foam rubber, it should be the same width as the cardboard, but 2 times longer. Line, each strip should be 5 cm and cut into strips. We fold the foam rubber in half along the length, apply glue and fix it.

Attach the floor boards to the floor
This casket design has survived several "trials" with 300 lb sandbags. The interior floor is 24 inches wide and 5 inches long. You must have 25 inches. Space the floor boards evenly and use glue, screws or nails to attach the boards to the frame. When you fasten, beware the square of the frame. The more square your frame is, the easier it will be to attach the sides and ends.
Choose two end panels and two side boards that will be the bottom boards on the sides and ends. These are the pieces that will attach directly to the floor frame and carry the handle support to the floor. You will drill holes for three handles on each side and one rope handle on each end. Choose a drill that is the same size as the one you purchased. Mark the boards for all the holes to be drilled 3 to 5 inches from the top edge of the bottom boards, leaving about 6 inches of board between the handle holes and the bottom edge of the box.
Cut off a piece of fabric. In width, it should be equal to the base, and in length be much larger than it. One end of the fabric is glued to the back of the cardboard. Next, you need to wrap and paste over the foam pads, while inserting a fabric between them. With the remaining fabric, wrap the cardboard again, and glue it at the end.
Box of postcards
The sides and ends are two pieces joined along a long edge. Use your preferred wood joinery method. Some kind of wood glue is recommended, even if you are using screws, nails, or an alternative wood joinery system.
Note. Remember to assemble the sides and ends so that the edge closest to the holes for the rope's handle is on top. This top side should be the side you attach to the top side boards. Use similar methods as you did to assemble the sides to assemble the top of the box with two outer planks and one middle plank. Attach them to the underside of the lid at both ends and one in the middle.
A cardboard is taken, which will be 1 cm higher than the pad, it must be bent, while stepping back from the edge of 1 cm. Repeat the same steps for the “wall” of the pad on the other side.
We take two pieces of fabric, you need to pay attention that they are 2.5 cm larger than the cardboard. Next, the corners are cut off and the cardboard is pasted over. “Walls” must be glued on the sides of the pads. The cardboard, which will be glued to the remaining free space at the bottom of the box, must also be covered with a cloth.
Prepare the sides and ends to attach to the floor
These pieces will serve two purposes: to provide extra strength to the lid, and to help align the lid when it sits on the box. You may have noticed that the sides are 25 inches longer than the length of the floor frame and the thickness of the two ends. This should provide an attractive joint that properly covers the final grain of both end pieces. Ends and sides should measure 5 inches from top to bottom. Due to inconsistencies in the operation of the mill, you may find that your sides or ends are slightly larger or smaller.
A jewelry box is simply necessary for a true Lady, because each time, chains and rings take a lot of time, and since they get tangled and always lie in different places, you need to make a jewelry box with your own hands and store all the jewelry in it.
There are a variety of caskets in stores, but their cost is quite high. It is better to make a box of improvised items that gather dust on your shelves anyway.
Do-it-yourself wooden box
Take the largest side and subtract the thickness of the floor to get the inside depth of your box. This measurement should be approximately 25 inches. Mark both sides and both ends this distance from what will be the top edge of your box. This procedure ensures that your box lid fits snugly on all four sides by moving the tolerance to the bottom edge of the box where it will go unnoticed.
Attach the ends and sides to the floor
Take one end and the floor and attach to each other. Slip the box over the side edge of the floor so you can access the underside of the floor and secure with your preferred fastening method. Fasten the other end in the same way. With the box still on its side, place one of the sides on top and secure it in your preferred way. Then turn the box over and attach the remaining side.
What can you make a jewelry box from:
- cardboard box;
- bamboo napkins;
- jewelry box from plastic bottle.
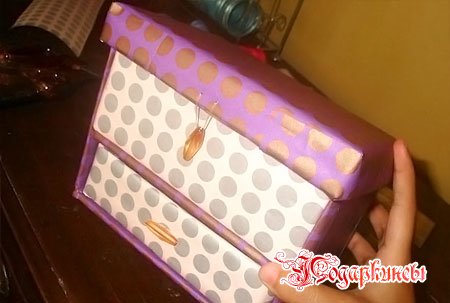
DIY jewelry box from the box
Beautiful things should surround any woman. Jewelry is a must, because with it you can focus on yourself and attract a man. But where do you put all this beauty?
The lid is ready to install with your preferred mounting method. If the casket is to be ready for viewing, we recommend a little sanding to ensure no one catches the wood chips. You can also be creative, paint, color or decorate your jewelry box to reflect the life and memories of a loved one.
This will allow players to enter dark boxes to sense objects such as eyeballs, bones, guts, and fingers. The trick to this game is that there are actually everyday items inside the boxes that players will have to try to guess.
For it you will need the following materials:
- two cardboard boxes (can be from under shoes);
- PVA glue;
- crepe satin 1.2 x 0.6 m;
- velvet patch 1.4 x 0.6 m;
- super glue 2 pcs;
- braid;
- foam rubber or ordinary sponges for dishes;
- interlining 1 x 1 m for a box with your own hands;
- improvised materials (scissors, pen, iron, etc.).
As a basis, you need to take one box and peel it from a thin layer of film in order to better glue the boxes. We make 2 cuts across the width on the lid, straighten the tucked edge and apply it to the side of the box.
Making a Halloween Mystery Box
This game is also known as Halloween mantis, halloween cute god box, halloween touch cabinet and halloween casket. Your first step in creating your Halloween jewelry box is to find a container that will hold each gross item. Here are some ideas of items that you are probably all set for.
You want to cut a hole in each box, big enough for your hand to reach, but small enough that you can't see the contents of the box. You can make your Halloween belt more ghostly by painting them black, putting duct tape on them, covering them with a sheet, or dressing them up with fake cobwebs. You can even walk to the box to make it look like a coffin.
We level the surface, glue the parts in contact and wrap it with tape on top.
We make the same cuts at the box so that it opens like a box. We remove the seals of the upper edges.
Now from the second box we need to make two inserts. We will make one from the bottom, the other from the lid.
Laminate the folded edge of the lid and cut off the excess to make them thin.
Here are some that are great for covering drawers. In every Halloween mystery box, you want to add a spooky or gross item. The person who puts their hand in the box must think that they feel something really disgusting, when in fact it is just an everyday item from your kitchen.
From a shoe box
Here are some ideas for what you can put in your Halloween boxes. Dried Apricots - Ears Swaddled Grapes - Eyeballs Futze Pipe Cleaners - Spider Legs Baby Carrots - Toes Nails Jointed cauliflower- brains Computer cores - teeth Candy corn - vampire teeth Pillow tomato - heart Bought noodles - guts Dried pasta - bones. Let your imagination run wild as you fill the boxes. Remember that you can add ketchup, vegetable oil, or water to these items to make them even rougher.

Getting Started interior decoration jewelry box. To do this, we need to sheathe cardboard and make the box beautiful from the inside.
We carry out measurements of the box and make a pattern on tracing paper or newspaper. It will turn out like this:
We bend the pattern along the lines marked when constructing the pattern, if it corresponds to the size of the box, then we can transfer it to interlining and velvet. Using an iron, we glue the cutout of non-woven fabric and velvet and remove excess non-woven fabric.
Smell also has a big effect, so consider adding fish, onions, cheese, southercrat, and other bad-smelling foods. You can add dry items directly to the box, but you may want to line boxes that will contain wet items with a plastic trash bag so there are no leaks.
Once you've filled in your boxes, it's time to create a real Halloween themed game. Here are some free printables to help you spook it even more. You may also have a slightly creepy one or one that plays from the speaker behind the boxes.
Such upholstery of the box with your own hands must be fixed with PVA glue from the inside of the box.

After all that has been done, the frame of the box is ready and you can do the fastening. For those who do not particularly bother, you can simply put the jewelry in the box, but for convenience, it is worth making special compartments.
For compartments in the box, you need to glue the foam rubber into one of the trays on PVA glue. We cut the sponges or foam rubber into as many parts as you need for jewelry, but do not press the sponge very tightly to the glue when gluing.

For the rings we will make an accordion. This is done simply, you need to cut the cardboard in width and twice as long as the box and paste over it with velvet, fastened with interlining. When the strip dries, fold it into an accordion.
You can measure a couple of cuts of the braid, make cuts in the velvet and fill in the glue, put the braid in. Hairpins and clips can be attached to the braid.
Exterior finish may be different. It is worth doing it according to the same pattern as we did on the inside.
Glue the outer fabric to the box, you can use super glue - it's still faster than PVA.
You can decorate the jewelry box in any way you like. Beads, rhinestones, sequins and more will only add life and creativity.

Bamboo tissue box
For such a box with your own hands you will need:
- thread and needle;
- magnetic clasp;
- bamboo napkin for jewelry box;
- scissors;
- cardboard;
- any fabric for decoration.
Cut out the sides of the box from cardboard. The form can be any. We fold the napkin so that your sidewalls are in the right place (i.e. on the sides of the box). Bamboo napkin can be sewn or glued to the sides.
The decor of such a jewelry box can include various butterflies and flowers, beads, buttons and fabric.
The fabric is glued on the sides, but if you want the box to look different, then use velvet or patterned fabric.
We make a rivet from a magnetic fastener, but you can use both a button and just a loop.
To protect against dirt, it is advisable to varnish the box with your own hands.

Jewelry box from a bottle
It is pleasant to store not only jewelry in such a box, but also simply use it as a gift. The royal jewelry box will become an indispensable luxury item on your dressing table.

For a do-it-yourself box from a plastic bottle, we need:
- 2,5 liter bottle;
- cardboard;
- glue gun;
- two types of fabric;
- thread and needle.
At the bottle we cut off the neck (up to 10 cm) and with the help of a thin knitting needle heated on the rut, we make holes around the circumference.
Then we need to cut out two circles from cardboard. One diameter is 11.5 cm (for the lid), the second is 8.5 cm (for the bottom). If the cardboard is not dense, then glue 2 circles together.
From the fabric we cut out a circle with a diameter of 20 cm and another circle with a diameter of 26 cm.
Using a glue gun, glue a cardboard circle to the bottom of the bottle, and assemble the fabric circle with a thread of a needle into an assembly, like a bag.
We insert the base of the box into a kind of bag and tighten the threads. Evenly distributing the folds, we sew the fabric to the bottle.

Now we proceed to the lid, we also cover it with fabric and we are engaged in lining the jewelry box.
For lining fit color contrasting with the outer color of the box. We put the lining in the box and sew it on, securing it with lace from the outside to hide the seams.
To hide the hole under the lid of the box, cut out a circle and sew it with lace in the same way, and decorate with beads.

On the lid of the box, you can attach or anything to your taste.
Jewelry Storage Ideas
How unusual to store jewelry:
- on a clothes hanger;
- on the decorative tree;
- jewelry can be stored on stands;
- in the frame of the picture;
- on a grater.
The idea for storing jewelry on a hanger is very interesting. If you hang it on the wall, you can create a special atmosphere.
![]()
It is convenient and easy to store jewelry on a decorative tree. Always the right moment, everything is at hand, clearly visible and easy to get.

The stands resemble a store, where everything is hung neatly and on the shelves.

Jewelry in frames with threads stretched inside looks especially creative. This is an equally convenient way to store jewelry.

But a painted grater looks much more creative.

Keep your jewelry and you will always gather in comfort and good mood!